Preface
This blog is part of the Security Tech Blog Series, written by Shaokang from the Mercari Product Security Team.
In this blog, I will explain our approach to securing the SDLC (Software Development Life Cycle) at Mercari, by introducing the major pain points we face during each phase of the SDLC and providing an overview of code scanning and other tools we have in our arsenal to aid in dealing with these issues.
The SDLC and Pain Points for Security
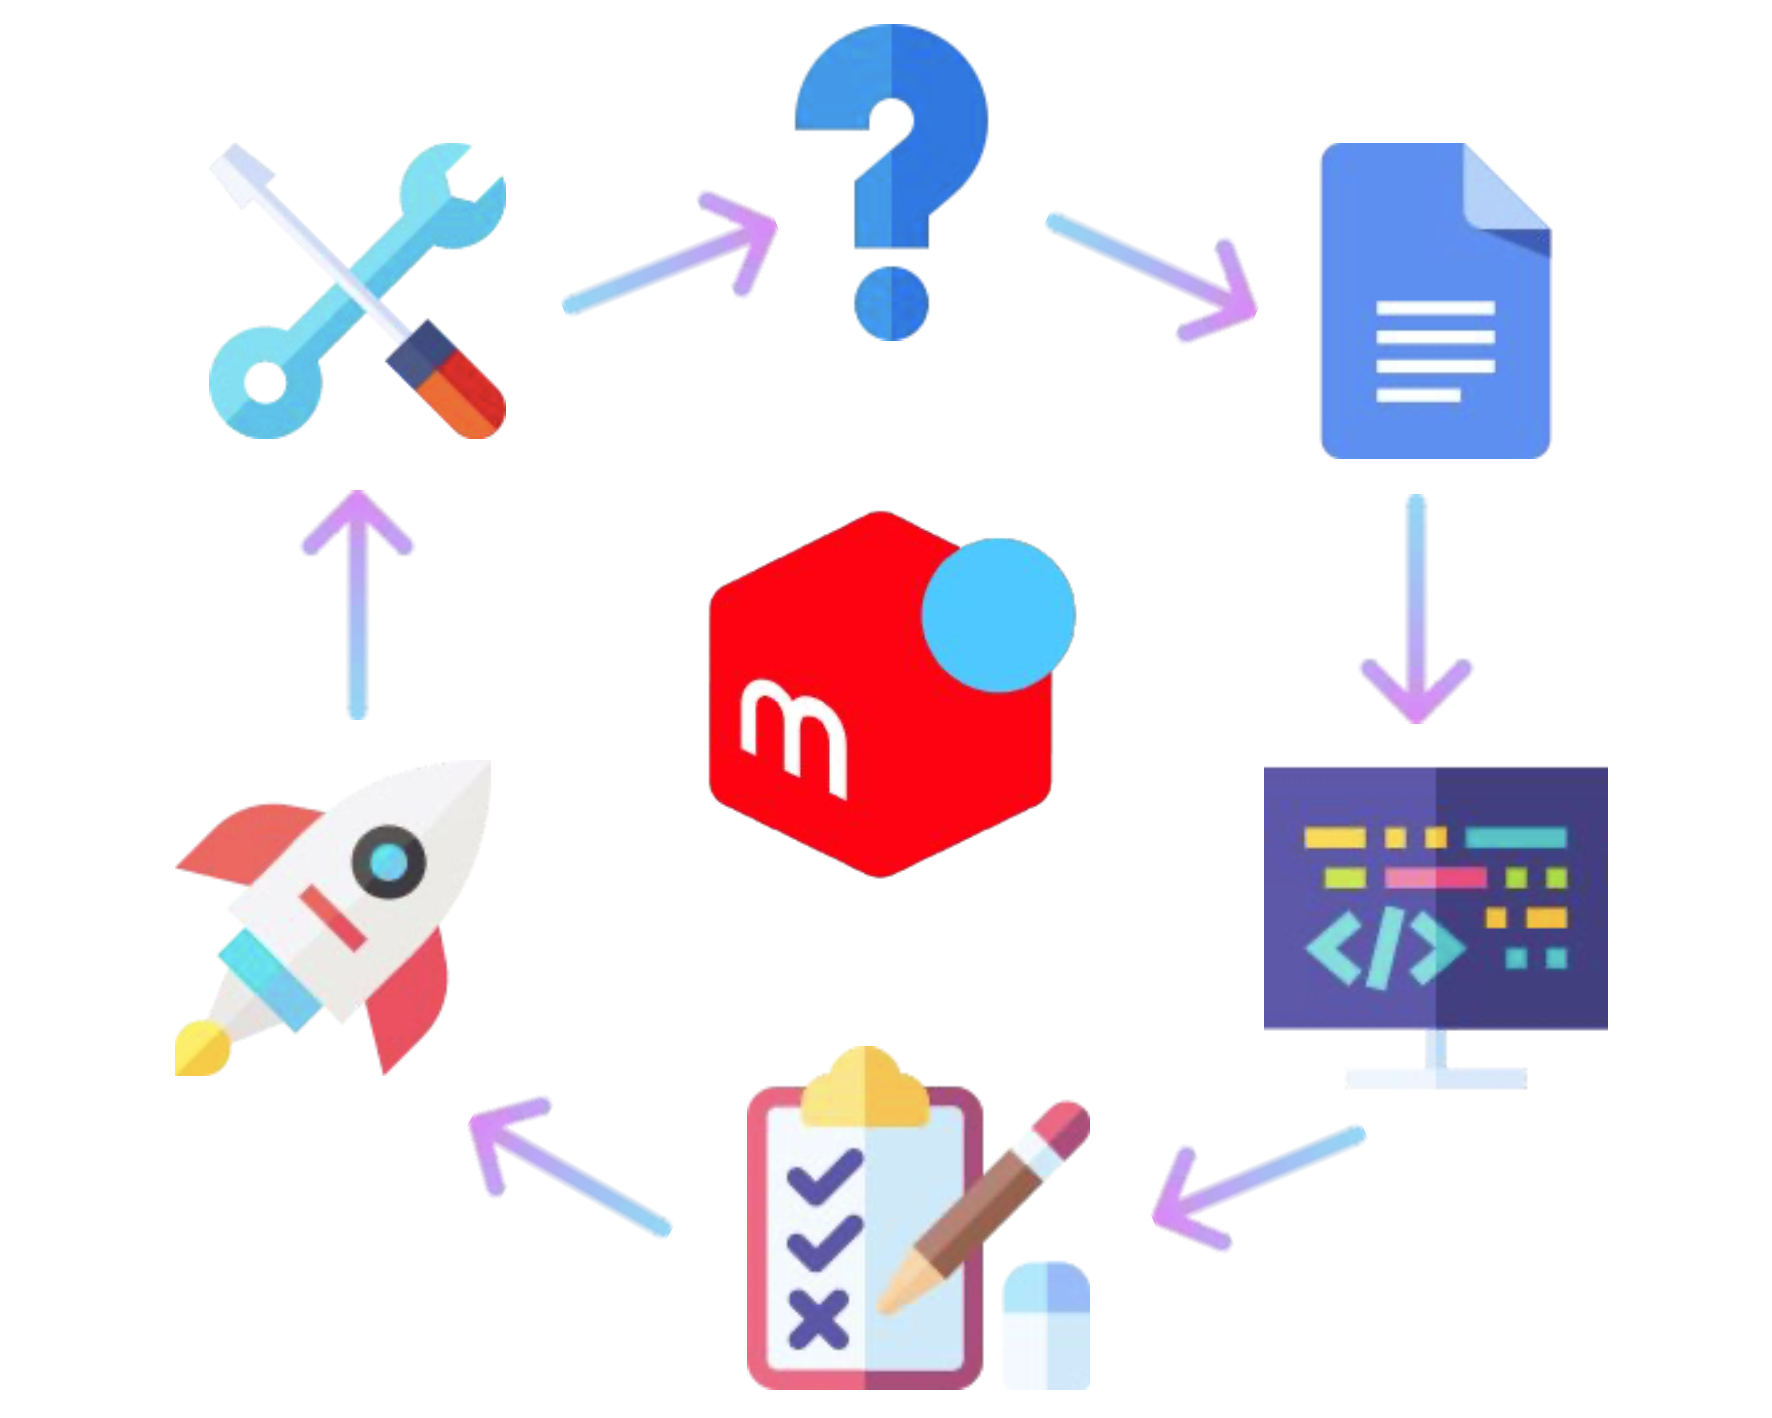
Phases of the SDLC
To begin with, let’s have a quick recap on the basics of each phase of the SDLC as illustrated in the diagram above and as they apply to Mercari.
-
Planning: All projects have to start somewhere. In this phase, PMs will come up with requirements for new features for a project or product.
-
Design: Based on the business requirements identified in the planning stage, engineers will start writing design documents to realize the new features / product and bring requirements into reality.
-
Development: Once design documents get a LGTM, engineers can start the fun part of the process, programming. Using GitHub engineers can collaborate together on specific features. With the help of CI/CD tools, we can automate the deployment of code to our test environment.
-
Testing: Once the development and deployment process is done, the QA team and security team will access the test environment and confirm if the application is behaving as expected, and conduct penetration testing to identify any potential vulnerabilities. Bugs and vulnerabilities are reported to the development teams, and the product is ready to be released once we confirm all the bugs are fixed or get risk acceptance.
-
Deployment: After a few rounds of testing, a decision is made to deploy the product to the production environment.
-
Maintenance: Engineers will continue to maintain projects, as new features are added and improvements made to the code.
In this blog our main focus will be on the Development and Testing phases of this lifecycle, but many of the solutions we put forward also support the application for the long-term through the Deployment and Maintenance phases as well.
SDLC Pain Points
As we can see from this overview of the SDLC, security is not necessarily an inherent part of most of the phases. This can lead to the following kinds of pain points:
Planning and design: Security is treated as an afterthought, where the focus is generally on functionality and user experience and in some cases security may not be addressed.
Development: Insecure coding may exist in the original code, such as bugs and even vulnerabilities. Apart from that, insecure inclusion may happen due to:
- Vulnerable / unmaintained libraries being in use
- Confidential information such as secrets finding their way into the code through misconfiguration
Testing: It is very likely that the following scenarios may happen. The first is the lack of resources for security testing. Depending on the scope and schedule for release, we may only be able to do blackbox testing without in-depth analysis of the source code, or we may not have time for extra rounds of testing after a feature update or even a QA bug-fixing pull request are made that introduce changes to the code. The second is the lack of End-to-End tests related to security features. Sometimes we have to test with mocked features / non-cascaded systems. Also it is possible that the test environment may differ from the production environment when it comes to more fine-grained configuration details and features.
Deployment: The schedule for security testing is often tight. As a result, it may not be possible to test all potential attack vectors, and it can be hard to decide which vulnerabilities to prioritize the testing and/or remediation of.
Maintenance: As time goes by, libraries get old and out-dated. Many modern threats to the supply chain also mean even up-to-date, well maintained libraries can be vulnerable to some nasty attacks.
Code Scanning at Mercari
In the next section, we will take a look at solutions we use at Mercari focused on the development and testing phases of the SDLC. Ultimately, there are two main pain points we are trying to solve here:
- Manual testing cannot spot problems in the early stages of the SDLC when insecure code may get committed.
- Manual testing cannot cover all test cases and will inevitably miss certain vulnerabilities.
Since the issues at these two phases are inherent to manual testing, automated approaches to testing (e.g. performing automated code scanning to identify and alert on potential vulnerabilities in the source code) can help tackle these challenges. These solutions can also be relatively easily integrated into our collaboration space – GitHub.
To achieve this we tested many different tools and after much trial and error, we came to the conclusion that GitHub Advanced Security (a solution integrated into GitHub) provided more or less the perfect framework to solve the challenges we were facing.
We compared several commercial solutions as well as an in-house developed toolset against one another, and it turned out that GitHub Advanced Security had more advantages in terms of developer productivity improvements, ability to implement into different CI / CD pipelines, and ability to customize code scanning rules, etc. For more details about GitHub and GitHub Advanced Security, there is also a customer story page available on GitHub.
To understand exactly what the complex flows involved in this new process are doing, first let’s take a look at the original workflow we had in place and break down step by step how we added to and improved it:
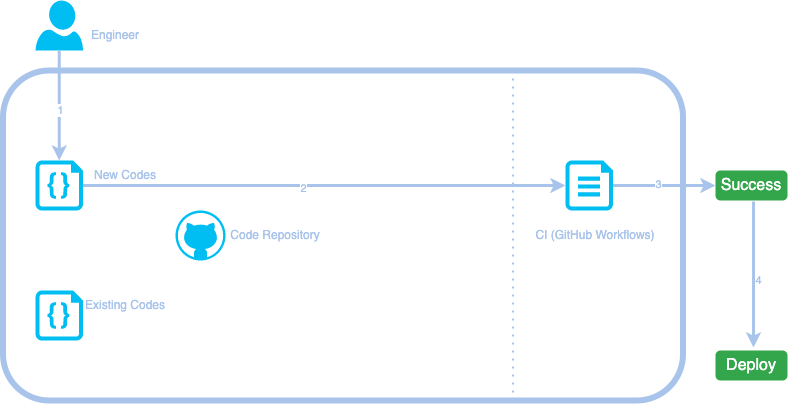
Step 0: The original flow
Here is the original workflow we had for an engineer to add new features during the development stage.
- An engineer writes some new codes and makes a pull request on GitHub.
- The new codes get peer-reviewed by team members (not shown in the workflow), then is processed by predefined GitHub Workflows or other CI config files.
- (Step 3 – 4) If the peer reviewer approves the changes and the CI jobs have completed successfully, the code will be automatically deployed to the test environment.
Step 1: CodeQL
What is CodeQL?
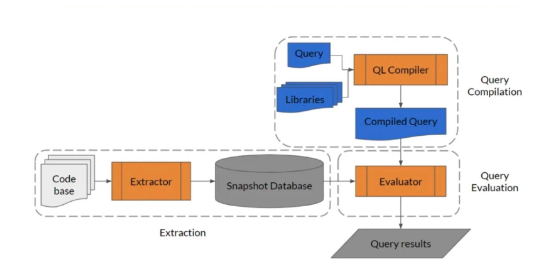
CodeQL is an analysis engine. It is used by developers to automate security checks, and by security researchers to perform variant analysis. Below is a diagram (refered from online resources) that explains the inner workings of CodeQL in more detail.
How does it work?
CodeQL treats code like data. In CodeQL, vulnerabilities / bugs / errors, etc. are modeled as queries that can be executed against databases extracted from code. When it comes to the functionality, CodeQL provides three main modules indicated by the orange boxes in the diagram above.
- Extractor: extracts code from the code base and converts it into a snapshot database.
- QL Compiler: generates compiled queries that will be used to query the database later.
- Evaluator: will do the final query evaluation and provide human-readable results.
Why does CodeQL work well as a SAST (Static Application Security Testing) solution?
There are two great features offered by CodeQL – taint analysis and variant analysis.
Taint Analysis:
Taint analysis is based on the concept that any variable could potentially be modified by a malicious party. Using taint analysis requires the analyzer to first define the source and sink of a data flow. Whenever an input from a user is observed as the source, it is assumed that not only this source itself is already tainted, but all the variables along the way up until the sink as an output are also tainted.
Variant analysis:
Variant analysis uses a known security vulnerability as a seed, to identify similar problems in the code. To begin with we can use default CodeQL queries to identify potential seed vulnerabilities. If needed, custom CodeQL queries can also be written to help identify more targeted vulnerabilities. By iterating over the query automatically more logical variants of the same bug can be found throughout the code space.
To better understand taint analysis and variant analysis, let’s take a look at an example. For this exercise we will do a manual code review on the following pseudo code sample:
package main
import (
  "fmt"
  "net/http"
  "xss/sanitizer" //Sanitize xss payloads with a 3rd party library by calling sanitizer() function
)

func test_server() {
  http.HandleFunc("/login", func(w http.ResponseWriter, r *http.Request) {
    r.ParseForm()
    username := r.Form.Get("username")
    password := r.Form.Get("password")

    if !isValid(username) {
      fmt.Fprintf(w, "%s is not a valid username", username)
    } else {
      //..
    }

    if !isCorrect(password) {
      fmt.Fprintf(w, "%s is not the correct password", sanitize(password))
    } else {
      //..
    }
  })
  //..
  http.ListenAndServe(":80", nil)
}- Taint analysis:
- Here from the
r *http.Request, we introduce the user input source from the request, so that it is tainted. - Then, from
username := r.Form.Get("username"), we assume theusernamevariable is also tainted. - Then, from
password := r.Form.Get("password"), we assume thepasswordvariable is also tainted. - Since the
isValid(username)function callsusername, we assume the function’s output sink –fmt.Fprintf– is also tainted. - Since the
isCorrect(password)function callspassword, we assume the function’s output sink –fmt.Fprintf– is also tainted.
- Here from the
Warning: It is well known that to learn programming quickly one must get the hands dirty, but remember to sanitize the input when actually programming.
- Variant analysis:
- Based on the assumption that the seed being used here is for XSS (Cross-Site Scripting) — a malicious injection attack that will trigger unwanted scripts provided by attacker input, we then use this input to query other instances of code to find more potential issues where user input is not handled correctly.
- For the sake of simplicity, in this example we will assume that the CodeQL query just checks if the source and sink are tainted, as is, without any sanitization. (The official CodeQL queries used for XSS can be found here.)
- In this case, the
usernameis directly printed byfmt.Fprintf(w, "%s is not a valid username", username)without any further actions, and CodeQL will report this as an issue. - Assuming
"xss/sanitizer"is actually callingsanitize(password)to sanitize all the dangerous characters, the password input should be safe from XSS. However, CodeQL will still report this as an issue, since CodeQL assumes that the 3rd party library is unpredictable / unreliable and thus doesn’t considersanitize(password)as a valid way to sanitize data. - If
sanitize(password)is considered sufficient for sanitizing the input, CodeQL requires the definition of anotherisSanitizer()function to tell itself to ignore this issue.
Warning: While our team would ideally like to put our feet up, enjoy a cup of coffee, and leave all the hard work of finding issues to our automated tool overlords, inevitably we still have to deal with the issue of false-positives. Reducing these and optimizing the scan results to provide reasonably accurate workable findings is not trivial work.
Why does CodeQL fit well with Mercari’s SDLC?
Here are the decisive benefits we see for using CodeQL in our environment:
-
It covers the main programming languages used at Mercari, including Golang, Javascript, Typescript, and more.

-
It provides powerful configuration options when combined with GitHub Advanced Security.
- It can be implemented on independent repositories with a single programming language, which fits well with Mercari’s microservice architecture.
- It gives more autonomy to code owners, so owners can decide by themselves what kinds of issues to track and block, what kinds of issues to ignore.
- It gives users the ability to customize rules themselves by writing specific QL packs (for specific cases).
CodeQL as part of the workflow
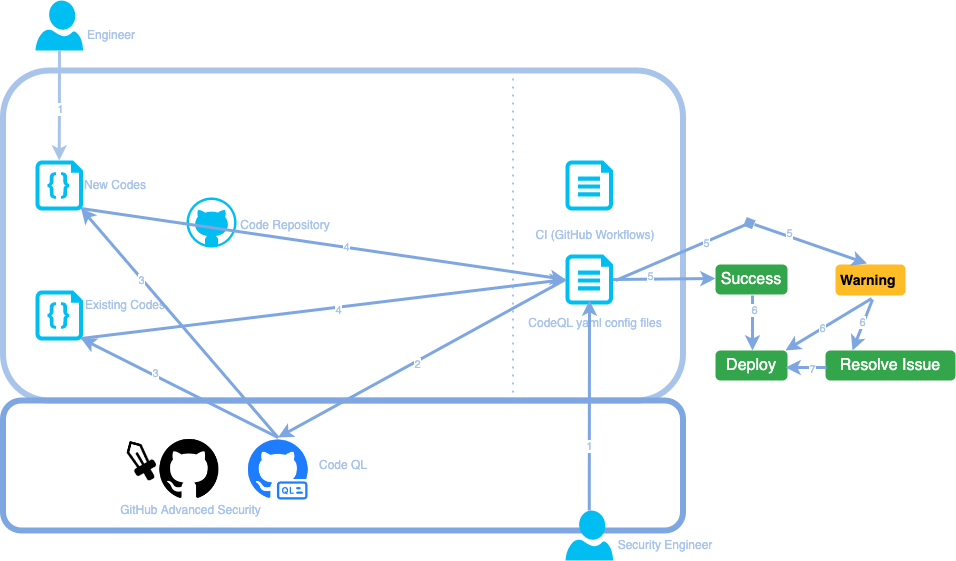
Here is what the workflow looks like with CodeQL integrated into the SDLC:
- An engineer writes some new code and makes a pull request to GitHub. A new GitHub workflow that includes the CodeQL instructions in the configuration is also pushed by a security engineer.
- After defining when to trigger, CodeQL can start scanning at different timings, such as when a new code push is made, or when a pull request is going to merge to the main branch.
- CodeQL will set up a code database and run QL packs on the database to generate potential issues.
- Detected issues will be reflected on the dashboard of the code owner’s repository.
- (Step 5 – 7) If all the issues get fixed or are confirmed to be acceptable, the code will be automatically deployed to the test environment.
Step 2: Secret Scanning
What is Secret Scanning?
A microservice architecture means that each GitHub repository is responsible for one single, independent microservice. However, in most cases, a single microservice is not isolated and needs to communicate with other microservices, or even some external services. Sometimes, the tokens, private keys or credentials that are needed to make these communications possible are mistakenly hard-coded and pushed to repositories. This means that anyone who has read access to the repository is able to exfiltrate these secrets and potentially abuse them to access services they should not be allowed to.
It is recommended that secrets should be stored (sometimes even encrypted before storing) in a dedicated, secure location, which is not in the same place as the source code. Secret scanning allows us to identify secrets violating these best practices that have found their way into the code and warn about potential secrets before they get committed.
How does it work?
GitHub provides two forms of secret scanning, "Partner Patterns" and "Advanced Security".
Partner Patterns:
Partner Patterns is used for public repositories. This scan will run automatically on all repositories under an organization. Any pattern that matches the list of supported secrets will be reported to the relevant partner. Once the secret is validated, GitHub will also notify the service provider who has issued the secret. If it is confirmed that a secret is included and probably leaked (e.g. due to supply chain attacks), the service provider will contact the organization for revoking/rotating secrets.
Advanced Security:
Advanced Security is for private repositories. Under GitHub Advanced Security, apart from the normal report provided, any pattern that matches the list of supported secrets will also be reported as alerts in the relevant GitHub repository under the Security tab and also in an overview dashboard for the organization. With these results, we can also enable CI checks to block pull requests that contain vulnerabilities at a certain risk level or higher. It is also possible to set up a similar config file like CodeQL to specify more rules, such as ignoring certain paths for secret scannings, or ignoring certain types of warnings that might be false-positives.
Another handy feature is “push protections”. Normally, secret scanning will run after a push is made to a list of predefined branches. However, in order to completely prevent secrets being pushed into the code, enabling push protections allows the code to be scanned in advance, preventing secrets from being pushed at all.
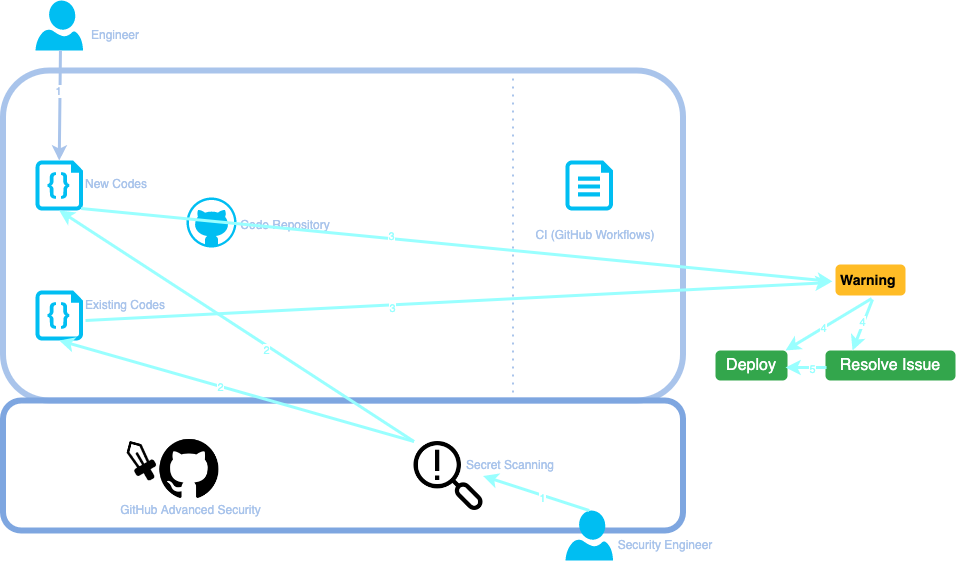
Secret Scanning as part of the workflow
Here is what the workflow looks like with CodeQL integrated into the SDLC.
- An engineer writes some new code and makes a pull request on GitHub. Secret Scanning is enabled on the GitHub repository by a security engineer prior to this.
- Secret Scanning will automatically scan new and existing code.
- Under Advanced Security mode, potential secrets will be alerted on the dashboard of the code owner’s repository.
- (Step 4 – 5) If secrets are found to be false-positives, we can ignore the alerts. Otherwise, they need to be removed before the pull request is merged, and if the secret has already been committed somewhere where it is visible to those who should have access to it, it should be removed, revoked, and rotated.
Step 3: Sourcegraph
What is Sourcegraph and what does it do?
So far, it seems that the pain points during the development phase have been solved by integrating CodeQL scanning and secret scanning. However, there are still other problems we need to solve. What about when we have an org that is made up of hundreds or thousands of different repositories? Enabling all these new workflows one by one would be a truly insurmountable task.
That’s where Sourcegraph comes in handy. It is another great tool to polish off our code scanning solution.
Sourcegraph has many features. The main feature it offers is providing a search engine to facilitate better search capabilities for code. It supports almost all kinds of programming languages and provides many keywords to filter and locate certain code snippets.
When it comes to the aforementioned problem, instead of manually adding new workflows to make things easy and go back to putting our feet up with a cup of coffee, we can use bulk change tools to apply a pull request to each repository using a configuration file. Let’s take a closer look at another great feature by Sourcegraph which helps us achieve this – Batch Changes.
How do batch changes work?
-
The first step is to use Sourcegraph to specify the target repositories. For example, if the requirement is to implement CodeQL into all Golang repositories that do not have CodeQL configured, the following search would work:
context:global -repohasfile:codeql-analysis.yml lang:go file:go\.mod count:all patternType:regexp- The
contextkeyword specifies the currently selected search context, whereglobalmeans all repositories on Sourcegraph will be the target. - The
-repohasfile:codeql-analysis.ymlexcludes the repositories that have already implemented CodeQL before with the yaml file. - The
lang:gospecifies the language should be golang. - The
file:go\.modgives a further check to make sure that the target repository does have a module file, so it is unlikely to be a test / dummy / not-working repository. - The
count:allmakes sure that every entry will be displayed in the results, since by default Sourcegraph will stop searching early and returns if it finds a full page of results. - The
patternType:regexpspecifies the use of regular expressions to match results.
- The
-
After locating all target repositories, the next step is to create a specification file in Sourcegraph. In this case, it is required to create a new pull request that pushes a CodeQL configuration file.
-
Once confirmed, the Sourcegraph CLI can be used to execute the specification file.
-
Sourcegraph also provides a UI and GraphQL API endpoint, so it is easy to track the changeset status across multiple repositories.
Sourcegraph as part of the workflow
Here is the workflow with Sourcegraph integrated into the SDLC:
- An engineer writes some new code and makes a pull request on GitHub. And a security engineer sets up the specification file to trigger a bulk update using Sourcegraph.
- Sourcegraph makes a pull request containing a CodeQL configuration file to all targeted repositories.
- (Step 3 – 4) Sourcegraph then collects the responses from GitHub, to track the changeset status.
- (Step 5) Security engineers can use Sourcegraph’s GraphQL API to query for any statistics.

Step 4: Final Form: Complete Workflow
Combining all these components above, here is a look at the final form of our workflow including GitHub Advanced Security:

It is worth mentioning that old / vulnerable library inclusion is also a high-risk issue that must be addressed. The details are omitted in this blog, but in our SDLC we employ an SCA (Software Composition Analysis) solution called Mend (formerly WhiteSource), which regularly monitors for old / vulnerable libraries throughout the SDLC triggering based on its frequently updated vulnerability database information.
Conclusion
Tools and Workflows for an Improved SDLC
- Sourcegraph helps to easily search code snippets, and also serves an important role in bulk updating CodeQL workflows on target repositories.
- CodeQL and Secret Scanning are configured to scan for vulnerabilities when new code is pushed or pull requests are merged. They will also automatically report potential issues to dashboards.
- GitHub Advanced Security gives us more freedom in defining different policies in different code repositories. The actual code scan trigger could be changed per a code owner’s specific requirements. Each code owner can confirm the alerts to remove false-positives under each repository’s dashboard.
- The security team can monitor all alerts and issues with the GitHub Advanced Security dashboard and other APIs (Sourcegraph GraphQL) through the development and testing phase in SDLC.
Improvement for the Future
While the above allows us to achieve a lot in automating security work throughout the SDLC, there is still much work and more to be done before we can truly enjoy that cup of coffee. Below are a few of the things we want to keep working on:
- More customized QL packs can provide more accurate and more specific results.
- A better log analysis system of Github webhook logs could give more statistics about code scanning usage.
- CodeQL workflow improvements such as cache management, language auto detection, etc. could improve the efficiency when running CodeQL on a large GitHub org made up of many repositories.
- Comparisons between the current solution with other code scanning tools (semgrep, Mend (formally Whitesource), etc.)
- Hiring more talented people is yet another efficient way to address resource issues in securing the SDLC. If you are interested in working on securing the SDLC at Mercari, our team is hiring!


