* This article is a translation of the Japanese article written on December 6, 2020.
Day 6 of Merpay Advent Calendar 2020 is brought to you by kenmaz from the Merpay iOS Team.
Hello. This is kenmaz from the Merpay iOS Team.
Today’s article is about automatically generating snapshot tests from Xcode Previews. I’ll be using actual examples as I cover how the Merpay iOS Team develops the iOS app, our current automated testing efforts, issues we’ve encountered, and solutions we’ve found.
Background
Development using Xcode Previews
The Merpay iOS Team codes most of the view and UI portions of the iOS app, and uses Xcode Previews to check the layout. Doing this allows us to preview the view in various states in real-time in Xcode, without needing to start iOS Simulator. Furthermore, we don’t use Storyboard or XIB, and instead write all views using code. This makes it easier to resolve revision conflicts and to perform source code reviews, improving the development efficiency of the team.
If you’re interested in more information on development using Xcode Previews, I wrote a blog article for last year’s Advent Calendar and also made a presentation at iOSDC 2020.
Test automation
The Merpay iOS Team is currently engaged in the following test automation efforts, both to increase development efficiency and to maintain/increase software quality.
| Type of test | Description |
|---|---|
| Unit test | A test done at the business logic level, not associated with the UI. |
| Snapshot test | A test done at the view level that involves capturing and comparing snapshot images of a view in various states to confirm whether rendering is correct. |
| UI test | This involves automatically starting and operating an app based on a script that has been written in advance, to test whether the app behaves as expected. |
If we can write robust test code at every layer in this way, we can continue to develop confidently and without worrying about degradation, even when features need to be improved.
Issues with test automation
All test types require writing test cases separate from production code, and therefore require some development resources. It’s been nearly two years since we released the Merpay app, and in that time it has become quite massive. The amount of test code has also increased proportionately, which means that development takes more resources.
So, we wondered whether there was some way to keep our automated testing robust, while also reducing the burden of developing test code.
That’s when we came upon the idea of automatically generating snapshot test code from preview code.
The key point for development using Xcode Previews is:
Write the various states of each view in preview code,
and then confirm the rendering results in Xcode.
The key point for snapshot tests (one of the automated tests) is:
Write the various states of each view in snapshot test code, capture the rendering results as images,
and compare to test whether rendering is correct.
The "various states of each view" have already been written as preview code. We then capture the preview results (rendered by the preview code) as images and compare them, allowing us to use it for snapshot test code as well. In other words, we can kill two birds with one stone.
We worked with the Merpay Expert Team to determine the viability of this idea, and shortly thereafter began introducing and running it in some of our projects.
From this point on, I’ll be using an actual example to explain the process.
Actual example
Preview view
When the Merpay iOS Team develops a new screen, we write the code for the subclass in UIView at the same time as we write code for the preview.
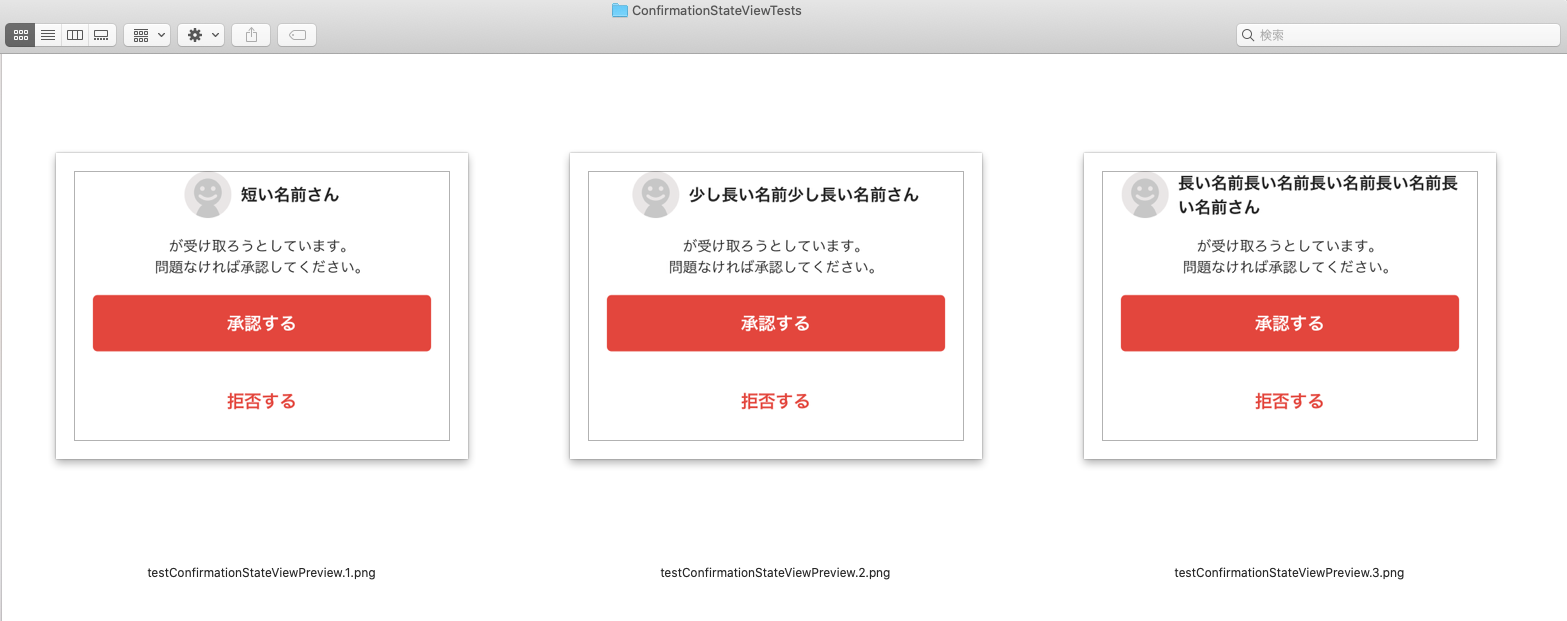
For example, let’s consider a case where we are developing a UIView subclass called ConfirmationStateView, which will be used to compose part of the "confirm receipt" screen from the "sending/receiving" feature of Merpay.

A code excerpt is shown below.
final class ConfirmationStateView: UIView, .. {
    struct Input {
        struct UserProfile {
            let screenName: String
            ...
        }
        ...
    }
    ...
    private lazy var screenNameLabel: UILabel = {
        let label = UILabel(...)
        ....
        return label
    }()
    ...
    func apply(input: Input) {
        screenNameLabel.text = input.profile.screenName
        ...
    }
Located toward the top of this view is screenNameLabel: UILabel, which is used to display the name of the recipient. The layout is implemented so that it will adjust flexibly based on the length of the name.
The Input type and apply(input:) method are also defined for this view, so that the view state can be changed externally. When incorporating this view into the app, we use things like ViewController to create an appropriate Input object and then call the apply method for the view, allowing the view to be changed to any state.
Writing preview code
Now, let’s try writing some preview code to confirm whether layout implementation for this view is operating properly. We’ll write some preview code similar to the following:
struct ConfirmationStateViewPreview: PreviewProvider { //(1)

    struct Wrapper: UIViewRepresentable { //(2)
        let input: ConfirmationStateView.Input
        init(input: ConfirmationStateView.Input) {
            self.input = input
        }
        func makeUIView(context: UIViewRepresentableContext<Wrapper>) -> ConfirmationStateView {
            let view = ConfirmationStateView() //(3)
            view.apply(input: input) //(4)
            return view
        }
        func updateUIView(_ uiView: ConfirmationStateView, context: UIViewRepresentableContext<Wrapper>) {
        }
    }

    static var previews: some View { //(5)
        Group {
            Wrapper(
                input: .init(
                    profile: .init(
                        ...
                        screenName: "短い名前"
                    ),
                    ...
                )
            )
            Wrapper(
                input: .init(
                    profile: .init(
                        ...
                        screenName: "少し長い名前少し長い名前"
                    ),
                    ...
                )
            )
            Wrapper(
                input: .init(
                    profile: .init(
                        imageURL: nil,
                        screenName: "長い名前長い名前長い名前長い名前長い名前"
                    ),
                    ...
                )
            )
            ....
        }
}
Let’s take a close look at this preview code. In section (1), we first define the ConfirmationStateViewPreview type, which conforms to the PreviewProvider protocol. When Xcode detects that Swift code containing PreviewProvider has been opened, it displays a preview on the right side of the source code editor.
Next, in section (2), we define Wrapper to wrap the view we want to preview. Only a SwiftUI view can be previewed in Xcode Previews. However, we want to preview a UIView subclass here, so we need to wrap it in a type that conforms to the UIViewRepresentable protocol, so that it can be handled as a SwiftUI view.
Let’s take a closer look inside the Wrapper type, specifically the makeUIView() method. In section (3), we initialize ConfirmationStateView (which is the view we want to preview now), and then in section (4) we use ConfirmationStateView.Input (which is specified as a constructor argument for Wrapper) to call the apply method and change the view to any state.
Finally, in section (5), we define the previews property to return the view in our preferred preview state. Here, we’ve created Wrapper containing a screenName of three different lengths for returning data. Xcode renders its preview based on the view returned by previews.

We can open this preview code in Xcode to display previews of the view in various states, as shown above. Adding a preview of another pattern is easy—simply add more similar code, and we can confirm the results displayed in real-time in the preview area on the right side.
Manually writing snapshot tests
Next, let’s try writing some test code. For testing at the business logic level unassociated with the UI, we would write unit test code to call the method to test and verify whether the return value is as expected. The question is, how should we write the view test?
In cases like this, the Merpay iOS Team implements a snapshot test for the view.
For example, we can write the following test cases to verify the results of displaying a view with three different lengths defined for names. This is similar to the preview code introduced previously.
import XCTest
import SnapshotTesting

class ConfirmationStateViewTests: XCTestCase {

    func testShortName() {
        let view = ConfirmationStateView() //(1)
        let input = ConfirmationStateView.Input( //(2)
            profile: .init(
                screenName: "Short name"
            ), ...
        )
        view.apply(input: input)
        assertSnapshot(matching: view, as: .image) //(3)
    }

    func testMiddleName() {
        let view = ConfirmationStateView()
        let input = ConfirmationStateView.Input(
            profile: .init(
                screenName: "Longer name Longer name"
            ), ...
        )
        view.apply(input: input)
        assertSnapshot(matching: view, as: .image)
    }

    func testLongName() {
        let view = ConfirmationStateView()
        let input = ConfirmationStateView.Input(
            profile: .init(
                screenName: "Long name Long name Long name Long name Long name "
            ), ...
        )
        view.apply(input: input)
        assertSnapshot(matching: view, as: .image)
    }
Each of these test cases is quite simple. For example, the testShortName method does the following:
- (1) Initializes the view to test
- (2) Specifies "Short name" as
screenName, creates anInputobject, and then calls theapplymethod to change the view to any state - (3) Calls the
assertSnapshotmethod to verify that the view is rendered as expected
The assertSnapshot method requires a bit of an explanation.
The Merpay iOS Team uses a library called SnapshotTesting to implement snapshot tests(*). assertSnapshot is a method provided by this library.
https://github.com/pointfreeco/swift-snapshot-testing
When we specify the view to verify as the first argument, the assertSnapshot method captures the view to verify as a bitmap image and saves it as a "reference image" in the specified path, but only when the test is run for the first time. When we run the test again, the image data captured for the view to verify is compared at the pixel level with the existing reference image, allowing us to verify whether the view is rendering as expected.
As for the other test cases, we can copy-paste our test code and simply replace the screenName text with "Longer name..." and "Long name..." to write similar test cases, in order to complete our snapshot test.
Having said that, doing all of this is still a little tedious— seeing as we just finished writing very similar code for the preview code portion, is there any way we could reuse it?
(*) The Merpay iOS Team also has some snapshot tests that use iOSSnapshotTestCase. For details, refer to this article.
Referencing the preview from the snapshot test
A comparison of the preview code and snapshot test will reveal that there is some similar code between the two. The code is the same up to the following parts:
- Initializing the view to test
- Creating the
Inputobject and calling theapplymethod to set the view to any state
Instead of writing the code for items 1 and 2 directly within the snapshot test code, we can obtain the view already created by the preview code and provide it to the assertSnapshot method, and use that as the view to test during the snapshot test.
We can therefore rewrite ConfirmationStateViewTests as shown below.
import SwiftUI //(1)
import XCTest
import SnapshotTesting

class ConfirmationStateViewTests: XCTestCase {
    func testConfirmationStateViewPreview() {
        for preview in ConfirmationStateViewPreview._allPreviews { //(2)
            assertSnapshot(matching: preview.content, as: .image) //(3)
        }
    }
}
It’s a lot cleaner now.
In section (1), we import the SwiftUI module because we have to reference the preview code in the snapshot test.
In section (2), we reference the _allPreviews property of the ConfirmationStateViewPreview type, which conforms to the PreviewProvider protocol defined in the preview code. We then obtain a _Preview type object, which displays each preview returned by the previews property.
Finally, in section (3), preview.content obtains the SwiftUI view corresponding to each preview (in this example, the Wrapper object) as an AnyView type. assertSnapshot, the assertion method provided by the SnapshotTesting library, can even be used for SwiftUI views. We can therefore directly pass preview.content, allowing us to reuse the view defined in the preview code as a snapshot test view.
If we run our rewritten ConfirmationStateViewTests as normal test code in Xcode, it behaves similarly to the original ConfirmationStateViewTests. The snapshot test view captured as an image is written as a PNG file to the __Snapshots__/ConfirmationStateViewTests/ directory in the same directory the test code is located. Note that it only does this the first time the code is run.

The same test code should also be written for other preview code, but Merpay already has a lot of preview code written, and it would be too much work to manually write test code for each preview.
All that the test code does is obtain each preview using PreviewProvider._allPreviews, and then pass this to the assertSnapshot method as an argument. That’s when we came up with the idea to use Sourcery to automatically generate this test code.
Using Sourcery to automatically generate snapshot test code from preview code
https://github.com/krzysztofzablocki/Sourcery
Sourcery is a code generator for the Swift language. We can use Sourcery to extract parts of swift code that meet certain conditions from within a project, and can then insert its type information into a template, allowing us to generate source code.
Here, we will search all the Swift code in the project for types that conform to PreviewProvider, and then will use _allPreviews to obtain each preview and generate code to pass to the assertSnapshot method. This is done in order to perform the same function as the test code above.
A Sourcery template looks like the following.
private func assertPreviewSnapshot<T: PreviewProvider>( //(1)
    _ target: T.Type,
    file: StaticString = #file, testName: String = #function, line: UInt = #line
) {
    for preview in T._allPreviews {
        assertSnapshot(matching: preview.content, as: .image, file: file, testName: testName, line: line)
    }
}

class PreviewSnapshotTests: XCTestCase {
{% for type in types.based.PreviewProvider %} //(2)
    func test{{type.name}}() { //(3)
        assertPreviewSnapshot({{type.name}}.self) //(4)
    }
{% endfor %}
}
Code for obtaining previews from _allPreviews and passing them to the assertSnapshot method is the same for any of the test cases, so in section (1), we extract this as the assertPreviewSnapshot method. We can pass the metatype for types that conform to PreviewProvider as method arguments in order to run snapshot tests for each preview included in PreviewProvider.
The key point for generating the actual test code is {{ types.based.PreviewProvider }} in section (2). Using that method to include this in the template prompts Sourcery to check all type information defined in the applicable Swift code, and it will obtain all (and only) information for types that conform to the PreviewProvider protocol. {{ type.name }} allows us to obtain type names for each type information obtained. Here, we define test methods for each PreviewProvider in section (3), and then enable passing the PreviewProvider metatype defined in each preview code as an argument for the assertPreviewSnapshot method in section (4) by indicating {{ type.name }}.self.
When building a target including the preview code, we run the sourcery command and configure it so that snapshot test code is automatically generated each time preview code is built.

For example, using this Sourcery template automatically generates the following snapshot test code when we build preview code related to "sending/receiving" for Merpay.

You can see that test cases are generated for all preview code related to the "sending/receiving" feature.
If we then run this test code (the first time only), reference images for snapshot testing will be generated as shown below.

Any subsequent tests that are run will compare the result of rendering each view with the reference images, and will fail if they do not match, immediately alerting us to any unintended changes or layout bugs.
We can also feel confident with adding new screens, as writing new preview code to confirm operation will also automatically add a corresponding snapshot test case.
Embedding to CI
Finally, we’ll embed snapshot test execution in CI. In the Merpay iOS Team, we’ve configured settings so that a snapshot test will be run whenever a new commit is pushed. This means we will immediately realize if there are any unintended view changes.
We’ve also prepared a GitHub label called Capture Snapshot 📸 for updating reference images for snapshots. If an existing view is modified or a new view is added, the developer first creates a pull request on GitHub and sets this label. This causes the CI machine to recapture reference images for all snapshot tests. If there are any differences, it also automatically creates a new pull request to update the reference images. The developer checks all of this, and if there are no issues, they merge it. This allows us to always keep our reference images for snapshots easily updated.

Summary of everything so far
Let’s summarize the article up to this point.
We’ve built a mechanism by which snapshot test code (based on preview code) and corresponding reference images can be automatically generated, simply by creating view code and preview code.
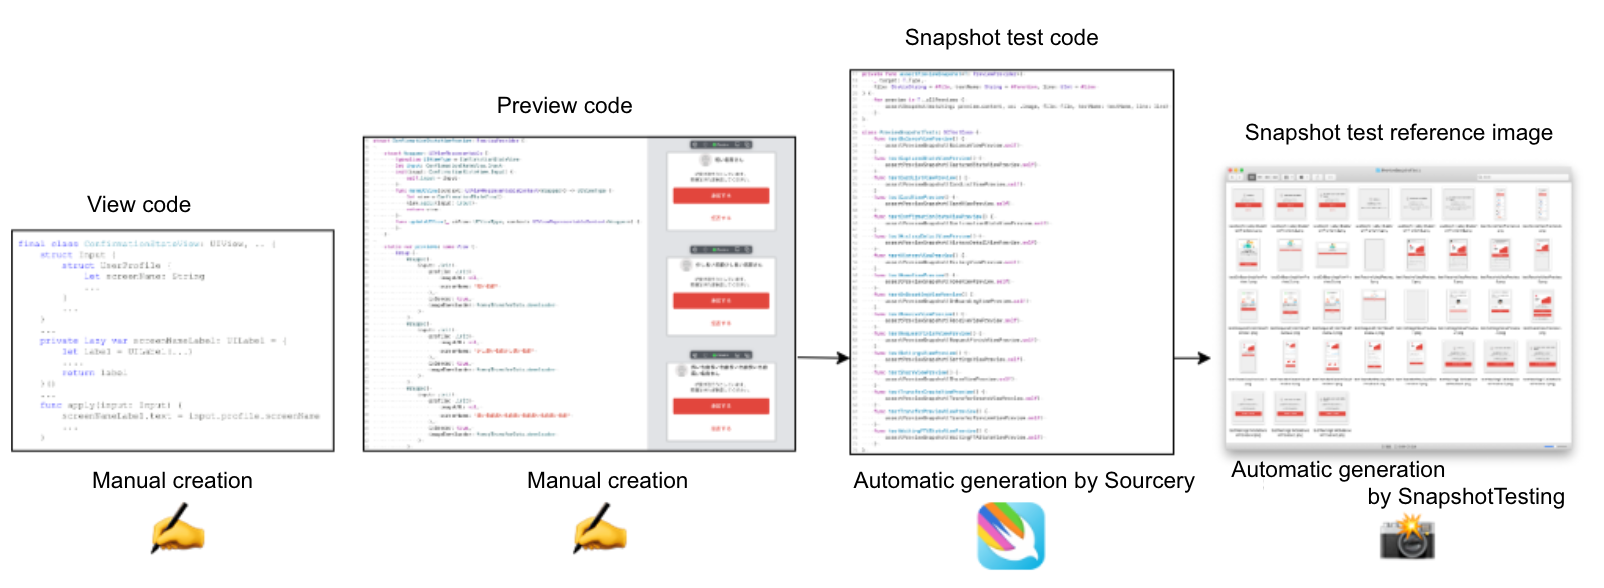
When writing view code, we use Xcode Previews to check the various states of the view. Snapshot code is also automatically generated by preview code. This means that preview code is no longer disposable code used only during development. Instead, it can be reused as snapshot tests for iterative verification.
The mechanism kills two birds with one stone, in that writing cleaner preview code allows for snapshot tests that cover various test cases to be automatically generated.
Tips
Finally, I’d like to bring up some tips and points of interest discovered while building this mechanism that automatically generates snapshot tests from preview code.
Align preview code and snapshot test sizes
By default, the assertSnapshot method provided by SnapshotTesting will capture previews at the screen size of the iOS Simulator that ran the test. In contrast, you can specify the view size for previews in the preview code. For example, you could specify .previewLayout(.fixed(width: 320, height: 100)) .
The preview size and snapshot size can be aligned by writing the following test code.
    for preview in T._allPreviews {
        switch preview.layout {
        case .fixed(let width, let height): //(1)
            assertSnapshot(
                matching: preview.content.edgesIgnoringSafeArea(.all), //(2)
                as: .image(layout: .fixed(width: width, height: height)), //(3)
                ...
            )
        default:
            assertSnapshot(
                matching: preview.content,
                as: .image,
                ...
            )
        }
    }
In section (1), the switch-case statement checks whether the size has been specified in the preview code. If so, the capture size is aligned with the preview code size in section (3). At the same time, the safeArea effect is ignored in section (2).
Long and narrow previews cannot be captured properly
Let’s consider the inner workings of the SnapshotTesting library. The SwiftUI view specified by assertSnapshot is set to the rootView of UIHostingController, and this is set to rootViewController for the UIWindow of a size specified by this. UIGraphicsImageRenderer is then used to capture images of the view. This caused an issue, due to safeAreaInset.top, where a preview of height 44 pt or less could not be displayed properly.
We were able to avoid this by checking the height of the preview when testing. If the height is 44 pt or less, we add a spacer to the lower part of the preview, and then pass the view to the assertSnapshot method.
    for preview in T._allPreviews {
        switch preview.layout {
        case .fixed(let width, let height):
            //Workaround for thin horizontal previews
            let adjustedHeight = max(0, 44 - height)
            let view = VStack {
                preview.content.frame(width: width, height: height)
                Spacer().frame(width: width, height: adjustedHeight)
            }
            assertSnapshot(
                matching: view.edgesIgnoringSafeArea(.all),
                as: .image(layout: .fixed(width: width, height: height + adjustedHeight)), //
                ...
            )
This allowed us to capture long and narrow previews properly, as shown below.

Differences in environments in which snapshot tests are run can cause differences in rendering results
Running the same code on two different machines can result in slightly different rendering results, depending on the language settings configured for iOS Simulator or Mac OS. For example, if Japanese has not been added as a language in the settings, kanji characters may be rendered using a Chinese font. Changing the font size in the accessibility settings can also cause issues. In order to prevent this from occurring, we generally capture reference images for snapshot tests and run tests only on the CI server.
How to determine why previews are not displayed correctly in Xcode 12 or later
This is an issue with Xcode Previews itself. If there are any layout inconsistencies in the code itself for a preview, Xcode Previews might crash and the preview might not be displayed properly. In Xcode 11 and earlier, you could access the crash log directly by pressing the (i) button at the top of the screen. However, this has changed in Xcode 12.
Tap the Diagnostics button at the top of the screen.

Select Generate Report > Reveal in Finder from the bottom of the popup screen that appears.

After waiting a short while, Finder will open up. Search for a folder with a name similar to preview-diagnostics-xxxx. Inside that folder is another folder called CrashLogs, in which you can find some .crash files. Pretty annoying!

I’ve already submitted feedback to Apple on this, so I hope they’ll update Xcode.
Summary
In this article, I used an actual example to show how the Merpay iOS Team automatically generates snapshot tests from preview code. These techniques can be used for developing UIKit-based apps and SwiftUI apps alike. I hope you found it interesting!
Acknowledgements
We were able to build this mechanism thanks to the extensive support of @kateinoigakukun from the Merpay Expert Team. Team members @yusuke0518 and @mime29 also contributed significantly toward implementing this in the actual project. Thanks!


