Introduction: Embracing Unit Testing in Flutter
Hi, I’m Heejoon, a software engineer at Mercari. I’m part of the Work Mobile team working on the Mercari Hallo app. I’m excited to share our approach to unit testing—it’s a big part of how we build a high-quality app!
Unit testing is essential for modern software development, especially for Flutter apps. It’s all about testing individual parts of our code (functions, classes, widgets—anything and everything!) in isolation to make sure they’re working as expected. Think of it like checking each ingredient of a recipe before baking—it helps avoid a disaster! By verifying that each piece works correctly on its own, we build a rock-solid foundation for a reliable and maintainable app.
So, why is unit testing so important in the ever-evolving world of Flutter?
Let’s look at some of the benefits we’ve found:
- Early Bug Catching: Unit tests are like our bug-catching superheroes. They find problems early in the development process, saving us headaches down the road.
- Better Code Design: Writing unit tests helps us design our code better. It encourages us to think about how different parts of our code work together, leading to more organized, understandable, and reusable code.
- Refactoring Without Fear: Refactoring is like cleaning up our code—making it more efficient and easier to work with. Unit tests give us the confidence to refactor without worrying about breaking things. They’re our safety net!
- Faster Development (Really!): We know writing tests might seem like extra work at first. But trust us, it actually speeds up development in the long run. By finding bugs early and making refactoring easier, we build features faster and with more confidence.
While other types of testing (like integration tests) are important, we’re focusing on unit and UI testing in this article. We’ll walk through how we write effective tests for both our UI and business logic, sharing practical tips to help everyone build robust Flutter apps.
Setting Up Your Flutter Testing Playground
Getting started with testing in Flutter is super easy, thanks to the awesome flutter_test package that’s already built-in! Here’s how we set up our testing lab:
- Add the secret ingredient: In your
pubspec.yamlfile, addflutter_testas a dev dependency. It’s like adding superpowers to your project!

- Power up your project: Run
dart pub get. This grabs theflutter_testpackage and all its helpful sidekicks. - Build your testing arena: Create a new file (something like
widget_test.dartorlogic_test.dart) inside atestdirectory at the root of your project. This is where the testing magic happens! ✨
Unit Testing
How to Test Simple Logic
Thoroughly testing core application logic, separate from the UI, is crucial for building robust and maintainable Flutter apps. This involves testing pure Dart code, such as models, services, and utility functions. Let’s illustrate with a practical example from our production codebase:

This code defines a Fraction type extension that converts a fractional value to a percentage, rounding up. The doc comments now include illustrative examples.
Now, let’s write unit tests to verify its behavior:

To understand how these tests function, let’s break them down:
- The
group('asPercentage', () { ... });block organizes related tests, improving the clarity of our test output. Think of it as categorizing our tests. - Each
test()function defines a specific scenario. The first argument is a descriptive label, and the second is the test logic. expect(actualValue, expectedValue);asserts that ourasPercentagemethod’s output matches the expected value. Any mismatch signals a potential issue.- Our test suite covers various scenarios, including different decimal places, boundary values like zero and one, and negative inputs. This comprehensive approach ensures the reliability of our
asPercentagemethod. - Note how our tests include boundary values (zero and one) and negative input. Testing these edge cases is crucial for uncovering hidden bugs and ensuring our function behaves correctly in all situations.
These tests also demonstrate key principles of effective unit testing:
- Descriptive Test Names: Clear test names act as documentation, aiding our understanding and maintenance. For example, we are encouraged to choose "rounds up to the nearest integer with no decimal places" over "test case 1".
- Structured Test Organization: Using
group()categorizes our tests for improved readability and navigation. - Comprehensive Coverage: Testing various inputs and edge cases strengthens the robustness of our code.
- Adhering to Conventions: Our test file name (
fraction_test.dart) follows the convention of appending_testand we put it into the same file path as the production file path just replacing"/lib"with"/test", which aids in organizing our tests.
By following these practices, we create effective unit tests that enhance the quality, reliability, and maintainability of our application.
How to Test Time-dependent Logic
Here’s another example that tackles a common challenge: dealing with time in our tests. We’ll focus on how we display elapsed time in a user-friendly way.
Imagine you want to show users how long ago something happened, like "5 minutes ago" or "2 days ago."

We use a Riverpod provider called elapsedTimeFormatProvider for this:
This provider takes a DateTime (target) and returns a human-readable string (e.g., "5 minutes ago"). We leverage Riverpod for dependency injection.
Now, here’s the key for testing: clock.now(). Typically, you’d use DateTime.now() to get the current time. But in tests, DateTime.now() presents a problem: it’s always changing! This makes our tests unpredictable. We want our tests to produce the same results every single time, no matter when they run. This is what we call deterministic tests.
The clock package solves this problem. It lets us freeze time and set it to a specific point. This gives us complete control over time in our tests, which is essential for writing reliable and consistent unit tests.

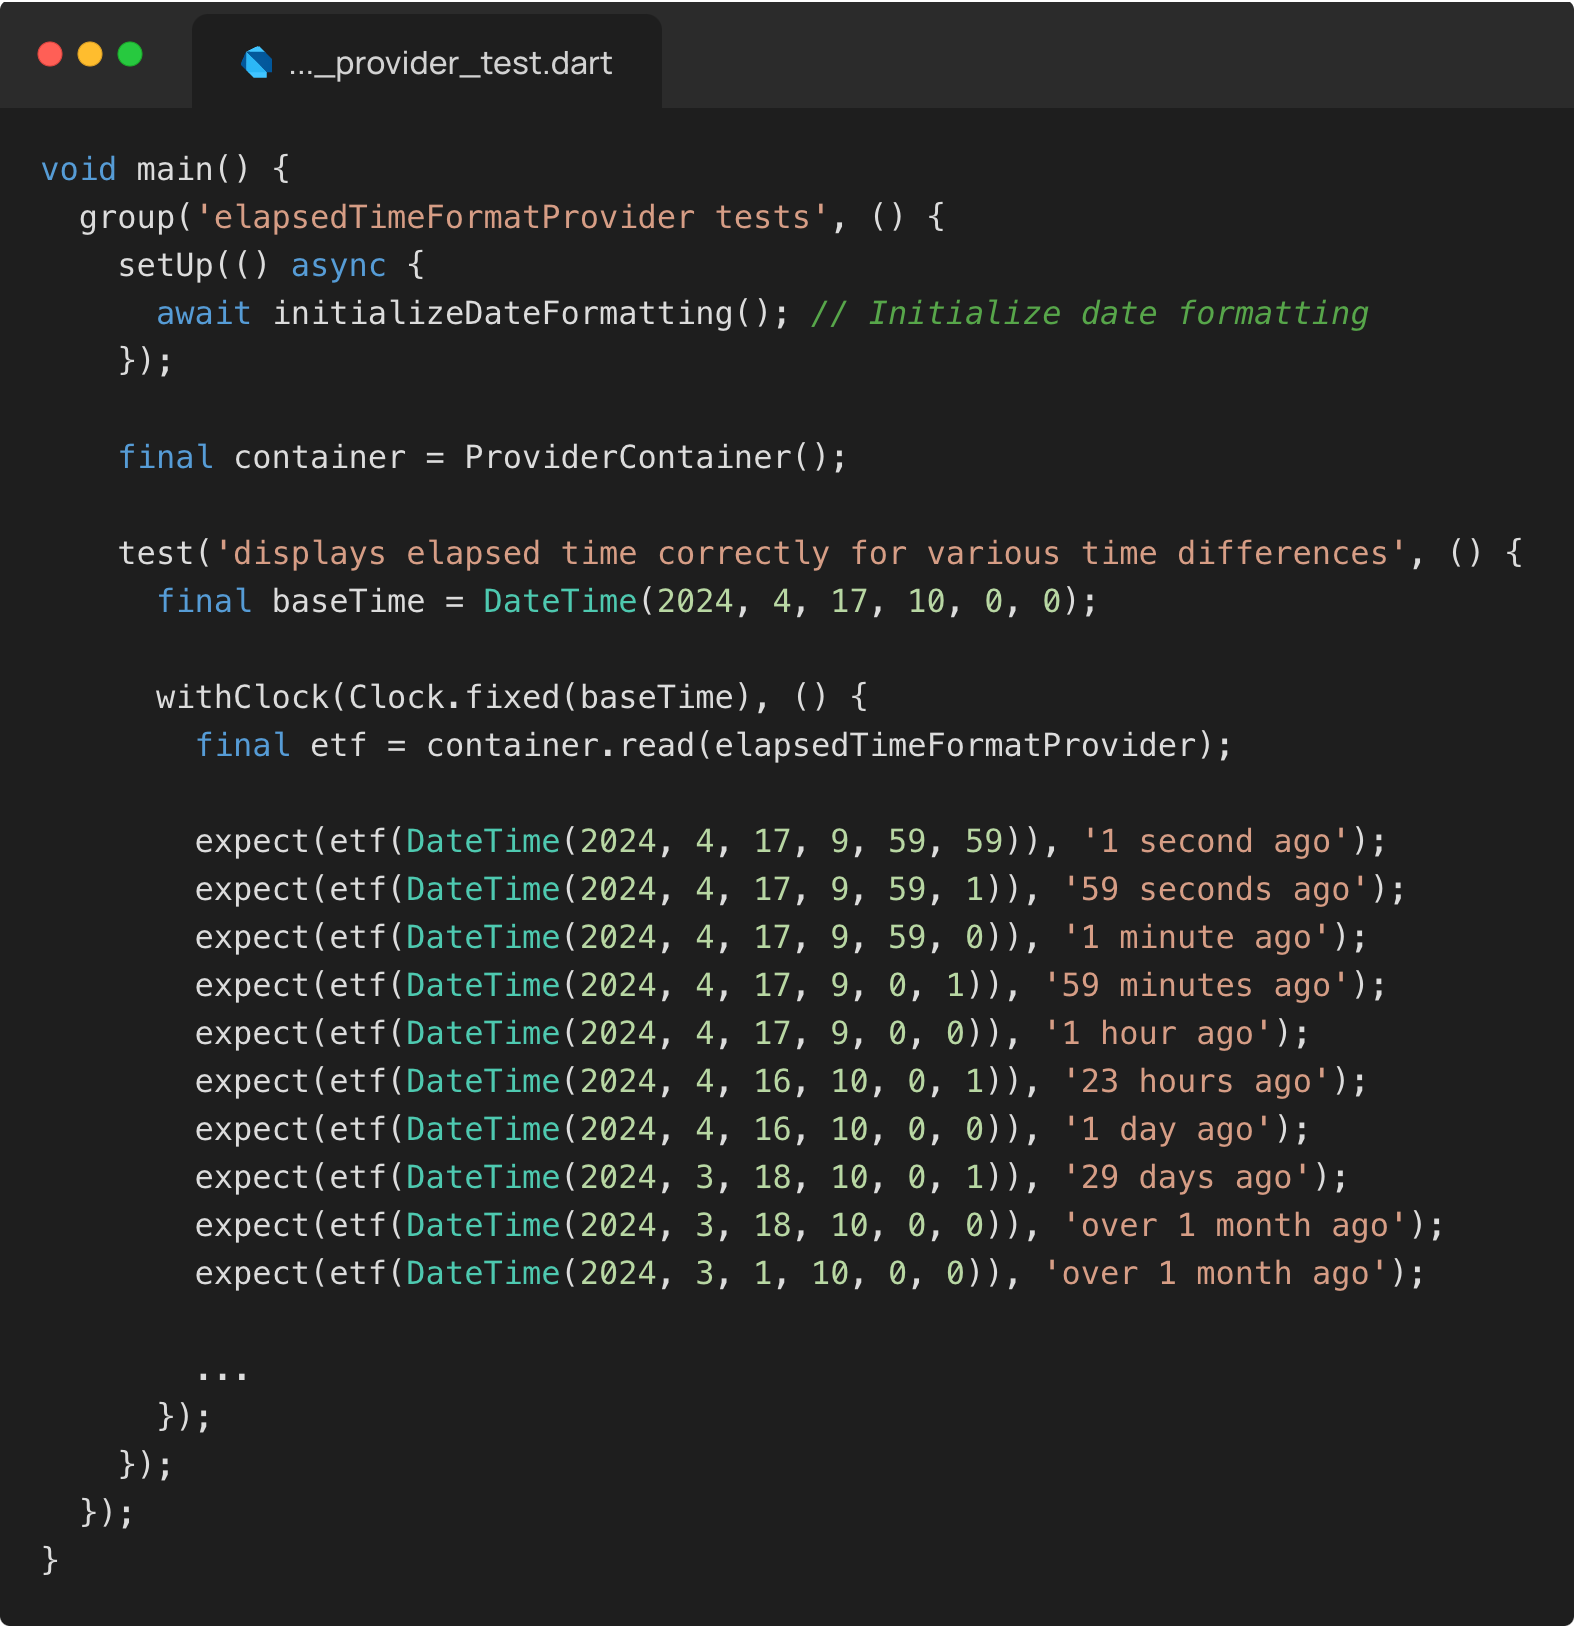
This test case shows a neat trick for dealing with time in our tests—something that can be a real headache! That’s where the clock package comes in, with its trusty sidekick withClock. Check it out:

We’re using Clock.fixed(baseTime) to create a magical frozen clock. We set baseTime to a specific moment (April 17, 2024, at 10:00:00 in this case). Time stands still inside that withClock block. Any code that calls clock.now() will get our baseTime, not the actual current time.
So, what’s the big deal? Well, it means our tests become deterministic. They’ll give us the same results every time, no matter when we run them. No more flaky tests due to the ever-ticking clock!
Inside the withClock block, we call our time-formatting provider (elapsedTimeFormatProvider) with different dates and check that it gives us the right strings (like "1 second ago," "59 minutes ago," and so on). Since time is frozen, we know exactly what to expect.
This trick is a lifesaver for testing time-based logic. The clock package and withClock, along with Clock.fixed, give us the power to control time in our tests, making them super reliable. It’s a must-have in your Flutter testing toolkit!
We’ve all been there: spending hours debugging a flaky test only to realize it’s because of DateTime.now(). To prevent that pain, we use a custom linter that guides us toward clock.now() instead. It’s a simple way to avoid those time-related testing headaches. We’d love to talk more about our custom linters—they’re pretty cool—but that’s an adventure for another day!
Widget Testing
Alright, so we’ve tackled the nitty-gritty of testing our backend logic. Now, let’s move on to the exciting part: ensuring our Flutter UI looks and behaves exactly as we envisioned! Widget testing, sometimes referred to as component testing, lets us verify the appearance and functionality of individual widgets, guaranteeing they render correctly with various inputs and states. This proactive approach helps us squash those pesky UI bugs before they reach our
users and potentially lead to negative app store reviews.
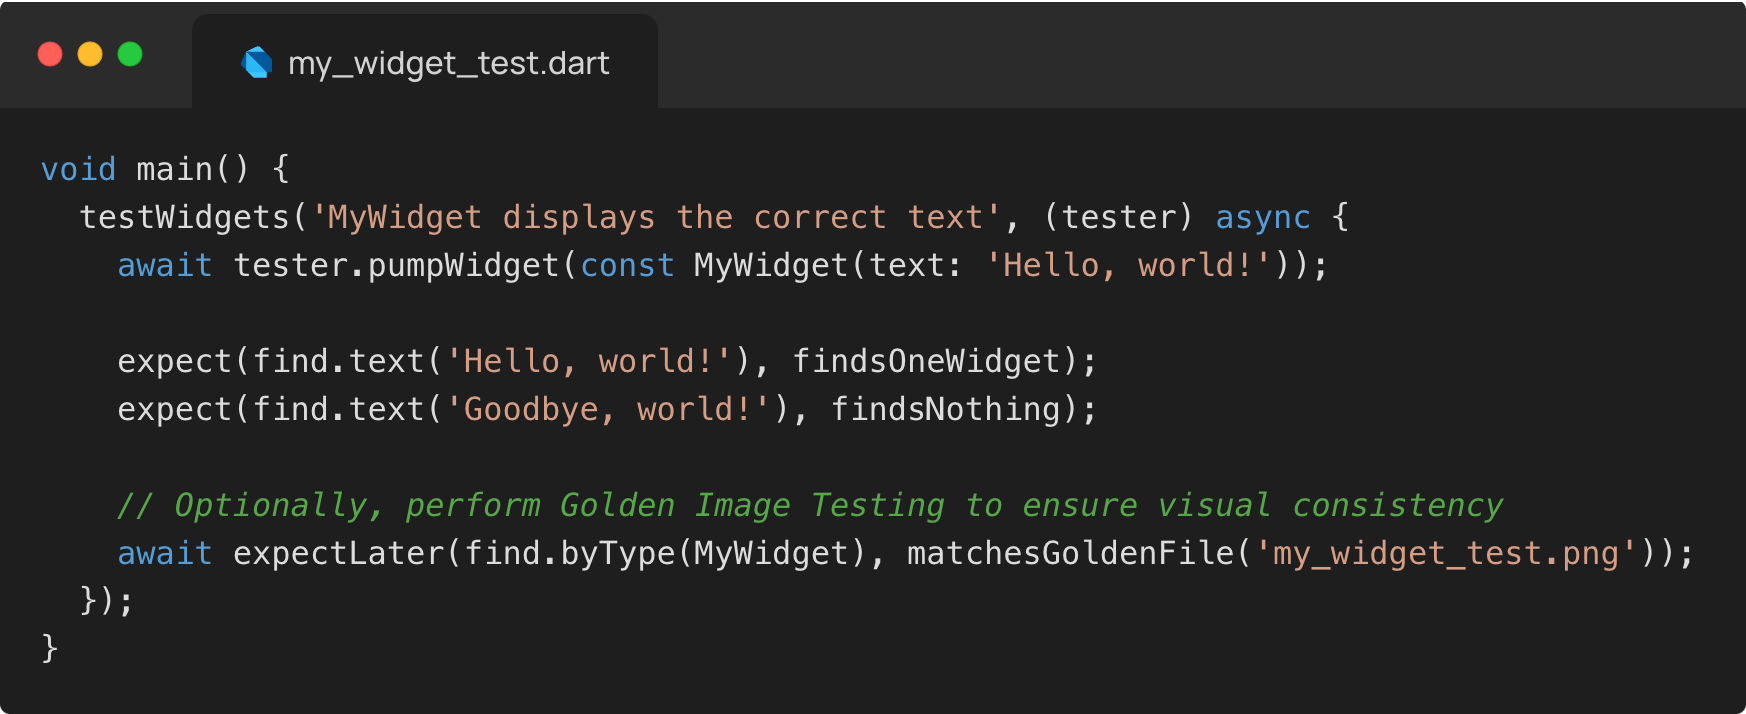
So, how do we put our widgets to the test? Flutter provides a handy testWidgets() function specifically for this purpose. It creates a simulated environment where we can render our widget, interact with it (e.g., tapping buttons, entering text), and then verify its behavior.
Here’s a simple example of a typical widget test:

However, our widget tests often look a bit different in practice. We’ve implemented some custom wrappers to streamline our testing process and handle the complexities of our app’s architecture, which uses Riverpod for state management. A more representative example of our tests would be:

Here’s a breakdown of our custom functions:
testThemedWidgets(): This wrapstestWidgets()and runs the test multiple times with different combinations of light/dark themes and surface sizes (defined insurfaceSizes). It also tags these tests with'golden'to facilitate efficient golden image updates using the commandflutter test --update-goldens --tags golden.pumpAppWidgetWithCrewAppDeps(): This wrapspumpWidget()and handles the setup of necessary Riverpod providers, simplifying the boilerplate required for each test.matchesThemedGoldenFile(): This wrapsmatchesGoldenFile()and, in addition to performing the standard golden file comparison, it dynamically replaces placeholders like{theme}and{size}in the filename with the actual values used during the test run.
By running flutter test --update-goldens --tags golden, we generate four
golden images: golden/light-320x480/my_widget_test.png, golden/light-375x667/my_widget_test.png, golden/dark-320x480/my_widget_test.png, and
golden/dark-375x667/my_widget_test.png. These images, along with the test
code, are committed to version control to prevent unexpected visual regressions.
Code Coverage
We love writing tests! But how can we be sure we’ve written enough? Code coverage helps answer that question. It tells us the percentage of our code executed during tests, allowing us to identify gaps in our testing strategy, ensure critical code isn’t left untested, and even uncover dead code. Think of it like exploring a treasure map—you don’t want to leave any areas uncharted!
We’re especially interested in coverage changes with each pull request. This verifies that the new code is well-tested and that existing tests remain effective.
Our CI/CD pipeline completely automates code coverage analysis:
- Generate Report: The pipeline runs
flutter test --coverage, producing a detailed report (coverage/lcov.info) showing executed code lines. - Clean Report: The pipeline refines
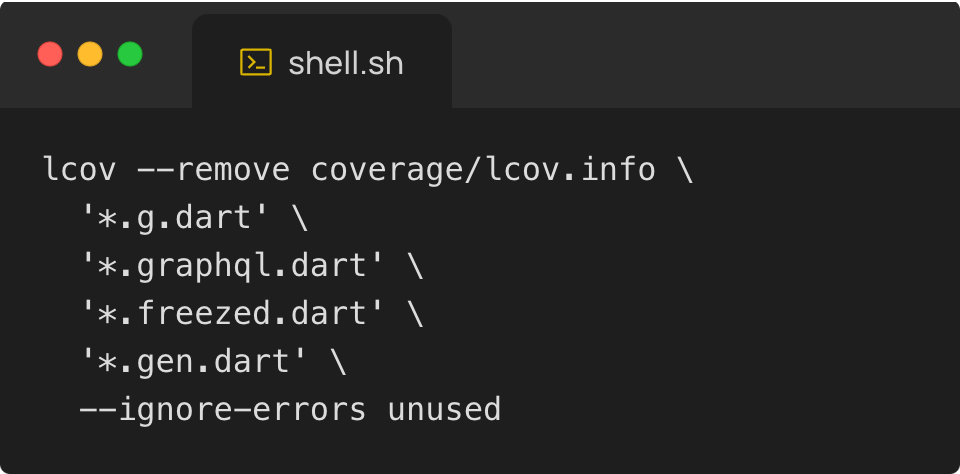
lcov.info, removing irrelevant entries (like generated code) for greater accuracy using commands like:

- Generate Visual Report with Coverage Metrics: The pipeline uses
genhtmlto create a user-friendly HTML report from the (filtered)lcov.info:

This generates an HTML report displaying both overall and differential coverage (changes introduced by new code). Differential coverage, inspired by the paper "Differential coverage: automating coverage analysis", helps pinpoint areas needing more tests and ensures existing coverage isn’t negatively impacted. - Upload Report to Cloud Storage: For easy access, the pipeline uploads the HTML report (with differential coverage) to a Google Cloud Storage bucket, enabling convenient browsing.
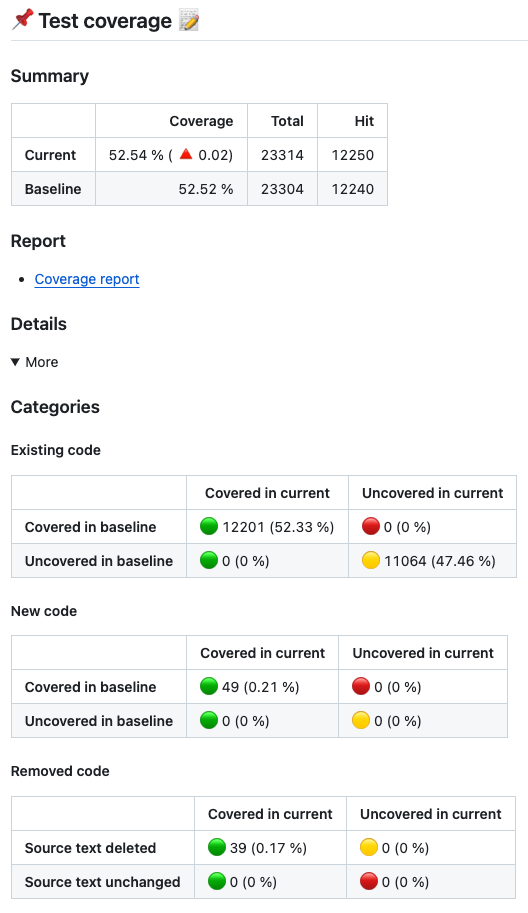
- Summarize Coverage in Pull Request: The pipeline adds a concise coverage summary to the pull request, including a link to the HTML report in Cloud Storage. This lets reviewers quickly assess coverage changes.
This automation streamlines our workflow and maintains high test quality, giving us confidence in our codebase and allowing us to focus on building great software.
The screenshot above shows a real coverage summary. We’re continually working to improve these reports! What do you think?
Advanced Topics
While we strive for comprehensive testing, sometimes we encounter roadblocks. Let’s briefly touch on several common challenges:
- Defining the "Unit": In a Flutter context, deciding what constitutes a "unit" for testing can be nuanced. We aim to test individual widgets and their associated business logic in isolation, but the level of granularity can vary. Sometimes, testing a small group of interconnected widgets as a unit makes more sense than strictly isolating every single widget. Finding the right balance is key to effective unit testing.
- Legacy Code: Even in a relatively young codebase like ours, some early-stage code can be difficult to test. This often stems from initial rapid development prioritizing features over testability, resulting in tightly coupled components and complex dependencies that make writing tests challenging. Refactoring these areas can improve testability, but requires careful planning.
- Mocking Dependencies: Testing components that rely on generated custom hooks from graphql_codegen, particularly those interacting with the
GraphQLClientfrom the graphql package, presents a unique mocking challenge. Effectively isolating our logic for testing requires carefully mocking both the client and the generated hooks, which can become complex depending on the query structure and data flow. Tools and techniques for mocking these specific dependencies are crucial for robust testing.
This section is intentionally brief; a deeper dive into these topics warrants dedicated articles in the future. Stay tuned!
Wrapping Up: Unit Testing for a Robust Mercari Hallo
That’s a wrap on our unit testing journey! We’ve covered a lot of ground, from setting up your testing environment to tackling tricky scenarios like time-dependent logic and mocking dependencies. We’ve also shown how we leverage custom tooling and CI/CD integration to streamline our testing process and maintain high code coverage.
Hopefully, this deep dive into our unit testing practices at Mercari, specifically for the Mercari Hallo app, has provided you with valuable insights and practical tips you can apply to your own Flutter projects. Remember, unit testing isn’t just about finding bugs; it’s about building a solid foundation for a robust, maintainable, and scalable app. It’s an investment that pays off in the long run with increased developer confidence, faster development cycles, and ultimately, a happier user experience for Mercari Hallo users.
We hope this article has been helpful to your projects and technical explorations. We will continue to share our technical insights and experiences through this series, so stay tuned. Also, be sure to check out the other articles in the Mercari Advent Calendar 2024. We look forward to seeing you in the next article!


