Introduction
At Mercari, we are using Istio for east-west traffic but we have not used it for north-south traffic. This year, we created a Proof of Concept (PoC) of Istio Ingress Gateway to validate whether it fitted our north-south requirements. Especially, we confirmed the Istio Ingress Gateway and our requirements have a parity. That’s because since a different service already addresses north-south traffic if they don’t have the parity, it’s difficult to migrate.
What’s the Istio Ingress Gateway
The Istio Ingress Gateway is a standalone Istio proxy deployed at the edge of the mesh. It allows Istio features such as traffic management to the traffic entering the Kubernetes cluster.
There are two ways to configure the Istio Ingress Gateway:
- Istio Custom Resources (CR)
- Kubernetes Gateway API
Regarding the Istio CR, we use the Istio Gateway CR and Istio VirtualService CR. The Gateway CR is used to configure the exposed ports and TLS configurations and so on. The VirtualSevice CR is used to configure the route configuration such as destination service, traffic shifting, and so on.
Concerning the Kubernetes Gateway API, Kubernetes Gateway API is an open source standard for service networking in Kubernetes. Its purpose is to provide an evolution of the Ingress API. By using CRs of Kubernetes Gateway API, we can configure Istio Ingress Gateway, Google Cloud Load Balancing, etc. If you want to know about other implementations of this API, please refer to the official documentation. In the Istio Ingress Gateway case, it’s currently in alpha phase, so if you want to use it, please be careful with backward compatibility.
Since we already use Istio CRs for east-west traffic, we preferred to use Istio CRs for the Istio Ingress Gateway PoC.
Feature requirements of our north-south traffic
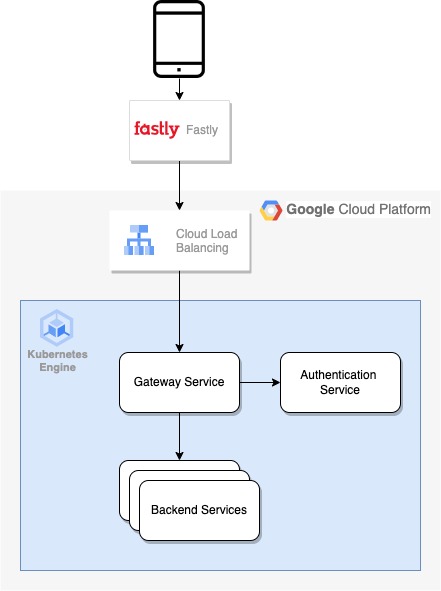
The following figure shows our typical north-south system situation. When the client makes a request to our system, the request reaches Fastly first then it goes to Google Cloud Load Balancing and goes to our Kubernetes cluster. In the Kubernetes Cluster, the Gateway service which is an in-house service written by Go receives the request first. The Gateway service communicates with an in-house authentication service to verify client requests and proxies them to backend services.
The important thing is the Gateway service doesn’t have application-specific logic instead it does general concerns such as Access Control, Client Authentication, Transcoding request/response, and so on. The application-specific logic is addressed by each backend service. By separating responsibilities in this way, each service owner can focus on developing own their service without blocking other services.
In the PoC, we confirmed that the Istio Ingress Gateway can realize more than 30 features that the current Gateway service has but it’s difficult to write about all the features in this article. Therefore, I picked up four features:
- Gzip compression
- gRPC transcoding
- Direct response
- Integrate with internal authentication service and request hedging
Let’s check the details of each feature.
Gzip compression
The Gateway service does Gzip compression. The purpose is to reduce the body size so the response can be returned to the client more quickly. As you may know, Fastly can do the same thing butthere are a few cases in which some endpoints don’t use Fastly. And also even if all endpoints are behind Fastly, we can reduce the egress cost by reducing the body size. Therefore, regardless of the Fastly, we need this feature in the Gateway service.
gRPC transcoding
In Mercari, many services are built with the gRPC server. For east-west communication, it’s useful because the caller service can easily get request/response payload from the Protocol buffers definition. For north-south communication, clients are the web browser, iOS, and Android, making it hard to enforce using gRPC requests. Since it’s not realistic that all services implement both gRPC endpoints and HTTP endpoints, the Gateway service transcodes HTTP requests into gRPC requests and transcodes gRPC responses to HTTP responses to ensure the interoperability of our clients and servers.
Direct Response
There are use cases which the Gateway service returns the response directly to the client without proxying the request to backend services. One of the use cases is access control such as IP based or Header based to protect backend services from malicious clients. In this case, the Gateway service does not proxy the request to the backend service, so it needs to return the response instead.
Integrate with in-house authentication service and request hedging
One of the important features is to communicate with an in-house authentication service for authenticating client requests because our service provides value tied to customers such as buying/selling/paying. Therefore, this process of associating a specific customer with a request is important.
Stability and performance are also important. Regarding stability, the communication between the Gateway service and in-house authentication service is over the network. Sometimes requests are delayed or dropped temporarily by the network issue. We can improve it by combining timeout and retries. As a result, even if the network is temporarily unstable, the request may be successful after the retry, leading to more stability but how about the performance? By using timeout and retries, it takes more time than usual to get the response, resulting in a latency increase.
In order to achieve both stability and performance, we have adopted the use of hedged requests. With hedged requests, the client first sends one request as usual, then falls back on sending a secondary request after some brief delay. Once the client gets the first response, it cancels the remaining outstanding requests . As a con, if the interval of subsequent requests is short, it adds additional loads to the destination service. Therefore, the appropriate interval is required. “The Tail at Scale” says If we set the 95th-percentile expected latency of requests in the delayed time for secondary requests, it substantially shortens the latency tail and limits the additional load to approximately 5%. In fact, in Mercari, less than 1% sent more than secondary requests, so the additional load is not adding that much more.
How to implement each feature requirement
Istio 1.12.5 (Envoy 1.20.3) was used in implementations.
Gzip compression
Istio doesn’t provide Gzip compression feature natively but Envoy supports it with the Compressor HTTP filter. By Istio EnvoyFilter CR, we can use Envoy native filters in Istio. If we apply the manifest below, the Istio Ingress Gateway compresses the response if request header has Accept-Encoding: gzip and response body size is over the 20 bytes and context_type is “text/plan”, “text/html”, “text/css” or “application/json“.
apiVersion: networking.istio.io/v1alpha3
kind: EnvoyFilter
metadata:
  name: gzip
spec:
  ~~~
  configPatches:
  - applyTo: HTTP_FILTER
    ~~~
    patch:
      operation: INSERT_FIRST
      value:
        name: envoy.filters.http.compressor
        typed_config:
          '@type': type.googleapis.com/envoy.extensions.filters.http.compressor.v3.Compressor
          compressor_library:
            name: for_response
            typed_config:
              '@type': type.googleapis.com/envoy.extensions.compression.gzip.compressor.v3.Gzip
              compression_level: "COMPRESSION_LEVEL_6"
          content_length: 20
          content_type:
            - "text/plain"
            - "text/html"
            - "text/css"
            - "application/json"
gRPC transcoding
Istio doesn’t provide gRPC transcoding feature natively but Envoy supports it with the gRPC-JSON transcoder HTTP filter. When we use the Gzip compression, we just created one EnvoyFilter resource. But in order to work the gRPC-JSON transcoder filter, we need more steps.
Let’s say we have the following proto file with the helloworld package. This package includes the Greeter service. The Greeter service has SayHello RPC, in which the request payload is HelloRequest and the response payload is HelloResponse. For defining the transcoding of the gRPC-JSON transcoder filter, we use annotations of googleapis/googleapis repository. In the case below, if the request path is /say and the the method is POST, the request/response will be converted to SayHello RPC.
syntax = "proto3";

package helloworld;

import "google/api/annotations.proto";

service Greeter {
  rpc SayHello(HelloRequest) returns (HelloResponse) {
    option (google.api.http) = {
      post: "/say"
    };
  }
}

message HelloRequest {
  string name = 1;
}

message HelloResponse {
  string message = 1;
}
The gRPC-JSON transcoder HTTP filter can’t read a proto file directly. Therefore, we need to convert it into the proto descriptor file. For example, if we convert the proto file above, we execute the following commands.
$ git clone https://github.com/googleapis/googleapis
$ protoc -I./googleapis --include_imports --descriptor_set_out=proto-descriptor.pb helloworld.proto
The next step is to pass the proto descriptor file to Istio. The gRPC-JSON transcoder HTTP filter provides two ways:
proto_descriptor: Specifies the file path of the proto descriptorproto_descriptor_bin: Specifies the base64 encoded proto descriptor
Regarding the proto_descriptor, we need to pass the file to the Istio-proxy container. If we use Istio-proxy’s official docker image, we need to consider how to pass the file to the container. One way is to pass the file through volume (e.g. ConfigMap). Concerning the proto_descriptor_bin, we encode the proto descriptor by Base64 and add the encoded one to the filter configuration. For keeping simple, we chose proto_descriptor_bin in the PoC.
First of all, we get Base64 encoded proto descriptor (e.g. cat proto-descriptor.pb | base64). Then we create the manifest like below. The encoded proto descriptor file is specified in the proto_descriptor_bin field and the exposed service is defined in the services field using the package_name.service_name format.
apiVersion: networking.istio.io/v1alpha3
kind: EnvoyFilter
metadata:
  name: grpc-json-transcoder
spec:
  workloadSelector:
    labels:
      istio: ingressgateway
  configPatches:
  - applyTo: HTTP_FILTER
    match:
      context: GATEWAY
      listener:
        filterChain:
          filter:
            name: envoy.filters.network.http_connection_manager
            subFilter:
              name: envoy.filters.http.router
    patch:
      operation: INSERT_BEFORE
      value:
        name: envoy.filters.http.grpc_json_transcoder
        typed_config:
          "@type": type.googleapis.com/envoy.extensions.filters.http.grpc_json_transcoder.v3.GrpcJsonTranscoder
          services:
          - helloworld.Greeter
          proto_descriptor_bin: <base64 encoded proto descriptor>
The final step is to configure the route using VirtualService CR. For the route of gRPC transcoding, we need to register the HTTP path and specify the gRPC service in the destination field like the manifest below. By applying it, Istio Ingress Gateway knows if the request path is /say, and it should be proxied to grpc-server.default.svc.cluster.local:8080. The gRPC-JSON transcoder HTTP filter is an HTTP filter. Therefore, the request is converted into a gRPC request before being proxied to the destination service. If you’re not familiar with the lifecycle of an Envoy request, “Life of a Request” will be helpful.
apiVersion: networking.istio.io/v1alpha3
kind: VirtualService
metadata:
  name: helloworld
spec:
  ~~
  gateways:
  - istioingressgateway
  http:
  - name: "grpc-transcoding-route"
    match:
    - port: 443
      uri:
        exact: /say
    route:
    - destination:
        host: grpc-server.default.svc.cluster.local
        port:
          number: 8080
Direct Response
From Istio 1.15, it started supporting direct response by using VirtualService CR (ref: HTTPDirectResponse). If conditions are simple (e.g. the header has a specific value), this feature is enough. But if the condition is complicated (e.g. certain conditions are met by extracting and comparing values from multiple headers), it’s difficult to use it.
To validate complicated conditions, we tried to use Wasm. Before looking at how to use Wasm in Istio, let’s briefly look back at the history of Istio and Wasm. Wasm began to be officially used from Istio 1.5. From Istio 1.9, Istio started supporting an experimental feature to fetch the Wasm module from remote repositories (HTTP) and also enabled the reload module without restarting Envoy. At that time, developers needed to use EnvoyFilter CR to use the Wasm filter and to put their own Wasm module in a location reachable via HTTP, which is not trivial. However, from Istio 1.12, the WasmPlugin CR became the first-class API, while OCI Images were supported. As a result, developers no longer need to maintain the HTTP endpoint. Instead, they just push the Docker image compatible with OCI in image repositories, such as Docker Hub, ECR, GCR, and so on.
From Istio 1.12, Wasm has become more accessible but how to implement it? First of all, you need to making a Wasm module followingthe Proxy-Wasm specification which is an Application Binary Interface. If the Wasm module doesn’t meet that specification, it can’t communicate with Envoy. In order to meet this requirement, it would be better to use SDKs. If we use them, even if we don’t have much knowledge about Proxy-Wasm, we can create a Wasm module. In the PoC, we used the Go (TinyGo) SDK (tetratelabs/proxy-wasm-go-sdk) because the purpose of PoC is that confirms the practicality of Wasm, therefore we chosen a language that we can use smoothly.
Let’s look at a real Wasm example. To keep the requirements simple and easy to understand, I created a Wasm module that meets the following requirements:
- If the request headers have
x-foo: 1andx-bar: 1, that request will be proxied to the destination service - Otherwise, a static response will be returned to the client with 400 status code
All the code implemented this time is stored in the following repository.
https://github.com/hatappi/direct-response-proxy-wasm
As written earlier, from Istio 1.12, we can use WasmPlugin CR. By applying the following manifest, you can get the direct response according to HTTP request headers.
apiVersion: extensions.istio.io/v1alpha1
kind: WasmPlugin
metadata:
  name: direct-response
spec:
  ~~~
  url: oci://ghcr.io/hatappi/direct-response-proxy-wasm/direct-response-oci:v0.0.1
  imagePullPolicy: IfNotPresent
  pluginConfig:
    message: “This is direct response!”
Integrate with authentication service and request hedging
Regarding the integration with in-house authentication service, since Istio provides the External Authorization (ext_authz) feature natively, we can use it. The point to note is that when the authorization server is the gRPC server, it is necessary to implement the Check RPC specified by Envoy.
Concerning the request hedging, there is no option to configure request hedging in both gRPC and HTTP. This is the same for Envoy. Even if we check the Envoy External Authentication filter (ext_authz filter) options, none are related to request hedging.
Actually, Envoy supports it with a hedge policy combined with a retry policy but the hedge policy can only be used in the HTTP router filter. The HTTP router filter is used in the Listener subsystem which handles downstream requests, and the router filter bridges the Listener and Cluster subsystems which handle the upstream connection. Sadly, it is not used for the external authentication filter. Therefore, In order to support request hedging with the ext_authz filter, we came up with two options:
- Sidecar pattern
- Loopback way
Regarding the sidecar pattern, this pattern deploys an additional container with istio-proxy. This container hedges requests to authorization service. If we specify that container for ext_authz, since the communication between istio-proxy and sidecar container is in the localhost, we can ignore unstabilized networks.
With the loopback way, the External Authentication filter makes a request to another listener having the authorization server routing information via localhost. Since Envoy supports hedge policy in the HTTP router filter, we can use hedge policy on those requests. The following figure shows how it works.

We can easily imagine implementing a sidecar pattern but we were not sure whether we can take the loopback option or not. Therefore, in PoC, we tried it. In order to realize the figure above, there are three steps:
- Create VirtualHost which has hedge_policy
- Register cluster and listener
- Configure External Authorization
1. Create VirtualHost which has hedge_policy
Since Istio doesn’t support configuring hedge_policy natively, we configured VirtualHost which is the top-level element in the routing configuration of Envoy by using EnvoyFilter CR. The following manifests register a listener with TCP port 5000. In the routes field, the ext_authz request path is registered. The cluster can be retrieved from Envoy config (e.g. with the ‘istioctl pc cluster’ command). The hedge and retry policies are defined according to the official documents. In the following manifest, the requests will be made every 0.5 seconds for up to 3 requests. There is also a risk that the process will loop indefinitely if the authorization feature is enabled for this route, so disabling extensions.filters.http.ext_authz.v3.ExtAuthzPerRoute.
apiVersion: networking.istio.io/v1alpha3
kind: EnvoyFilter
metadata:
  name: ext-authz-with-request-hedging
spec:
  ~~~
  configPatches:
    - applyTo: VIRTUAL_HOST
      ~~~
      patch:
        operation: MERGE
        value:
          # To prevent loop
          typed_per_filter_config:
            envoy.filters.http.ext_authz:
              "@type": type.googleapis.com/envoy.extensions.filters.http.ext_authz.v3.ExtAuthzPerRoute
              disabled: true
          routes:
            - match:
                prefix: "/envoy.service.auth.v3.Authorization/Check"
              route:
                cluster: [cluster of authorization service]
          retry_policy:
            retry_on: "connect-failure"
            num_retries: 3
            per_try_timeout: "0.5s"
            retry_host_predicate:
            - name: envoy.retry_host_predicates.previous_hosts
            host_selection_retry_max_attempts: 3
          hedge_policy:
            hedge_on_per_try_timeout: true
2. Register cluster and listener
Since the VirtualHost above is added manually, we need to register the cluster and the listener manually.
In order to configure the cluster, we used Istio ServiceEntry CR. The following ServiceEntry registers the loopback-gateway.local cluster which points to 0.0.0.0:5000. After applying it, you can check the created cluster using this istioctl command: istioctl pc cluster [pod name of Istio Ingress Gateway] --fqdn loopback-gateway.local
apiVersion: networking.istio.io/v1alpha3
kind: ServiceEntry
metadata:
  name: loopback-gateway-local
spec:
  hosts:
  - loopback-gateway.local
  ports:
  - number: 5000
    name: grpc
    protocol: GRPC
  location: MESH_INTERNAL
  resolution: STATIC
  endpoints:
  - address: 0.0.0.0
The next step is to register a listener. In Istio Ingress Gateway, we can configure the listener using Gateway CR. The following manifest registers a new listener which exposes the TCP 5000 port with the ‘loopback-gateway.local.’ host.
apiVersion: networking.istio.io/v1alpha3
kind: Gateway
metadata:
  name: loopback-gateway
spec:
  ~~~
  servers:
  - port:
      number: 5000
      name: grpc
      protocol: HTTP
    hosts:
    - "loopback-gateway.local"
3. Configure External Authorization
Now, Istio Ingress Gateway can reach its own listener using loopback-gateway.local. We set that to [envoyExtAuthzGrpc` of MeshConfig](https://istio.io/latest/docs/reference/config/istio.mesh.v1alpha1/#MeshConfig-ExtensionProvider-EnvoyExternalAuthorizationGrpcProvider).
  meshConfig:
    ~~~
    extensionProviders:
    - name: "grpc"
      envoyExtAuthzGrpc:
        service: "loopback-gateway.local"
        port: "5000"
Finally, we created AuthorizationPolicy CR to use ext_authz in the Istio Ingress Gateway. A crucial part is excluding the loopback CIDR otherwise, the loopback request will fail because the request also attempts authorization.
apiVersion: security.istio.io/v1beta1
kind: AuthorizationPolicy
metadata:
  name: ext-authz
spec:
  ~~~
  action: CUSTOM
  provider:
    name: grpc
  rules:
  - from:
    - source:
        notRemoteIpBlocks:
          - 127.0.0.0/8    # loopback CIDR
Conclusion
We confirmed that Istio met the requirement parity with our Gateway Service by creating a PoC. If Istio does not provide the functionality, but Envoy does, it can be achieved by using EnvoyFilter CR. It’s powerful but we need to use it carefully. Otherwise, it breaks the entire mesh by an incorrect configuration. When we provide these features to developers, it would be great to provide appropriate abstractions and guardrails to them. Fortunately, we already have those foundations. For abstraction, we can use CUE (ref: Kubernetes Configuration Management with CUE). For guardrails, we can use Open Policy Agent. It would be great if these could be used to create an environment that allows developers to focus on the application settings and not the Istio settings!
Tomorrow’s article will be by masartz. Look forward to it!


