The 10th day’s post of Merpay Tech Openness Month 2021 is brought to you by @Liu from the Merpay ML team.
Last time, we shared our practice of Vertex Pipelines and feature store in the Merpay Tech Fest. This time, we would like to share more details about the Vertex Pipelines used in our projects from an engineer’s perspective.
Overview
First, we’d like to introduce our legacy development and production environment for machine learning projects,
- Analysis and experiment with cloud jupyter notebooks (Vertex Notebooks)
- Training model with Legacy AI Platform Jobs
- Deploying and Serving with Legacy AI Platform Models
- Predicting pipeline with Airflow or microservices on GKE
Training, deploying in the above is usually started by the CircleCI, which runs when we create a new release at GitHub.
We are migrating our projects to Vertex AI now. The related pipelines include
- Training-deploying pipeline
- For training and deploying machine learning model.
- Experiment pipeline
- For the experiments of improving machine learning models.
- Feature ingesting pipeline
- For ingesting new data into the feature store.
- Predicting pipeline
- For getting predictions using the deployed machine learning models, including some preprocessing and postprocessing.
By creating these pipelines, we are able to notice lots of benefits of using Vertex Pipelines
- Easy to get start
- We don’t need to prepare the clusters by ourselves, so we don’t need to put lots of resources into the environment creating or managing.
- Great UI
- Great support for showing the metrics.
- Works well as an aid to writing documents.
- Native GCP support
- Great interaction with other parts of GCP (GCS, BigQuery, …)
- Lower costs, higher convenience in the experiments
- Time cost: we can easily have multiple experiments run at the same time without creating numerous notebook instances.
- Billing: The instances used to experiment will shut down after everything is finished. In the meantime, the cloud notebook can only shut down manually. When we train the model on a large dataset for the experiments, probably through the night, compared to the cloud notebook, using the Vertex Pipelines will save money on machine idling time.
- Logs: Vertex Pipelines can keep the input and output of each component, which makes the logs of the pipeline saved adequately.
(experiments here do not mean Vertex Vizier. Another post on 9/30 by @matchan will share our experience in using Vertex Vizier)
Next, we will introduce how we implement the pipelines from 4 sides, and a real project using Vertex Pipelines will be shared by @hmj on 9/21.
2 Types of components
In our investigation, there are two proper ways for us to implement components in the pipeline
- Kubeflow Pipelines SDK python function-based components
- Allow us to build our component code as a Python function and generate the component specification for us.
- Allow us to define the input-output all by ourselves.
- Able to take the pipeline run parameters as the input parameters.
- Everything needs to be written by ourselves.
- Google Cloud pipeline components
- Provide a set of predefined components for us to interact with Vertex AI.
- The input-output is usually already defined.
- Can’t take the pipeline run parameters as the input parameters (environment variables)
- Only need to call the operators instead of implementing every detail of them.
For example, if we want to use a custom python script for the training job, and a few libraries not covered by the official pre-built containers. In addition, we hope this python script is able to be used in experiments with new features. To avoid the unnecessary waste of resources in creating features, we’d like to put all the potential features in one dataset and take parts of the features for training in one run. So it’s better if this script takes the feature name list as one of its input parameters.
Let’s see how to do it in these two different ways.
For the python function-based component, we need to implement a python function train_model like this:
@component(
    base_image="us-docker.pkg.dev/vertex-ai/training/tf-cpu.2-4:latest",
    output_component_file='../component.yaml',
    packages_to_install=[
       "package-a",
       "package-b",
    ]
)
def train_model(
    project_id: str,
    feature_refs: Input[Dataset],
    dataset: Input[Dataset],
    model_artifact: Output[Model],
):

   get_training_set(feature_refs, dataset)
   preprocess()
   train()
   dump_model(model_artifact)

. . .

@dsl.pipeline(
    pipeline_root=settings.PIPELINE_ROOT,
    name=settings.PIPELINE_NAME,
)
def pipeline(
    PROJECT_ID: str,
    FEATURE_REFS_URI: str
)

. . .

    import_feature_refs = kfp.dsl.importer(
        artifact_uri=FEATURE_REFS_URI,
        artifact_class=Dataset
    )

    train_model_op = train_model(
        project_id=PROJECT_ID,
        feature_refs=import_feature_refs_op.output,
        dataset=dataset_op.output,
)

. . .
After we compiled this pipeline to a JSON file, we can use it to run multiple experiments. When we want to change the used features, we only need to set the parameter values when running the pipeline
response = api_client.create_run_from_job_spec(
    job_spec_path='pipe_pre_built.json',
    service_account=settings.SERVICE_ACCOUNT,
    parameter_values={
        "PROJECT_ID": settings.PROJECT_ID,
        "FEATURE_REFS_URI": settings.FEATURE_REFS_URI
    }
)
For Google Cloud pipeline components, we need to use the predefined component CustomContainerTrainingJobRunOp like:
from google_cloud_pipeline_components import aiplatform as gcc_aip

train_model_op = gcc_aip.CustomContainerTrainingJobRunOp(
    project=settings.PROJECT_ID,
    display_name=settings.TRAINING_DISPLAY_NAME,
    container_uri=settings.TRAINING_CONTAINER_URI,
    command=['python3', '/root/training_script.py'],
    staging_bucket=settings.PIPELINE_ROOT,
    environment_variables={
        "PROJECT_ID": settings.PROJECT_ID,
        "FEATURE_REFS": settings.FEATURE_REFS
    },
    dataset=dataset_op.output,
    training_fraction_split=1,
    validation_fraction_split=0,
    test_fraction_split=0,
)
We need to build a docker image with package-a and package-b installed to use this operator. The training_script.py needs to be built into the docker image as well. Unlike function-based component, the predefined component already defines the input and output. If we want to send some custom parameters to the training_script.py in the docker image, we must rely on the environment_variables. Sadly, the assignment to the element of environment_variables can’t be the output of other components or parameters of the pipeline; it must be JSON serializable and hardcoded into the compiled JSON file. So, it’s a little hard for us to start a set of experiments with one single compiled pipeline file.
In conclusion, it’s better not to use Google Cloud pipeline components when the components require to be highly customizable. But for simple components, it could save us some unnecessary work.
For example, creating an Endpoint on a vertex AI via the Google Cloud Pipeline Component would be as simple as:
from google_cloud_pipeline_components import aiplatform as gcc_aip

create_endpoint_op = gcc_aip.EndpointCreateOp(
    project=settings.PROJECT_ID,
    display_name=settings.ENDPOINT_DISPLAY_NAME,
)
If we use function-based components, we need to implement the creation of Endpoint via python script in a function.
Developing process
In this chapter, I’d like to explain more about how Vertex Pipelines works to aid documentation.
The first step in our pipeline development process is to decide on the overall structure of the pipeline, including the purpose, inputs and outputs of each component.
With the vertex pipeline, we no longer need to use drawing tools to draw the structure of the pipeline. We can write the design doc in python code and a nice diagram of the pipeline structure will be generated. In python code, we create a pipeline that connects some empty function-based components with input-output defined.
With the python code and the generated diagram, we put them together in a document and maybe write a little more explanation. We can then have our team members and stakeholders review the design.
Once the design of the pipeline is fixed, we will start developing each component.
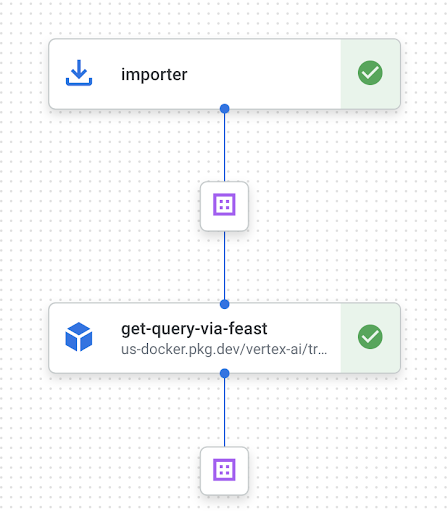
We will create sample data of the inputs and outputs for each component. By using the kubeflow SDK’s importer to import the sample inputs, we can create a 2-components pipeline as shown below. This pipeline allows us to develop each component individually, which will make it easier to test and review code.
Another benefit is that we can work together for a pipeline by implementing components in parallel.
An example of using the importer is as follows
import_feature_refs = kfp.dsl.importer(
    artifact_uri=settings.FEATURE_REFS_URI,
    artifact_class=Dataset
)

get_query_via_feast_op = get_query_via_feast(
    feature_refs=import_feature_refs.output
)
Common components
We have at least four types of pipelines, and each machine learning project has some of the pipelines mentioned earlier.
For these pipelines, they share some common components such as fetching features from the feature store or saving data to BQ / GCS. For these common components (not provided in Google Cloud pipeline components), we compile and manage them as YAML files to save engineer resources.
When a function-based component specifies the output_component_file in the decorator, the component will be saved as a YAML file when the pipeline is compiled. We will create the component YAML file with the 2-components pipeline mentioned earlier.
@component(
    base_image="python:3.7",
    output_component_file='../component.yaml'
)
def common_component_b():
    do_something()

from kfp.v2 import compiler

@dsl.pipeline(
    pipeline_root=settings.PIPELINE_ROOT,
    name=settings.PIPELINE_NAME,
)
def pipeline():
   common_component_b_op = common_component_b()

compiler.Compiler().compile(
    pipeline_func=pipeline,
    package_path=settings.PIPELINE_PATH
)
With the generated YAML files of common components, The file directory tree is as below.
.
├── project_a
│   ├── components
│   │   ├── custom_component_a
│   │   │   └── src
│   │   │       ├── __init__.py
│   │   │       └── custom_component_a.py
│   │   ├── custom_component_b
│   │   │   └── src
│   │   │       ├── __init__.py
│   │   │       └── custom_component_b.py
│   ├── pipelines
│   │   ├── __init__.py
│   │   ├── training_deploying_pipeline.py
│   │   ├── experiment_pipeline.py
│   │   ├── feature_ingesting_pipeline.py
├── project_b
│   ├── pipelines
│   │   ├── __init__.py
│   │   ├── training_deploying_pipeline.py
└── common
    └── components
        └── common_component_a
            └── src
                ├── __init__.py
                └── common_component_a.py
            └── component_v1.yaml
        └── common_component_b
            └── src
                ├── __init__.py
                └── common_component_b.py
            └── component_v1.yaml
            └── component_v2.yaml
When we need to use these common components in a pipeline, we will load the YAML files instead of importing the python functions.
_common_component_b = kfp.components.load_component_from_file('common/components/common_component_b/component.yaml')

@dsl.pipeline(
    pipeline_root=settings.PIPELINE_ROOT,
    name=settings.PIPELINE_NAME,
)
def pipeline():
   common_component_b_op = _common_component_b()
The advantage of using YAML files is when a common component needs to be updated, but we don’t want to update all the pipelines that use it. By version controlling the YAML file, we can update the components without affecting all the pipelines.
Condition and Auto-ML-Model-Maker
In this capture, we’d like to share a little about our future plan for the Auto-ML-Model-Maker.
By using kubeflow SDK, we can choose whether to deploy a model by the evaluation result of it.

with dsl.Condition(
    eval_model_op.outputs["dep_decision"] == "true",
    name="deploy_decision",
):
    model_upload_op = model_upload(train_model.outputs["model_artifact"])
...
This feature takes us one step closer to our goal.
We will create a training-deploying pipeline that can be triggered when a new feature is ingested into our feature library.
With the Condition, after the pipeline trained and evaluated the model, the model can be deployed and start serving automatically if the evaluation results meet some conditions that we have decided beforehand.
For our ML engineers, we have spent lots of time on improving the current models, especially in the field of fraud detection where we always need to retrain and improve the models to deal with new fraud types.
With Auto-ML-Model-Maker, we can save time on some repetitive work while the current models will keep improving themselves.

