* This article is a translation of the Japanese article written on September 8, 2021.
Hello. This is yusuke_h from the Merpay iOS Team.
This article is for day 6 of Merpay Tech Openness Month 2021.
Today’s topic is, "multi-module development to support Merpay scalability." In this article, I’ll be covering the development approach currently used by the Merpay iOS Team and how it got this way.
Background
An enormous number of modules
We’ve developed a wide variety of features since Merpay’s release.
It got to the point where modules were becoming larger each time a feature was added, and this was causing all sorts of problems. First, the build process was taking longer. Second, it became increasingly difficult to figure out which features were contained in a given module. Finally, multiple people were making changes to the same module more often, which made it easier for conflicts to occur.
Longer build times
Previously, the development app was a single app combining all modules. As the number of features grew, so did the amount of source code. This also increased build times. This was especially true for the source code for modules involved in the dashboard, which is the top screen of the Merpay tab on the Mercari marketplace app. We couldn’t expect to improve build times simply by creating apps at the single module level.
While we were struggling with this issue with build times, we also introduced Xcode Previews. Xcode Previews allows us to view previews of views implemented with code. Being able to instantly see previews of views implemented with code meant that we could make detailed view adjustments simply by checking out the preview. This feature really helped to improve development efficiency. However, we ran into the same problem with Xcode Previews; it would take a long time to build a preview if a single module was too large.
We really began to feel the need to improve development efficiency by reducing build times per module, and we decided to introduce some mechanism to separate the larger modules into smaller modules and to define new features as new modules.
Lack of feature transparency
Build times weren’t our only issues. A single module would have various features implemented within it, so it was difficult for developers to manage which features were in what modules. I’ll use the dashboard module, which used to be an actual Merpay module, as an example to explain.

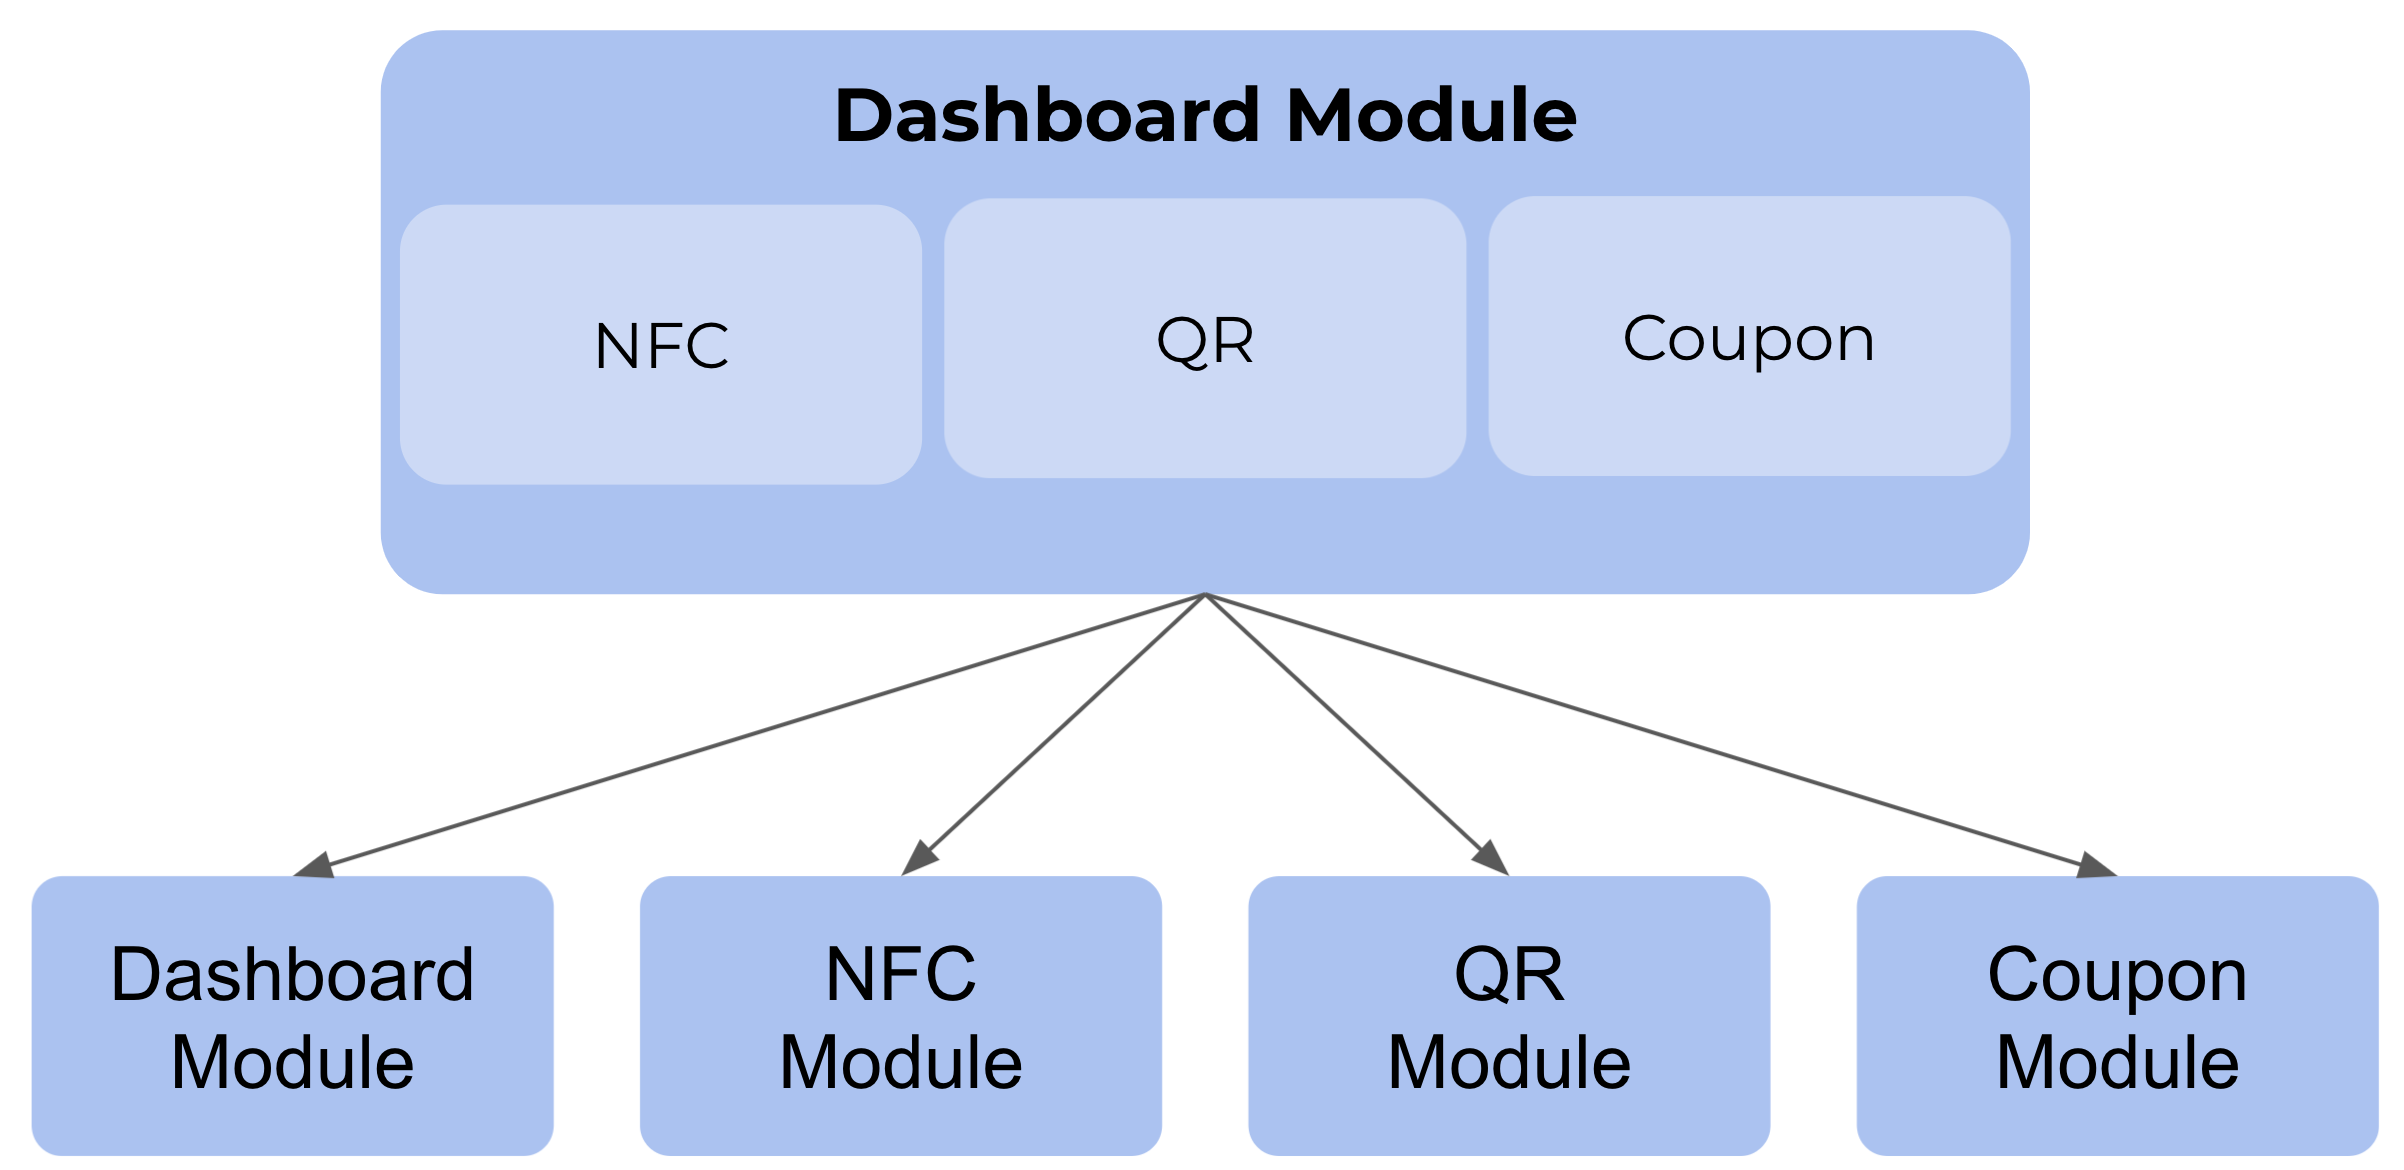
The dashboard contains various features. NFC combines several features required for iD payment. This includes not only features for making iD payments, but the settings screen and tutorial page for iD payments. QR combines several features required for QR payment. As with NFC, it combines payment with other related features. The dashboard also has a coupon feature. This contains several features, including displaying coupons on the Merpay screen and obtaining coupons for display.
The dashboard also has some additional features, such as history and passcode features. These features never shared many dependencies, but they were all implemented in a single module we called "dashboard." This could make it difficult for developers to find or use features.
For this reason, we thought it would better suit Merpay now to adopt a development approach where features are separated by meaning, and individual modules are created for each feature.
Conflicts
Work at Merpay is generally done on a project basis. The engineers on each team work within their assigned projects. It can be difficult to know what the engineers on your own team are doing for other projects.
The Merpay iOS Team often encountered conflicts caused by the same module being changed within multiple projects. A feature branch would generally be taken for each project, but this often resulted in massive conflicts when changes were merged with the master branch by people on other projects.

In order to prevent these kinds of conflicts, we needed to avoid situations where changes would be made to the same module within multiple projects. The first solution that came to mind was to create separate modules for each project. We decided that the ideal way to do this would be to separate modules at the feature level.
Adopting multi-module development
Separating existing modules
In order to adopt multi-module development, we first needed to separate existing modules by feature. I’ll use the same dashboard module from above to explain.
As I mentioned earlier, the dashboard module contained various features such as NFC and QR. The goal of multi-module development is to create a separate module for each of these features, so we separated the dashboard module into discrete modules for each feature. In addition to the dashboard module, we now had several new modules, including the NFC module and QR module. This meant that Merpay modules were now structured by feature, which meant that individual modules could be created and managed at the project level.

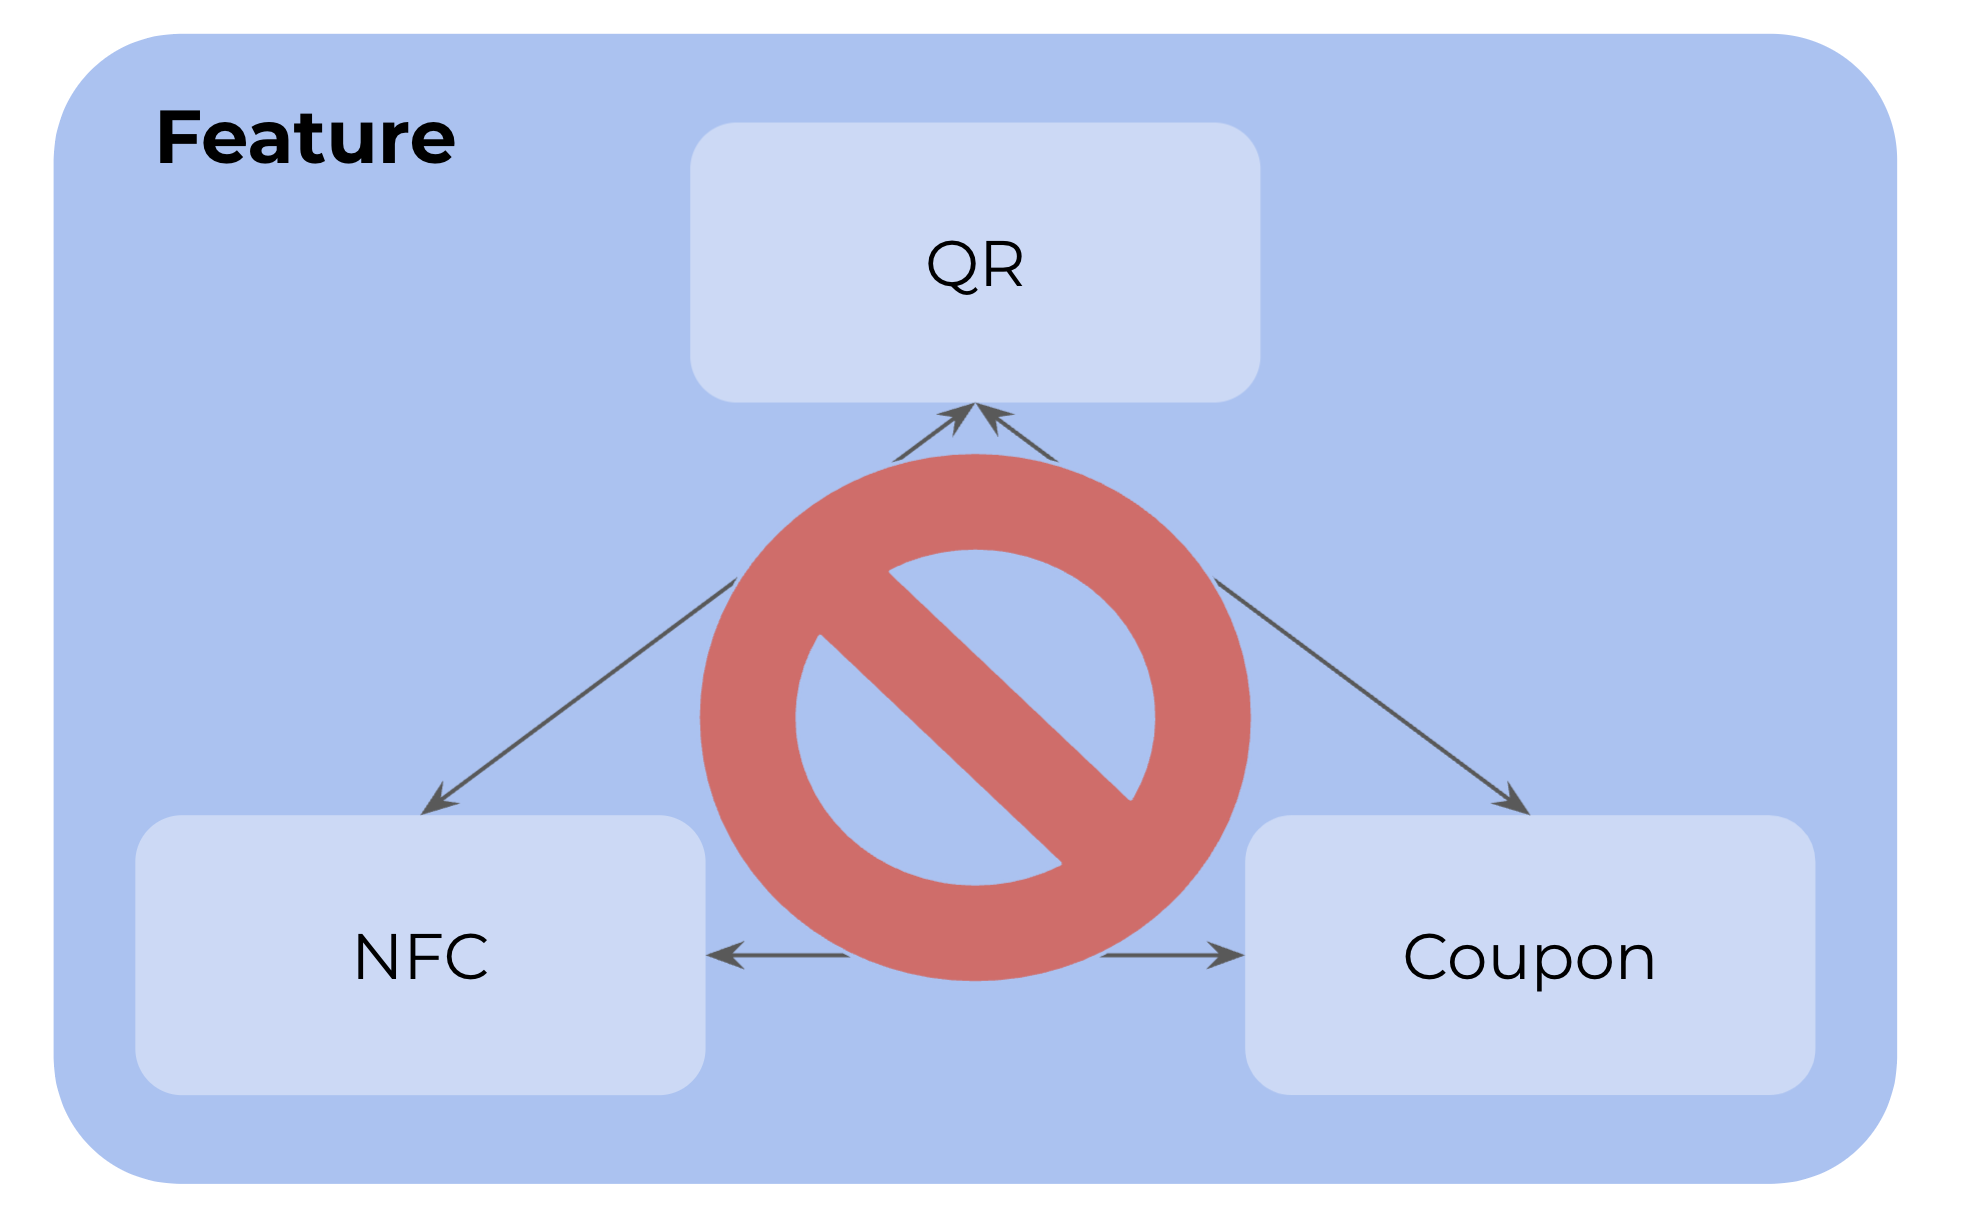
Although the modules were not coupled very tightly together, they also aren’t totally independent from one another. A great example is screen transitions between modules. For example, imagine a coupon (coupon module) being used for iD payment (NFC module). This would result in a screen transition between these two modules.
The team also discussed the need to apply multi-module development concepts even in how modules are linked. In the next section, I’ll explain how we linked modules.
Links between modules
Adopting multi-module development meant that there were more modules than before. We would also be creating new modules whenever we developed new features. A module with a feature is called a feature module. If these feature modules directly reference one another, their dependencies would become more complicated and difficult to manage. For example, imagine there are ten feature modules. If we imagine each of them directly referencing the others, that would result in 45 combinations. This development approach would result in the creation of more and more new modules, and it would soon become unmanageable. Furthermore, any components we develop that used multiple feature modules would need to be defined for each feature module, which would increase the amount of code. This would also be very difficult to maintain. If we want to change a component in a module, we’d also need to modify that component in other modules.

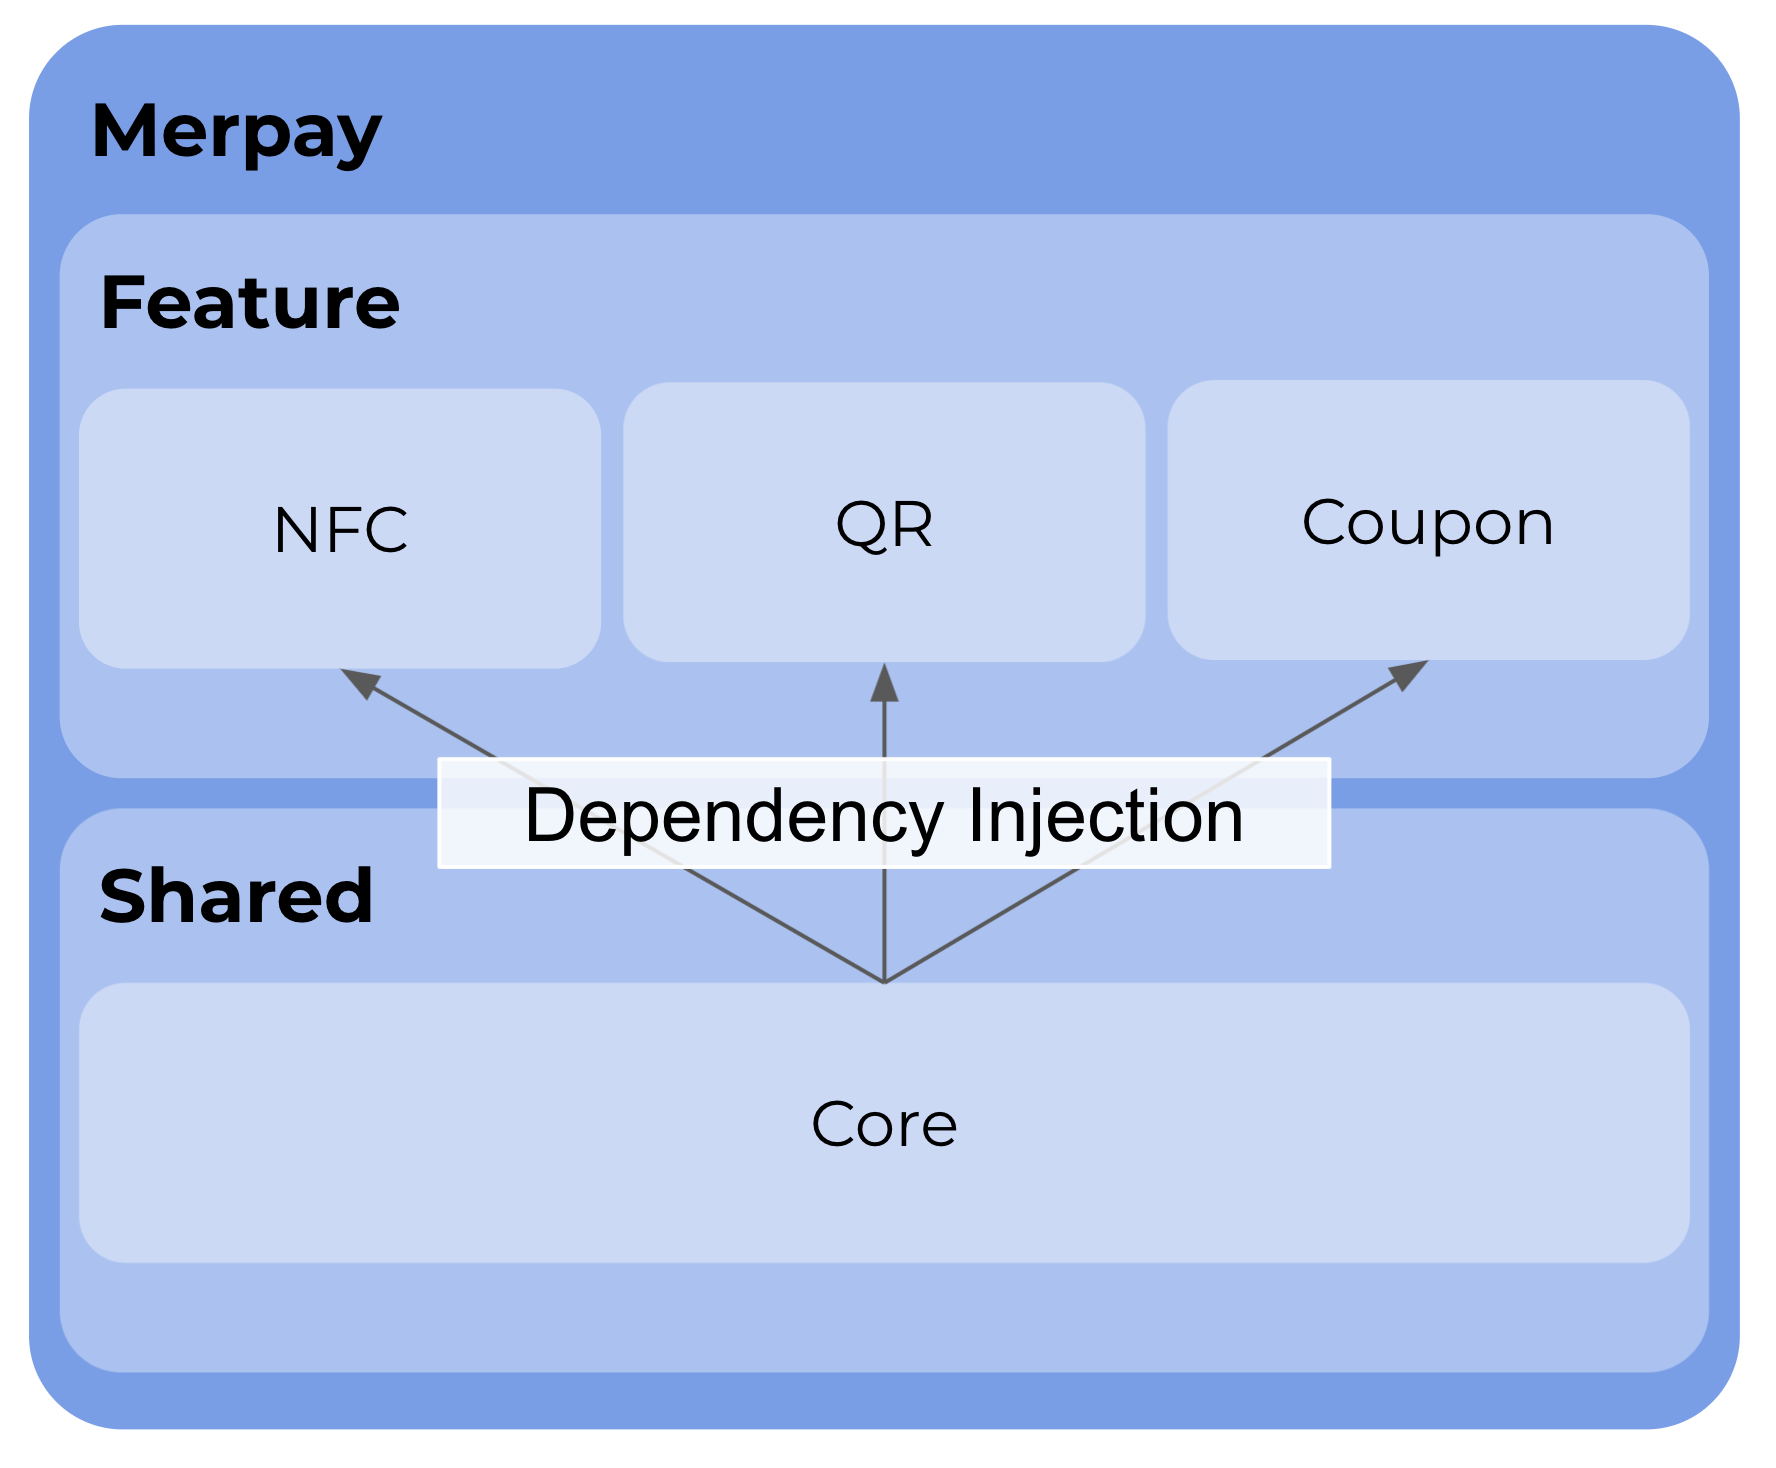
We decided, then, to create a core module (a type of shared module) separate from the feature modules, that could be shared and used between feature modules. Features, components, and anything else we want to use with multiple modules are defined in the core module. We then incorporated dependency injection and implemented the screen transition feature there, to serve as a mechanism for screen transitions between feature modules. Using dependencies in feature modules allows us to obtain screens and other elements from other modules.

Using a core module means that we only need to define features used in multiple modules once. This made things much easier. Dependency injection also made it easier to manage the links between feature modules. In the next section, I’ll explain how the core module is used to implement screen transitions between feature modules.
Screen transitions between modules
I mentioned screen transitions between feature modules as an issue with multi-module development. For Merpay, we took an approach of requesting a ViewController for this, which is the same method used in Mercari. I’ll be discussing some actual code here.
In order to request a ViewController in Merpay, we defined something called MerpayScene in the core module. This was implemented as shown below.
public enum MerpayScene {
    case nfcKit(scene: NFCKitScene)
    case qrKit(scene: QRKitScene)
    case couponKit(scene: CouponKitScene)
    ...
}

extension MerpayScene {
    public enum NFCKitScene {
        case nfcScene1(argument: NFCKitScene1Argument)
        case nfcScene2(argument: NFCKitScene2Argument)
        ...
    }
}

extension MerpayScene {
    public enum QRKitScene {
        case qrScene1(argument: QRKitScene1Argument)
        case qrScene2(argument: QRKitScene2Argument)
        ...
    }
}

...
A screen shared between modules is defined as a "scene." We use nested enums to define scenes for each module. This helps prevent omissions and serves as a good code base for future revisions and additions. We also define arguments, allowing us to call ViewController even if the ViewController request contains arguments within it. The argument class is defined in a separate file. The following is an example. This is also defined similarly in the core module.
extension MerpayScene {
    public struct NFCKitScene1Argument {
        public let foo: String
        public let bar: Int64

        public init(foo: String, bar: Int64) {
            self.foo = foo
            self.bar = bar
        }
    }
}
Next, we implement the function for requesting ViewController, which actually uses MerpayScene. We define a protocol called MerpaySceneFactoryType, which contains viewController (the function used to call ViewController). Next, we create a class called MerpaySceneFactory, which implements this protocol. This class has the factories as a class property. Also registered here is SceneFactory, which is implemented in each module by the register function. When a ViewController is actually called, each registered factory is checked in order, and the ViewController for the first matching request is returned. An instance of this MerpaySceneFactory is stored in the SceneFactory property in DependencyType.
public protocol MerpaySceneFactoryType {
    func viewController(scene: MerpayScene, dependency: Dependency) -> UIViewController?
}

public class MerpaySceneFactory: MerpaySceneFactoryType {
    private var factories: [MerpaySceneFactoryType] = []

    public func register(factory: MerpaySceneFactoryType) {
        factories.append(facotry)
    }

    public func viewController(for scene: MerpayScene, dependency: Dependency) -> UIViewController? {
        for factory in factories {
            if let viewController = factory.viewController(for: scene, dependency: dependency) {
                return viewController
            }
        }
        return nil
    }
}
public protocol DependencyType {
var sceneFactory: MerpaySceneFactoryType { get }
}So far, I’ve covered what needs to be implemented in the core module. Next, I’ll discuss the implementation of SceneFactory in each module. I’ll use the NFC module’s NFCKitSceneFactory as an example. This is where the function for calling the NFC module screen from other modules is implemented. As shown below, we implement the MerpaySceneFactoryType defined in the core module. This protocol contains the viewController function, which is the function that’s actually called when a ViewController request is made. Predefined arguments for each case are used to create the ViewController, which is then returned. One point to note here is that scene (used as an argument for the viewController function) contains the entirety of MerpayScene. We need to ensure that requests for modules other than the NFC module are discarded within the NFC module. This is done by the guard statement on the first line of the function.
import Core
final class NFCKitSceneFactory: MerpaySceneFactoryType {
    func viewController(for scene: MerpayScene, dependency: Dependency) -> UIViewController? {
        guard case .nfcKit(let scene) = scene else { return nil }
        switch scene {
        case .scene1(let argument):
            return NFCKitScene1ViewController(
                argument: .init(foo: argument.foo, bar: argument.bar),
                dependency: dependency
            )
        case .scene2(let argument):
            return NFCKitScene2ViewController(
                argument: .init(foo: argument.foo, bar: argument.bar),
                dependency: dependency
            )
        ...
        }
    }
}
The SceneFactory properties created for each module are registered in MerpaySceneFactory within the core module (discussed above), and these need to be passed to Dependency. This implementation is described below. In the application function, a MerpaySceneFactory instance is created, and a SceneFactory is registered for each module. Then, the MerpaySceneFactory instance is passed as an argument to this Dependency instance, and Dependency is passed to RootViewController. This Dependency is passed during each ViewController transition, allowing for screen transitions to be made between modules.
import Core
import NFCKit
import QRKit
import CouponKit

func application(xxx, didFinishLaunchingWithOptions ...) -> Bool {
    ...
    let sceneFactory = MerpaySceneFactory()
    sceneFactory.register(NFCKitSceneFactory())
    sceneFactory.register(QRKitSceneFactory())
    sceneFactory.register(CouponKitSceneFactory())
    let dependency = Dependency(
        ...,
        sceneFactory: sceneFactory
    )
    let rootVC = RootViewController(dependency: dependency)
    window?.rootViewController = rootVC
    ...
}
Finally, let’s take a look at the code used for actually calling the NFC module screen from another module. You can find a description of this implementation below. As explained above, we can always expect ViewController to have Dependency, so we call our screen (.nfcScene1) from there. When doing so, we pass arguments defined in the core module. Although the expected ViewController will generally be returned, there are cases where the ViewController won’t be able to be created properly due to arguments or the like. The viewController function is optionally returned and so the request is described using the guard statement. Once the ViewController is obtained, push and present are used to perform screen transitions. The nice thing about this ViewController request is that the transition method can also be defined by whatever is performing the call. Previously, we needed to implement screen transitions between modules.
import Core

final class SceneViewController: UIViewController, Instantiatable {

    init(argument: Argument, dependency: Dependency) {
        self.dependency = dependency
        ...
    }

    private let dependency: DependencyType

    func showNFC() {
        guard let vc = dependency.sceneFactory.viewController(
            for: .nfcKit(scene: .nfcScene1(argument: .init(foo: foo, bar: bar)))
        ) else { return }

        navigationController?.pushViewController(vc, animated: true)
    }
}
MerpayScene here allows us to perform screen transitions between modules, without needing modules to reference each other. This means that all ViewControllers in a module can be internal. It’s important to note here that what’s returned by the viewController function in order to perform screen transitions is an abstract class called UIViewController. This feature cannot obtain the class for the screen of one module, from another module.
Summary: Implementing multi-module development
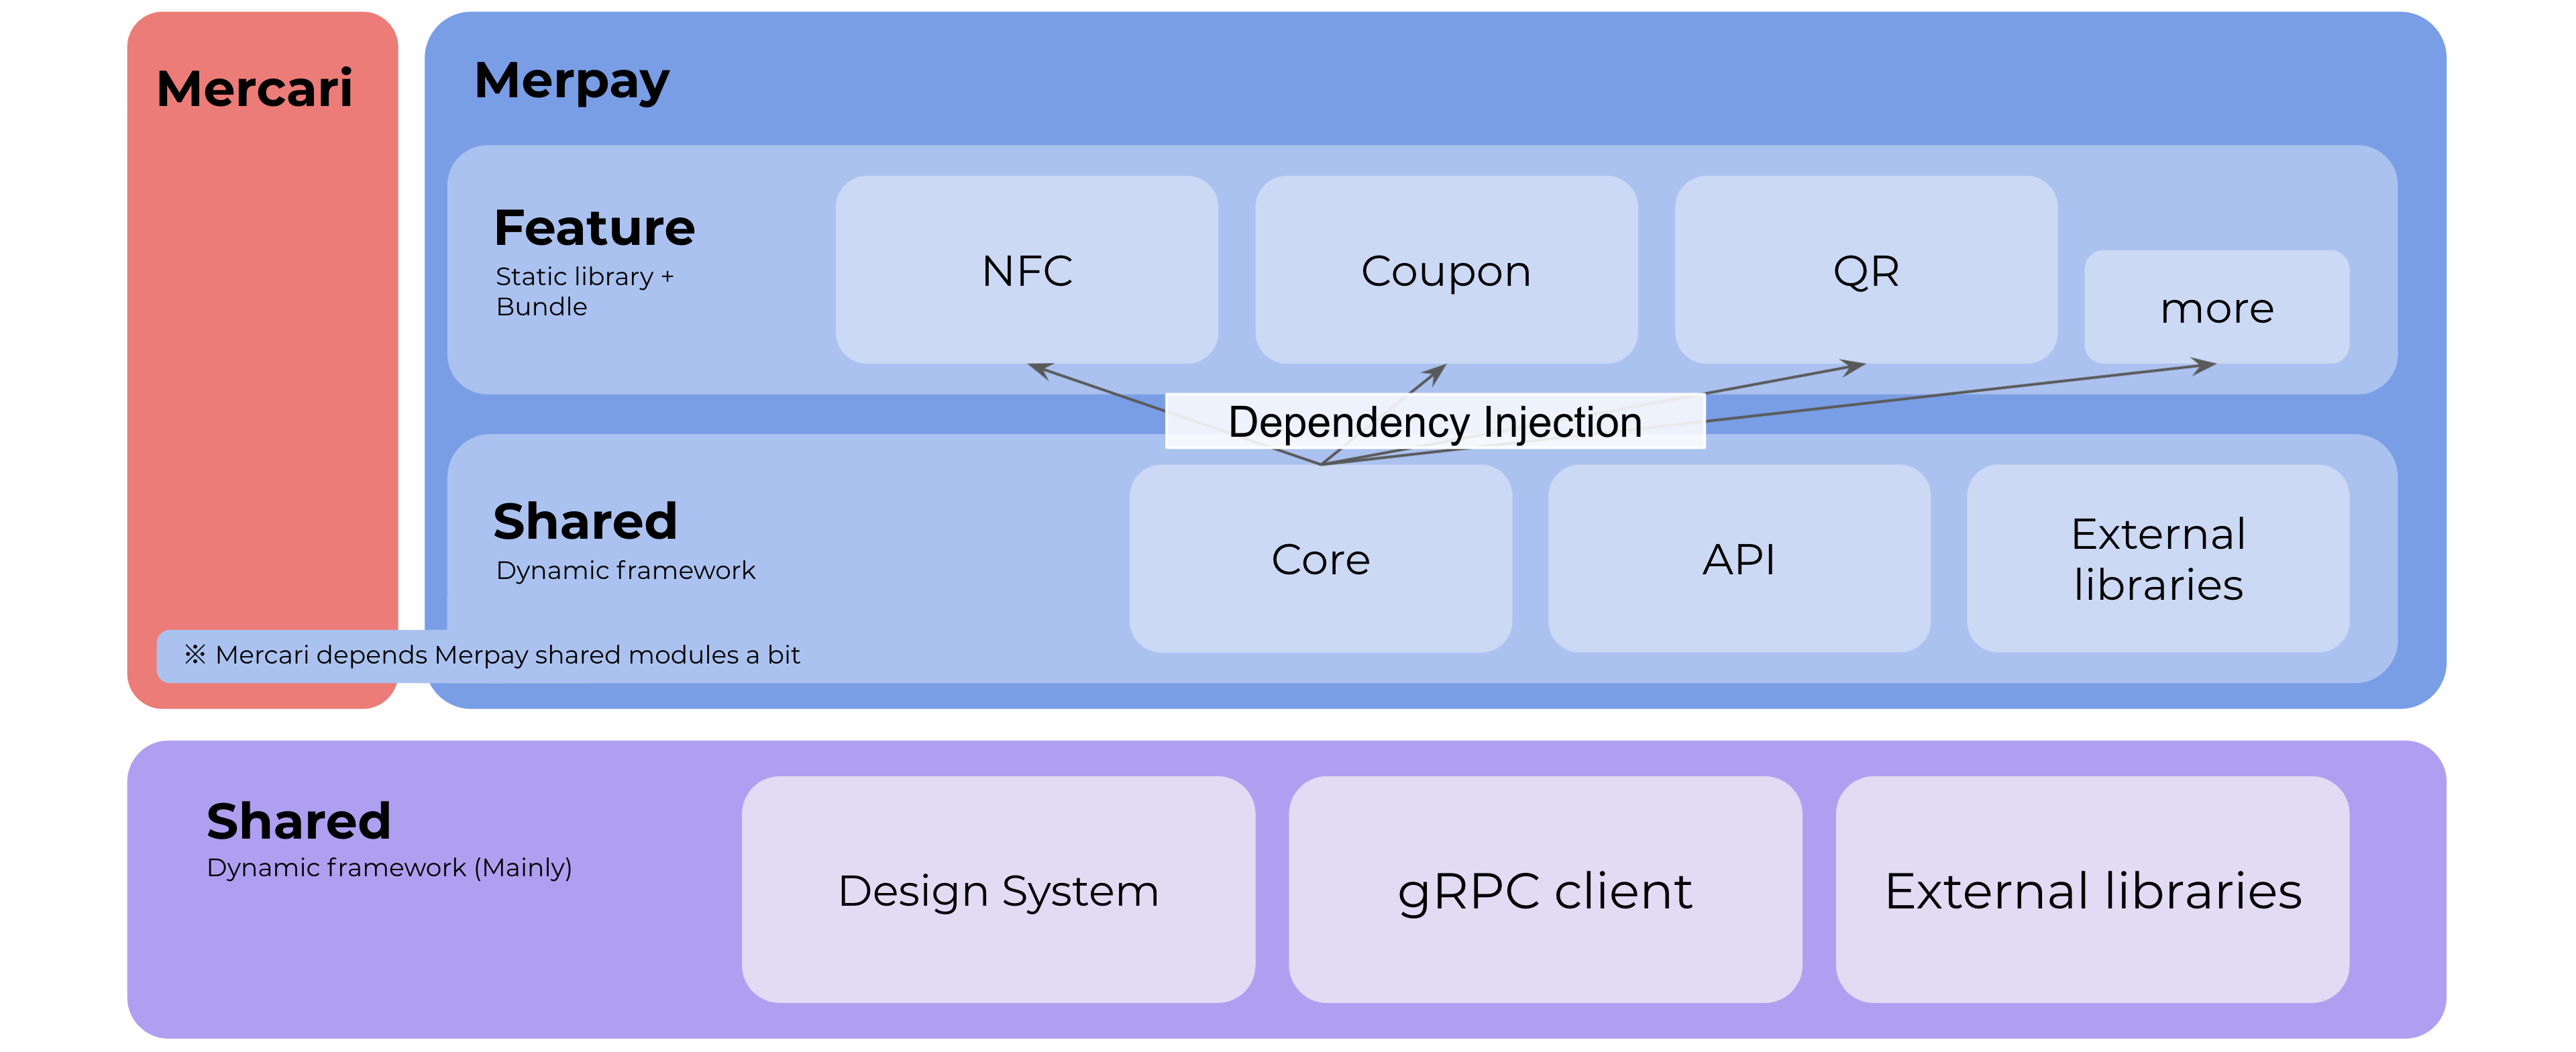
Based on the problems we were experiencing (described in the "Background" section), we decided to separate our existing modules by feature. We then ran into the issue of links between modules. We resolved this by introducing the core module (a shared module) and using dependency injection. This allowed us to achieve a clean structure without any dependencies between modules. The full structure for Merpay can be found below.

I already covered the core module, but you can see that there are also other shared modules, such as the API module for calling APIs. Merpay also provides features as SDKs to Mercari, so there are some modules used by both Mercari and Merpay. One major example is the design system module, which collects UI components defined to standardize the design of Mercari and Merpay. Also, a combined Mercari and Merpay Dependency is used as the Dependency in Merpay.
Each feature module performs static linking, so increasing the number of feature modules won’t have any impact on app startup time. This provides for a very scalable structure. Furthermore, separating modules by feature has made independent development easier, as well as made it harder for conflicts to develop. Finally, there’s no need to build the entire code for Merpay, and we can create sample apps for each feature module. This has improved development efficiency. I’ll discuss this later on.
The multi-module development approach means that we create a new module whenever a new feature is developed. This provides engineers involved in development with ownership of these modules, and they can watch as the modules grow, which should help keep engineers motivated.
Developments since implementing multi-module development
New feature development process
We’re still developing new features for Merpay. There are plenty of opportunities to add new features. Toward that end, we’ve also prepared mechanisms for creating new modules for new features. We’re developing a template module that contains the bare minimum features a new module would require. We’ve also created a shell script (init_framework.sh) for using this template module to create new modules. We use the following process to use this shell script to develop new features.
- Create new module
./bin/init_framework.sh MerpayNewFeatureKit - Create feature branch
git checkout -b feature/merpay-new-feature - Merge with main branch daily while working on feature branch (or lower)
- Build Mercari on feature branch, and perform QA
This is the procedure we use for development. Lately, we’ve adopted a development approach where we use feature flags and avoid using feature branches whenever possible. I’ll discuss this in the next section.
Trunk-based development
There’s an issue with the development approach of developing new features on feature branches taken from a main branch. The problem here is that the changes cannot be merged with the main branch until the new feature has been completed, and this can result in pull requests with massive changes. Merging can then have a significant impact on other branches, which can result in many conflicts and reduce development efficiency. Furthermore, the possibility of there being conflicts in the feature branch itself increases along with the number of feature branches. This can result in an enormous management cost until development is completed, which also reduces development efficiency.
This led us to consider adopting trunk-based development. In trunk-based development, new features are rapidly merged with the main branch. This can reduce management costs, and can also decrease the risk of conflicts during merging.
In order to adopt this development approach, we took the approach of not linking to Mercari until a new feature is released. We adopted this approach with the understanding that we could include new modules in the main branch without causing problems, as long as they were not linked with Mercari. We now use trunk-based development to develop new modules, where we merge with the master branch but do not link with Mercari.
We also use feature flags when developing new features in existing modules, to control the release of new features. However, this can cause an issue if features are included in the app binary, so we use feature branches for release control without incorporating trunk-based development. We now use a hybrid development approach for Merpay, where we use both trunk-based development and development using feature branches. An example of using a feature flag is shown below. Processing can be changed based on whether the feature flag is enabled. In the following example, the destination screen is switched depending on whether the feature flag is enabled.
func showNFC() {
    let scene: MerpayScene
    dependency.merpayFeatureFlag.result(from: .showNewNFCScene).isVariant {
        scene = .nfcKit(scene: .nfcScene1(argument: .init(foo: foo, bar: bar)))
    } else {
        scene = .nfcKit(scene: .nfcScene2(argument: .init(foo: foo, bar: bar)))
    }

    guard let vc = dependency.sceneFactory.viewController(for: scene) else { return }
    navigationController?.pushViewController(vc, animated: true)
}
Sample apps
As I mentioned in the "Background" section above, we previously used a single development app containing all features. However, build times were increasing as we added new features. To resolve this, we tried creating sample apps at the module level. By developing sample apps at the module level, we could dramatically reduce build times since other feature modules were not included. I measured the build time for an app containing all features, and the build time for a couple of feature module sample apps. The results are shown below.
| Single combined app | Dashboard app | NFC app |
|---|---|---|
| 166.26(s) | 81.63(s) | 66.10(s) |
Arranged in order from most code to least code, we have Single combined app > Dashboard app > NFC app. The order for build time is the same as for code amount. We can also run unit tests and previews within each feature sample, and this has dramatically increased development efficiency compared with using just a single combined app. This has left us with a much more scalable development platform.
Issues with multi-module development
So far, I’ve covered how multi-module development has improved things. However, we’ve also encountered some issues. The first issue is that domain knowledge tends to gather among individuals, because features are developed independently without much knowledge of other modules. We can help make up for this by sharing knowledge during team meetings. Members of the Merpay iOS Team take turns making weekly presentations. The second issue is migrating features to shared modules. We generally need to migrate any features used by multiple modules to a shared module. However, migrating too many modules will increase the size of the shared modules, which can somewhat negate the benefits of multi-module development. We haven’t been able to find any best practices on this, so we plan on searching for a good approach to take.
We’ve also encountered various other issues, such as what would happen if we made a total migration to trunk-based development (discussed previously). The team plans to discuss how to improve the environment to increase scalability and make development easier.
Summary
We were able to adopt a development approach that better suits Merpay today, by introducing multi-module development. This development approach is very scalable, and provides us with a good platform for rapidly developing new features. Multi-module development has also made branch management possible, providing us with an even better development environment. You can expect some great new features coming to both Merpay and Mercari. Thank you for reading!
Acknowledgements
The mechanism introduced in this article was proposed by team member @masamichi. @ku, also on the iOS Team, was the first to suggest MerpayScene, which was a huge help. Finally, @kenmaz, also on the same iOS Team, helped with implementing multi-module development. Thank you everyone!
Related materials
iOS Tech Talk: Multi module strategy session
https://www.youtube.com/watch?v=5p6h5yiQ2PQ
iOS Tech Talk: Multi module strategy session vol. 2
https://www.youtube.com/watch?v=glpfnnDDaz8


