Introduction
Hello everyone, my name is Karuna Murti, and I’m working as tech lead for Merpay’s Cash I/O team. Happy holidays!
Today I want to bring you the 25th post of the Merpay Advent Calendar 2020, just right on time for Christmas.
The Cash I/O team works closely with external financial institutions (banks). Our team connects Merpay customers to banks by enabling bank account registrations and charging from bank accounts. Our team also do development for financial institutions related services such as ATMs, which presents a different kind of challenge for software engineers, especially compared to regular API based programming.
One of the main reason is because of the black box nature of the machines. At Merpay we always try to make the best product for our customers by ensuring our backend and mobile applications are bug-free, so software engineers and QA members have to go back and forth to make appointments with financial institutions and do black box QA on site.
Before this blog post, and the related improvement, we used various command line tools and locally ran web applications to do regression testing. QA team members had to run the command line tools, click the link to open a generated QR code, continue on the command line, copy the result, input the result into the web application, copy the result again, input the result another time and so on. The various applications did their job perfectly, but it was time consuming and surely as software engineers we can do better than that.
I was originally planning to make a web application that does everything in a single application interface to help QA team members do their regression testing. The original plan was to make the application in JavaScript, but as an engineer that has particular interest in the Rust programming language I decided to make the web application in Rust. Especially as web development is no longer limited to JavaScript and all major browsers have shipped with webassembly support since November 2017.
What is webassembly? It’s basically specifications for instruction sets for virtual machines, specifications for a binary format, and specifications for virtual machines which is then implemented in all major browsers (Google Chrome, Microsoft Edge, Mozilla Firefox, Safari, mobile browsers). Webassembly is still in the early stages and there are many things that are not defined yet, for example the team has not defined the file manipulation interface yet. But just like HTML, JS and CSS, it’s expected to revolutionize how people communicate in the future.
You can make a program in your favorite programming language, compile it to a binary format supported by the webassembly virtual machine and it will be running on the virtual machine, which was implemented by the browser.
The Application
Let me show you an example on how to make a webassembly application using Rust programming language and the Seed web frontend framework. Seed is influenced by JavaScript frameworks like Elm, React and Redux, so if you are familiar with front end development using those frameworks you can do it quickly. It follows the Elm or Model View Update (MVU) architecture
Scope
First let’s establish what we are going to make. For this example we are going to make something similar to what Merpay is doing.
- Show a landing page
- Generate a QR code and show the QR code to the customer
- Input the confirmation code
- Simulate inserting money (by inputting the amount)
- Validating the amount because it’s not a real ATM
- Send the data to the backend server
- Finally, show the result on the screen
Preparation
Next, let’s prepare the development environment.
Install Rust on your machine by installing rustup, an installer for the Rust programming language https://rustup.rs/.
After that download the Rust support for your text editor or programming IDE. I like to use Visual Studio Code with the rust-analyzer extension
Rust uses cargo as its package manager and should already be installed, but people have also expanded its use with development related tools such as building, linting, etc.
For Seed projects we also need cargo-make as a build tool. Install it by running cargo install cargo-make
Development
Now that our development environment is ready, let’s start building our Rust web application.
-
Let’s make an application skeleton using a template from the Seed quickstart repository
cargo generate --git https://github.com/seed-rs/seed-quickstart.git --name sampleapp -
On the first terminal window, let’s make a watcher to watch source code changes and automatically builds when there’s a change in our code.
cd sampleapp
cargo make watch -
On another terminal window, run the build for the web server:
cargo make serve -
Then to open the generated web application, open http://localhost:8000 in your web browser.
Congratulations, you just made your first webassembly application!
Please take a look at the filesrc/lib.rsinside the generated application, this is where we’re going to edit our application. -
The first thing we are going to do is the QR code generation. Let’s add our QR code handler
Cargo package is called crate, and you can search libraries that people have made available for public in https://crates.io/
First add dependencies to generate QR code toCargo.tomlfile.[dependencies] … qrcodegen = "1.6.0"Then let’s add a struct to store QR code data on
lib.rsuse qrcodegen::{QrCode, QrCodeEcc}; ... #[derive(Default, Debug)] struct Qr(String);After that, let’s implement the QR code data generation. Usually web developer put
<img src="/somefile.jpg">as their tag, but theimgtag inside html also accepts binary data as its source, so we can generate a QR image programatically and append that data to theimgtag.const SVG_HEADER: &'static str = "data:image/svg+xml;base64,"; impl Qr { pub fn new() -> Qr { Qr(String::from("Hello Merpay")) } pub fn qr_data(&self) -> String { let qr = QrCode::encode_text(&self.0, QrCodeEcc::High); let svg = qr.unwrap().to_svg_string(4); let encoded = base64::encode(svg); format!("{}{}", SVG_HEADER, encoded) } pub fn as_bytes(&self) -> Vec<u8> { self.0.as_bytes().to_owned() } } -
For the message popup, we want to have two kinds of notification: regular popup and error popup. Let’s make an enum to handle that.
#[derive(PartialEq)] pub enum MessageType { Error, Notification, } -
We are going to need some kind of marker to know which part of the application the customer is at. Let’s make another enum to do this.
#[derive(PartialEq)] pub enum ViewNavigation { HomePage, QrPage, InsertCodePage, InsertMoneyPage, FinishScreenPage, } pub struct Model { pub view_navigation: ViewNavigation, pub message: String, pub message_type: MessageType, pub show_message: bool, pub qr_code: Qr, pub inserted_company_code: String, pub amount: u32, } impl Model { pub fn show_error(&mut self, error: &str) { self.message = error.to_string(); self.message_type = MessageType::Error; self.show_message = true; } pub fn show_notification(&mut self, notification: &str) { self.message = notification.to_string(); self.message_type = MessageType::Notification; self.show_message = true; } pub fn hide_message(&mut self) { self.message.clear(); self.message_type = MessageType::Notification; self.show_message = false; } } -
We are going to send requests and receive responses, so let’s make the appropriate container for that. We are going to use serde for serialization and deserialization from Rust’s struct to json and vice versa.
Add dependencies toCargo.toml[dependencies] ... serde = { version = "1.0", features = ["derive"] } serde_json = "1.0"Add structs to handle requests and responses. For this tutorial we’re just going to make very simple structs.
#[derive(Serialize, Deserialize)] struct Request { amount: String, } impl Default for Request { fn default() -> Self { Request { amount: String::new(), } } } #[derive(Serialize, Deserialize)] pub struct Response { result: bool, } impl Default for Response { fn default() -> Self { Response { result: false, // we want to make sure this changed if we get success response } } } -
Seed, just like Elm and React, works via a messaging system. Let’s define the messages that we are going to use in the application.
Since we are going to handle keyboard events, let’s includeweb_syscrate as a dependency.web_sysis a crate for rust binding for web api.
Let’s include that dependency inCargo.toml[dependencies] … web_sys = "0.3”Let’s implement all the messages that we are going to use.
use web_sys::KeyboardEvent; ... pub enum Msg { Home, QrPage, InsertCodePage, CodeKeypress(KeyboardEvent), CodeChange(String), InsertMoneyPage, AmountKeypress(KeyboardEvent), AmountChange(String), MoneyInserted, GetResult(seed::fetch::Result<Response>), HideMessage, } -
Now that we have messages ready, let’s make the Update function.
First we are going to handle keyboard events. QA team members should only be able to insert numeric values, since that reflects the real situation. Make a function to handle keyboard events like this:fn prevent_non_numeric_key(keyboard_event: &KeyboardEvent, key_code: &str) { if !(vec![ "1", "2", "3", "4", "5", "6", "7", "8", "9", "0", "Enter", "Left", "Right", "Home", "End", "ArrowLeft", "ArrowRight", "Delete", "Backspace", ] .contains(&key_code)) { keyboard_event.prevent_default(); } }Notice that
web_syscrate has equivalent web apiprevent_default() -
Now let’s implement the navigation and the keyboard input. We will not implement sending the request to the backend server just yet. Most of the code below is for handling navigation, for example if the update function receives
Msg::Homeit will setmodel.view_navigationtoMsg::Homeand the view will filter what part needs to be rendered automatically.const VALID_CODE: &str = "1234"; fn update(msg: Msg, model: &mut Model, orders: &mut impl Orders<Msg>) { match msg { Msg::Home => { model.view_navigation = ViewNavigation::HomePage; } Msg::QrPage => { model.qr_code = Qr::new(); model.view_navigation = ViewNavigation::QrPage; } Msg::InsertCodePage => { model.view_navigation = ViewNavigation::InsertCodePage; } Msg::CompanyCodeKeypress(keyboard_event) => { let key_code = keyboard_event.key(); prevent_non_numeric_key(&keyboard_event, key_code.as_str()) } Msg::CompanyCodeChange(code) => { if &code != VALID_CODE { model.show_error("コード違いました・Code mismatched"); } model.inserted_company_code = code; } Msg::InsertMoneyPage => { if &model.inserted_company_code == VALID_CODE { model.view_navigation = ViewNavigation::InsertMoneyPage; } else { model.show_error("コード違いました・Code mismatched"); } } Msg::AmountKeypress(keyboard_event) => { let key_code = keyboard_event.key(); prevent_non_numeric_key(&keyboard_event, key_code.as_str()) } Msg::AmountChange(amount_string) => { // ensure valid positive number let amount_result = amount_string.parse::<u32>(); match amount_result { // user can only insert bills, no coins Ok(x) if x % 1000 != 0 => { model.show_error( "金額は1000円倍数の必要であります・Amount must be multiple of 1000円", ); } Ok(x) => { model.amount = x; } Err(_) => { model.show_error("金額が有効な数値ではありません・Amount is not a number"); } } } Msg::MoneyInserted => { model.show_notification("処理してます・processing"); model.view_navigation = ViewNavigation::FinishScreenPage; // TODO: send request to server } Msg::GetResult(Ok(response)) => { if response.result { model.show_notification(format!("成功。金額:{}・Success. Amount: {}", model.amount, model.amount)); } else { model.show_error("応答エラー・Response error"); } } Msg::GetResult(Err(_)) => { model.show_error( "応答エラー・Response error", ); } Msg::HideMessage => { log!("hiding message"); model.hide_message(); } } } -
Now let’s make a function to send HTTP requests to the backend server.
async fn send_request(
    request: String,
) -> fetch::Result<Response> {
    let mut headers = Headers::default();
    headers.add(Header::content_type("application/json; charset=utf-8";));
    Request::new("https://example.com/backend/path")
        .headers(headers)
        .method(seed::fetch::Method::Post)
        .text(request)
        .fetch()
        .await?
        .check_status()?
        .json()
        .await
}
There’s a lot of things going on in that function. First we set the function as asynchronous function.
And after that the function sets up the url, sets up the HTTP header, sets the HTTP request method to POST, sends the request to the backend server, receives the response, checks the HTTP response code, converts the response back from JSON to the internal Response struct. -
And then let’s implement the request to the backend. The request to the backend is done after the customer inserts the money, so let’s modify what’s happening after the amount is validated. Let’s do it in the
Msg::MoneyInsertedbranch of theupdatefunction.... Msg::MoneyInserted => { model.show_notification("処理してます・processing"); model.view_navigation = ViewNavigation::FinishScreenPage; let mut request = Request::default(); request.amount = format!("{}", model.amount); let request_result = reqeust.to_string(); if request_result.is_err() { model.show_error("リクエスト作るエラー・Error creating request"); } else { let request_body = request_result.unwrap(); orders.skip().perform_cmd(async move { Msg::GetResult(send_request(request_body).await) }); } } ... -
And finally we can implement the view. We can implement the view inside view function. Seed framework already has a lot of Rust macro to simplify the view and we can use it just like HTML. For example
div![]macro will be turned intodivHTML by Seed webassembly binary.
Let’s make the view structure first. This is pretty straightforward, we setmain_contentvariable which will render a view based on our navigation which we set up in the model and in enumViewNavigation. We also set up adivwhich will show notification when there’s a message to show notification. And finally there’s aview_headerwhich will be used to show different messages based on the navigation later.pub fn view(model: &Model) -> Node<Msg> { let main_content = match model.view_navigation { ViewNavigation::HomePage => view_home(), ViewNavigation::QrPage => view_qr_page(), ViewNavigation::InsertCodePage => view_insert_code_page(), ViewNavigation::InsertMoneyPage => view_insert_money_page(), ViewNavigation::FinishScreenPage => view_finish_screen_page(), }; div![ nav![ attrs! { At::from("role") => "navigation", At::from("aria-label") => "main navigation", }, div![a![ attrs! {At::Href => "/"}, img![attrs! { At::Src => "assets/merpay_logo.svg", At::Width => "112", }], ev(Ev::Click, |_| Msg::Home), ],], ], IF!(model.show_message => { div![ button![ ev(Ev::Click, |_| Msg::HideMessage), ], &model.message, ] }), main_content, ] } fn view_home() -> Vec<Node<Msg>> { vec![] } fn view_qr_page() -> Vec<Node<Msg>> { vec![] } fn view_insert_code_page() -> Vec<Node<Msg>> { vec![] } fn view_finish_screen_page() -> Vec<Node<Msg>> { vec![] } fn view_header(header_content: &Vec<Node<Msg>>) -> Node<Msg> { section![ header_content, ] } -
Now let’s implement the landing page. This page should be very simple. We are creating a button which when clicked will go to the QR page.
fn view_home() -> Vec<Node<Msg>> {
    vec![
        view_header(&vec![
            h1!["QA Tools にようこそ・Welcome to QA Tools",],
            h2!["Applicationを選んでください・Choose your Application",],
        ]),
        div![a![
            attrs! {At::Href => "/tools1"},
            ev(Ev::Click, |_| Msg::QrPage),
            img![attrs! {
                At::Src => "assets/tools1.jpg",
                At::Width => "400px",
            }],
        ],],
    ]
}
-
After that when user click the image link it will send
Msg::QrPageto the webassembly application, and theupdatefunction will change themodel.view_navigationtoViewNavigation::QrPageand themain_contentwill filter the view. Nice. Now let’s implement the QR Page. Pay attention toAt::Src, we are setting the image from the binary data that we generated in theQrimplementation.fn view_qr_page(model: &Model) -> Vec<Node<Msg>> { vec![ view_header(&(h1!["QR Code をスキャンしてください・Please Scan QR Code",].into_nodes())), div![figure![img![ id!("qr"), attrs! { At::Src => model.qr_code.qr_data(), At::Width => "300px", At::Height => "300px", } ],],], div![button![ "次・Next", ev(Ev::Click, |_| Msg::InsertCodePage), ]], ] }
-
After the customer scans the QR code using the Merpay application, Merpay will return a code that needs to be inserted. Let’s implement that page as well. On this page we have a text input which has 2 event handlers, on change and on key down. One of the convenient things is that the Seed framework already provides those helpers.
When a customer does something, the view will send a message to the webassembly application and since we already handle those messages the customer will not be able to enter non-numeric values.fn view_insert_code_page() -> Vec<Node<Msg>> { vec![ view_header(&(h1!["会社コードを入れてください・Please insert company code",].into_nodes())), div![input![ id!("company_code_field"), attrs! { At::Type => "text", At::Placeholder => "0000", At::MaxLength => "4", }, input_ev(Ev::Change, Msg::CompanyCodeChange), keyboard_ev(Ev::KeyDown, Msg::CompanyCodeKeypress), ]], div![button!["次・Next", ev(Ev::Click, |_| Msg::InsertMoneyPage),]], ], }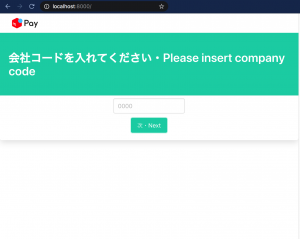
-
Next step is to make the “insert the money amount” page. This page is basically the same as the previous page, but we add an amount handler in the code because in real life, customers will not be able to insert negative amounts, zero for the amount, or coins.
fn view_insert_money_page() -> Vec<Node<Msg>> {
    vec![
        view_header(&(h1!["金額を入れてください・Please insert money amount",].into_nodes())),
        div![input![
            id!("amount_field"),
            attrs! {
                At::Type => "text",
                At::Placeholder => "3000",
                At::MaxLength => "6",
            },
            input_ev(Ev::Change, Msg::AmountChange),
            keyboard_ev(Ev::KeyDown, Msg::AmountKeypress),
        ]],
        div![button![
            "次・Next",
            ev(Ev::Click, |_| Msg::MoneyInserted),
        ]],
    ]
}
-
The last page is just a blank page and notifications will be displayed to the customer.
fn view_finish_screen_page() -> Vec<Node<Msg>> {
    view_header(&(h1!["結果・Result",].into_nodes())).into_nodes()
}
So that’s a small tutorial on how to create web applications using Rust.
The actual implementation is more complicated than the tutorial above. There is encryption/decryption and a lot more HTTP requests that we omitted. The end result is we can give this application to the QA team and make the regression tests for the Cash I/O team faster.
A little bit of advice when you decide to use webassembly using any language for client side application, please research before the implementation. Webassembly is an emerging technology and Rust is also an emerging technology. A lot of things are not yet available, for example webassembly does not have DOM integration yet. Also Rust support for webassembly is still limited. A lot of libraries using C bindings are not compatible yet.
Hope you can learn something from this blog post, and once again, Happy Holidays!