
* This article is a translation of the Japanese article written on December 6, 2021.
Introduction
Hello! I’m @goccy, from Merpay’s Architect Team. In this article, I would like to introduce a tool developed to accelerate our daily integration testing between microservices.
Integration testing between microservices
@zoncoen has written here in detail about our integration testing system. I’ll provide a quick summary here.
- The result of sending a request to a service is used to request another service. This series of events is defined in a YAML file as a "scenario."
- The YAML file can describe expected responses for requests to each service, with scenarios proceeding while validation is performed.
- YAML files containing scenarios can be processed using a tool called scenarigo.
- scenarigo is used for integration tests, which are run periodically using CI.
- prow is used for CI. (It is also used for Kubernetes development.)
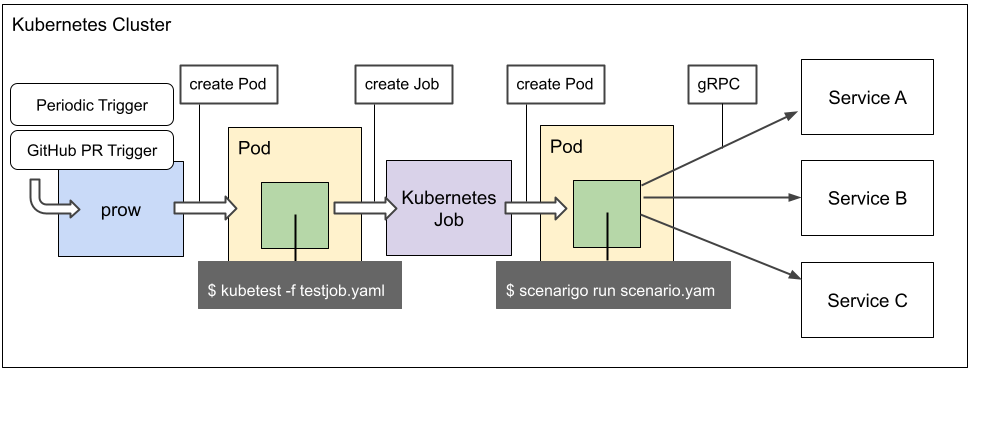
When prow starts a periodic test job, a test execution Pod starts in the same cluster as the Kubernetes cluster in which the microservice is running. On that Pod, scenarigo loads the YAML file containing the test scenario, and integration testing is performed. This is shown in the diagram below.
When writing a new scenario, you would typically want to test the validity of the scenario itself, and so prow is also used to start the test job even when the scenario has been revised following a GitHub pull request.

The problem with test execution times
We found a problem where the time required for testing increased as we ran the integration tests. scenarigo takes care of processing scenarios in parallel at an appropriate granularity, so this problem was not caused by multiple scenarios being run in series. Most of the time required to run a scenario is taken up by the processing time at the microservices receiving requests, and so the services receiving requests would be the main reason why so much time is taken up.
For example, we often see issues where services that have been historically difficult to scale have prevented scenarios from proceeding as they wait for results from these services. When running scenario testing for Merpay, we first execute a request to create a test user, and then utilize that user information to make subsequent requests. The process of creating a user is definitely slow, and this was increasing execution times.
In order to resolve this, we created a pool of users required for testing ahead of time. Instead of running the creation process once a user creation request was received, we extracted and returned an existing user from the pool. This resolved situations where the bottleneck was the processing time for a service required to run a scenario. However, this solution became difficult to scale up as running several hundreds of scenarios used up all CPU resources. Simply adding tests in this way wouldl increase execution times.
The distributed testing approach
Of course, you could increase resources assigned to the Pod launched by prow for test execution, and thereby reduce the CPU load. However, you would eventually reach the limit of this solution as you scale up and add more scenarios. We decided then to resolve this issue by taking a distributed testing approach, which would let us scale out resources required for test execution, allowing us to handle as many tests as we could theoretically add.
In the next section, I cover a tool called kubetest that we developed for distributed testing.
kubetest
kubetest is a CLI tool developed to perform distributed task processing based on Kubernetes. It’s capable of splitting and processing heavy task processes while making efficient use of Kubernetes cluster resources. We created it based on the key phrase, "distributed test," hence the name. However, as mentioned in the instructions, it can also be used for purposes other than tests (for example, distributed building). Unfortunately, we later found out that the repository containing the code for prow also contains a component of the same name. We should’ve done more research before naming the tool, but we’ll worry about that later.
kubetest CLI is run with a YAML file (containing distributed execution definitions) as an argument. As shown below, the YAML file takes a format defining a resource called a "TestJob," which is a Kubernetes custom resource. The idea is to support the controllers that process TestJob resources and to allow TestJob to be handled as a true custom resource later. For now, only execution through kubetest CLI is supported.
apiVersion: kubetest.io/v1
kind: TestJob
metadata:
  name: simple-testjob
  namespace: default
spec:
  mainStep:
    template:
      metadata:
        generateName: simple-testjob-
      spec:
        containers:
          - name: test
            image: alpine
            workingDir: /work
            command:
              - echo
            args:
              - "hello"
The YAML above should be easy to understand for anyone who has used a Kubernetes Job before. spec.mainStep.template corresponds to the spec.template used with a Kubernetes Job, while the portion below template can be used to describe the same content as PodTemplate. In the example above, one container based on the "alpine" image starts, and then echo "hello" is run. The job then ends.
kubetest actually uses a Kubernetes Job internally to process tasks. The following diagram shows how this operates including prow.
It creates a library called kubejob and controls the Kubernetes Job so that we can easily create the Kubernetes Job inside kubetest, continuing to obtain logs while we wait for the job to be finished.
The example above involves executing just a single command, and there is no difference in what can be done compared with using a Kubernetes Job. In the next section, I’ll describe how to run distributed testing, which is the main topic of the article.
Distributed testing using kubetest
In order to perform distributed task processing, we first need to determine the rules used to split heavy tasks. In this case, we define the "process all scenarios" task as a heavy task, and we need to define a rule for splitting it. In kubetest, we define this in spec.mainStep.strategy, as shown below.
apiVersion: kubetest.io/v1
kind: TestJob
metadata:
  name: strategy-static-testjob
  namespace: default
spec:
  mainStep:
    strategy:
      key:
        env: TASK_KEY
        source:
          static:
            - TASK_KEY_1
            - TASK_KEY_2
            - TASK_KEY_3
      scheduler:
        maxContainersPerPod: 2
        maxConcurrentNumPerPod: 2
    template:
      metadata:
        generateName: strategy-static-testjob-
      spec:
        containers:
          - name: test
            image: alpine
            workingDir: /work
            command:
              - echo
            args:
              - $TASK_KEY
As shown above, we define the names of each task in spec.mainStep.strategy.key.source (this is called a "distributed key" in kubetest). If we already know the names of all tasks, we list them under the static field. Three task names are defined in the example above (TASK_KEY_1 through TASK_KEY_3). This means that we have split a single heavy task into three tasks (TASK_KEY_1, etc.) for processing. The three split tasks are each run on separate containers, based on the settings in strategy.scheduler. The task name (distributed key) is passed to each container as the value of the environment variable specified by strategy.key.env, so each task can perform a different process depending on this value.
When using this function for testing, the distributed key will be the name of the test case. The specified environment variable will be set to the name of the test case when executing a test in each container, so we can use this value to execute only the specific target test. For example, we can run a test using Go as follows.
apiVersion: kubetest.io/v1
kind: TestJob
metadata:
  name: go-testjob
  namespace: default
spec:
  mainStep:
    strategy:
      key:
        env: TEST
        source:
          static:
            - TEST_1
            - TEST_2
            - TEST_3
      scheduler:
        maxContainersPerPod: 2
        maxConcurrentNumPerPod: 2
    template:
      metadata:
        generateName: go-testjob-
      spec:
        containers:
          - name: test
            image: test-image
            workingDir: /work
            command:
              - go
            args:
              - test
              - .
              - -run $TEST
When there are three test cases (TEST_1 through TEST_3), the TEST environment variable is referenced to obtain the name of each test case, and the applicable test (and only that test) is run by executing go test -run $TEST. It would be very annoying to have to write the name of a new test below "static" every time you add one, so you can also dynamically create a list of distributed keys. In this case, running the command will result in standard output split with line breaks by default. If using Go, the result of executing go test -list . can be used with lines unrelated to test names filtered out.
As with scenario testing, a command for obtaining all scenarios is used to obtain a list of scenarios, and each scenario name is passed to the environment variable on a different container. These names are then used to run the scenario tests using scenarigo.
You may have noticed so far that a single container is used to run a single distributed task. For testing, a single container is launched in order to run a single test case. This might appear to be an extravagant use of resources. However, doing this allows you to perform processing at the individual container level in a manner that is not dependent on the results of processing other tasks, and this should make it easier to abstract task processing.
Now that you understand the relationship between distributed tasks and containers, you might be concerned about how Kuberenetes resources are used. For example, if all containers run on the same Pod, they would use up all the resources on that Pod, even though the tasks have been split.
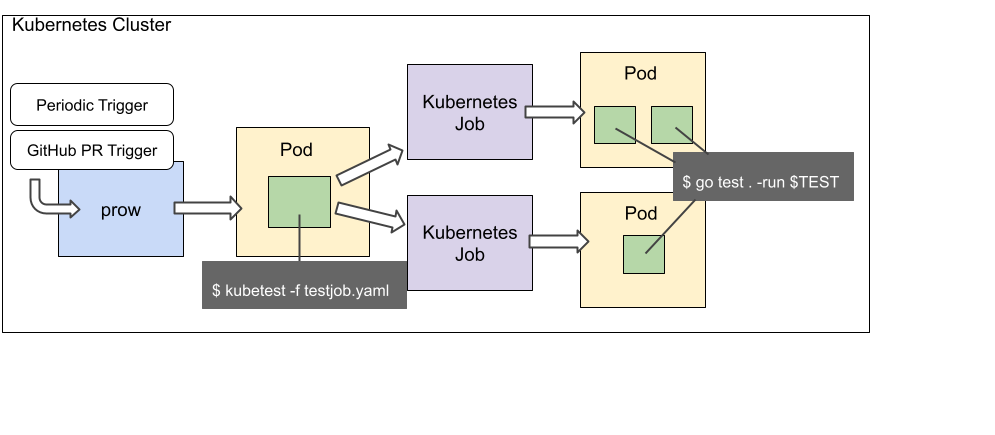
To resolve this, kebetest allows you to write distribution rules in spec.mainStep.strategy.scheduler, so that each task can be told to run on a different Pod. maxContainersPerPod is used to specify the maximum number of containers to run per single Pod, while maxConcurrentNumPerPod is used to specify the number of task processes to run in parallel per single Pod. In the example above, there are three test cases, and the rules specify to run up to two containers per single Pod. This means that we start two Pods for running tests. The maximum number of processes to run at the same time has also been set to two processes, so two task processes are run at the same time on each Pod. This allows us to control the number of parallel processes, and doing so can be effective in cases such as our scenario test example, where some of the services required for a test are difficult to scale.
The following diagram shows the overall procedure when running a Go test.
Mechanism to help run tests
Actually running tests is a lot more complicated than this. For example, in many cases we want to use test code located in an internal private repository to run testing. It would be a lot of work to include repository content in an image each time we test, and it would be inefficient to recreate the image each time we commit when we want to test pull request content. In these cases, we need a process that will clone the repository used for testing, immediately before running the test. We need the appropriate access token in order to clone a private repository, which means we need to consider how to prepare that token. Also, if we don’t need the token used to clone the repository when running the test, it’s safer from a security perspective to prevent that token from being referenced from the environment used for testing.
In order to resolve this, kubetest provides a mechanism for mounting repositories and tokens only in the environment (container) that requires them.
Repository and token mounting
spec.repos is used to specify repository information (by writing the information under it) that should be referenced when processing tasks. This section is used to specify the URL of the repository to clone, or the branch name or commit hash to switch to after cloning. For a private repository, this is also used to specify the token. Tokens specified here are defined in spec.tokens. In the following example, GitHub App information is used to create a temporary GitHub access token.
apiVersion: kubetest.io/v1
kind: TestJob
metadata:
  name: private-repo-testjob
  namespace: default
spec:
  tokens:
    - name: github-app-token
      value:
        githubApp:
          organization: goccy
          appId: 123456
          keyFile:
            name: github-app
            key: private-key
  repos:
    - name: kubetest-repo
      value:
        url: https://github.com/goccy/kubetest.git
        branch: master
        token: github-app-token
  mainStep:
    template:
      metadata:
        generateName: private-repo-testjob-
      spec:
        containers:
          - name: test
            image: alpine
            workingDir: /work
            command:
              - ls
            args:
              - README.md
            volumeMounts:
              - name: repo
                mountPath: /work
        volumes:
          - name: repo
            repo:
              name: kubetest-repo
When using a cloned repository, the name of the target repository is specified in volumes. The name given for that volume is just used to specify the mount destination in volumeMounts. This can be used along with the volumes / volumeMounts mechanism integrated with Kubernetes, such as emptyDir.
In addition to repositories, you can also mount tokens and the results of previous task processing (described next). This allows you to select and use only what is required for task processing.
Transferring over artifacts (results)
Let’s assume that there is a common process performed by all tasks when processing a distributed task. Some examples of this might be building test code or downloading modules required by test code. It wouldn’t be efficient to perform this process on all tasks, so we’d want to perform the process just once prior to running distributed tasks.
The spec.preSteps section in kubetest allows you to define a process in advance that’s required to process the main task executed in spec.mainStep.
apiVersion: kubetest.io/v1
kind: TestJob
metadata:
  name: prestep-testjob
  namespace: default
spec:
  preSteps:
    - name: create-awesome-stuff
      template:
        metadata:
          generateName: create-awesome-stuff-
        spec:
          artifacts:
            - name: awesome-stuff
              container:
                name: create-awesome-stuff-container
                path: /work/awesome-stuff
          containers:
            - name: create-awesome-stuff-container
              image: alpine
              workingDir: /work
              command: ["sh", "-c"]
              args:
                - |
                  echo "AWESOME!!!" > awesome-stuff
  mainStep:
    template:
      metadata:
        generateName: prestep-testjob-
      spec:
        containers:
          - name: test
            image: alpine
            workingDir: /work
            command:
              - cat
            args:
              - awesome-stuff
            volumeMounts:
              - name: prestep-artifact
                mountPath: /work/awesome-stuff
        volumes:
          - name: prestep-artifact
            artifact:
              name: awesome-stuff
As shown in the example above, preSteps defines several processes to execute prior to mainStep. These processes will be executed in the order they are written. Here, preSteps[].template.spec.artifacts can be used to define processing results to save as artifacts, which can be reused by mounting them when processing subsequent tasks.
This could be used, for example, to save a private module (obtained using a token) as an artifact, which would make it the only artifact referenced when executing the main task. This would allow you to exclude the token from the main task execution environment.
Similarly, postSteps can be executed after running mainStep. This allows you to save an artifact after running a test, and then to save that externally during the postStep.
By now, you should have a good idea of how to write tasks to run tests.
Summary
In this article, I began by discussing the mechanism used to perform integration testing between Merpay’s microservices. I then explained how a distributed testing approach can be used to resolve the problem of extended execution times caused by increasing the number of tests being performed. Finally, I introduced a tool we developed for that purpose.
I think kubetest should definitely help to reduce daily test times, but it still has room for improvement. Hopefully I can come back to share some more information once we’re able to make some improvements and establish an even better test execution environment.


