This is the 18th post for MERPAY TECH OPENNESS MONTH.
Hi, I’m @celia, an iOS Engineer working at Merpay. In this article, I want to introduce how the Merpay iOS team practices MVVM architecture with viewModel Inputs/Outputs, to create an isolated, highly testable codebase.
Let me begin by explaining how we chose to use it in the first place. When native iOS development started in early 2018 at Merpay, we wanted to create a modular, well architected product that could be seamlessly integrated into the Mercari app, or provided to third parties as a service if needed. We wanted the codebase to be independent and lightweight, with minimum dependency requirement on open source frameworks. We also want it to be easy to write tests for, because we think of code and tests as one. This led us to try out viewModel Inputs/Outputs, an approach inspired by the company Kickstarter, and after working with it for a year and a half, our team is happy with it.
What It Is
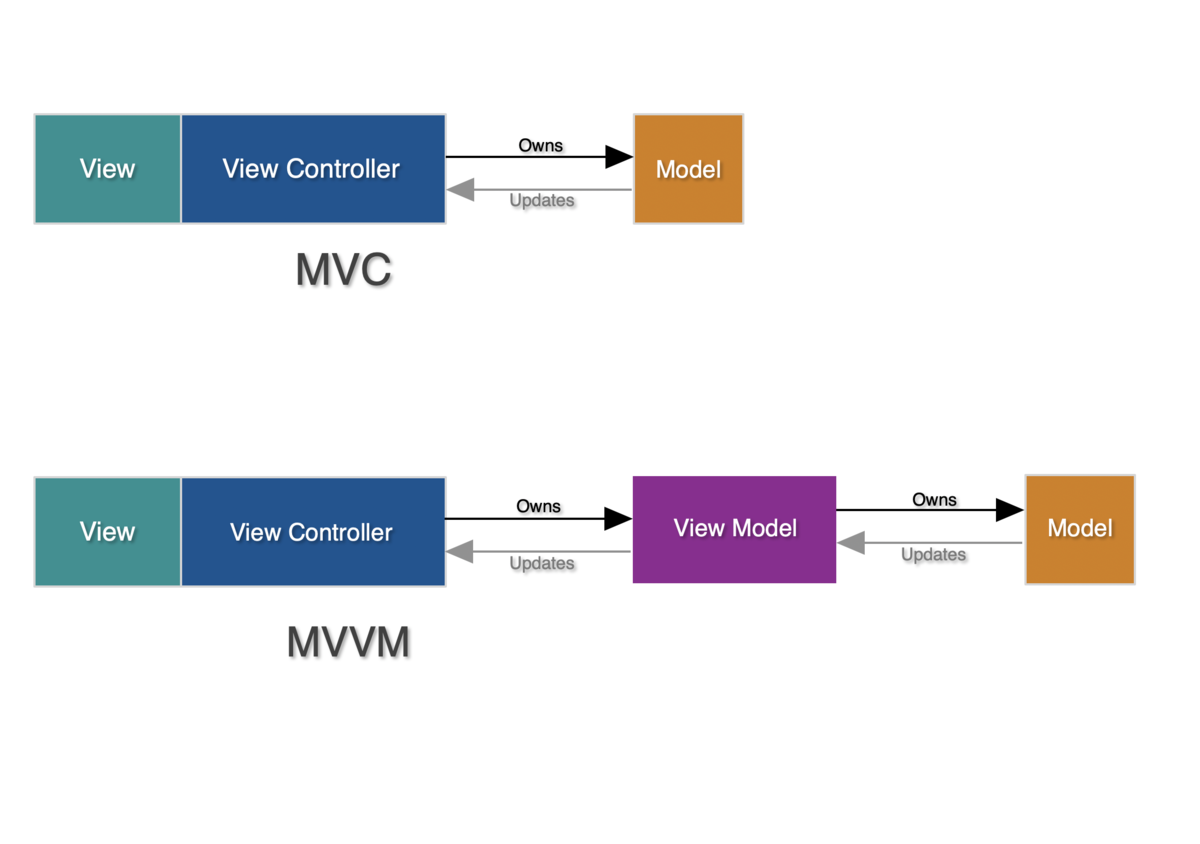
The MVC architecture has been the default practice for iOS development from the beginning. As a project gets bigger, the view controller’s code gets more complex, and harder to maintain and test – a phenomenon well known as Massive View Controller. With MVVM, we add a new layer called viewModel between the model and the view controller, and move the presentation logic and data operations from the view controller into the viewModel. It reduces the complexity of the view controllers and makes the viewModel a single source of truth for the user interface state.

Reference: objc.io
It’s common practice to combine MVVM with a binding mechanism. Many choose functional reactive programming frameworks such as ReactiveSwift or RxSwift, but at Merpay, we minimize third-party framework dependencies as much as possible. We create our viewModel with Inputs/Outputs protocols. Why protocols you ask? Well, the protocols force the code author to reach the viewModel through Inputs and Outputs each time, thus keeping a consistent style across the entire codebase. Also they’re similar to Java Interface which means we can use them to mock classes easier. Essentially, it’s a lightweight way to map input and output signals to mimic binding behavior, so we can have functional programming without using binding frameworks.
Enough said! Let’s take a look at a sample viewModel:
import UIKit
protocol ExampleViewModelInputs {
func viewDidLoad()
func tappedButton()
...
}
protocol ExampleViewModelOutputs {
var didReceiveServiceError: ((ServiceError) -> Void) { get set }
var reloadData: (() -> Void) { get set }
...
}
protocol ExampleViewModelType {
var inputs: ExampleViewModelInputs { get }
var outputs: ExampleViewModelOutputs { get }
}
final class ExampleViewModel: ExampleViewModelInputs, ExampleViewModelOutputs, ExampleViewModelType, Instantiatable {
struct Input {
//passing in data the viewModel needs from the view controller
}
private let input: Input
init(input: Input) {
self.input = input
}
// MARK: - ExampleViewModelType
var inputs: ExampleViewModelInputs { return self }
var outputs: ExampleViewModelOutputs { return self }
// MARK: - ExampleViewModelInputs
func viewDidLoad() {
...
}
func tappedButton() {
reloadData()
}
// MARK: - ExampleViewModelOutputs
var didReceiveServiceError: ((ServiceError) -> Void) = { _ in }
var reloadData: (() -> Void) = { }
}
The viewModel gets Inputs from the view controller and computes it into Outputs. Inputs can be a view controller life cycle event, such as invocation of viewDidLoad(), or any event or interaction from the view, such as a button tapped. Outputs are changes the viewModel wants to update to the view. In the above example, the output method reloadData() will be triggered when input method tappedButton() is called. If our goal is to reload data when a button is tapped, how can we connect it with the view controller?
Here’s an example:
override func viewDidLoad() {
super.viewDidLoad()
bind()
viewModel.inputs.viewDidLoad()
}
@IBAction private func didTapButton(_ sender: Any) {
viewModel.inputs.tappedButton()
}
private func bind() {
viewModel.outputs.didReceiveServiceError = { [weak self] error in
if let vc = self {
UIAlertController.show(error, in: vc)
}
}
viewModel.outputs.reloadData = { [weak self] in
self?.reloadData()
}
}
…
Remember, the view controller does not perform any operation except for sending event signals to the viewModel via Inputs/Outputs, and the viewModel acts as the functional core containing pure logic behind the view controller.
How We Write Unit Tests
The view controller is designed to contain no logic, it only reacts to stateless, immutable values that are emitted by viewModel Outputs. It provides a high level of testability, since every kind of expected behavior can be mocked by calling viewModel’s Inputs methods, and we can verify the outputs to make certain the code is functioning properly.
For example, to test whether a loading HUD is shown and hidden when the data is being loaded in viewDidLoad():
func test_viewDidLoad() {
let exp = XCTestExpectation()
exp.expectedFulfillmentCount = 3
exp.assertForOverFulfill = true
viewModel.outputs.showHUD = {
exp.fulfill()
}
viewModel.outputs.dismissHUD = {
exp.fulfill()
}
viewModel.outputs.finishedLoading = {
exp.fulfill()
}
viewModel.inputs.viewDidLoad()
wait(for: [exp], timeout: 1.0)
}
To test a detail page is shown after user taps a button:
func test_tappedButton() {
let exp = XCTestExpectation()
viewModel.openDetail = {
exp.fulfill()
}
viewModel.inputs.viewDidLoad()
viewModel.inputs.tappedButton()
wait(for: [exp], timeout: 0.01)
}
Whether you practice Test Driven Development or not, by decoupling the viewModel into Inputs/Outputs elements, it’s easy to write isolated, explicit test cases.
Summary
Inputs/Outputs gives our viewModel a clear structure. It keeps our code style consistent across the entire codebase. It reduces app size and dependency to third-party frameworks, and significantly increases code testability.
At the beginning it could take a while to get familiarized with, but once you get used to it, it’s easy for team members to collaborate on it, because the protocols, methods and interfaces are all well-defined. At Merpay, we are very proud of our test coverage. It guards our code logic so we are not afraid to make changes knowing if we break something the test will fail, and this is facilitated by viewModel Inputs/Outputs.
Tomorrow @knsh14 will write about メルペイにおけるお客さま残高の管理手法. Happy reading!
We are hiring! Merpay is looking for talented iOS engineers who share our mission and value to join our team. If you are interested, please reach out to us.
References
One of our team member @akifumi talked about this in a tech meetup:
speakerdeck.com
Open sourcing our Android and iOS apps! By kickstarter:
https://kickstarter.engineering/open-sourcing-our-android-and-ios-apps-6891be909fcd
Objc.io iOS at Kickstarter:
https://talk.objc.io/collections/ios-at-kickstarter
Kickstarter vm structure:
https://github.com/kickstarter/native-docs/blob/master/vm-structure.md
RxSwift & MVVM – An alternative structure for your ViewModel:
https://benoitpasquier.com/rxswift-mvvm-alternative-structure-for-viewmodel/