
This Day 5 post of Merpay Tech Openness Month 2022 is brought to you by Kris from the Merpay iOS team.
In this article I’ll briefly introduce how to implement NFC on iOS. First, I’ll give some background on what NFC is, I’ll explain the steps involved for using NFC in iOS development, and then we’ll go through the code.
What is NFC?
Near Field Communication, commonly referred to as NFC, is a short-range wireless communication technology available on more than two billion devices around the world which enables you to do things like process digital payments, easily transfer data, and even unlock your front door. NFC is finding its way into the technology we use in our daily lives and connects physical items to the digital world such as Apple’s Air Tags, and also helps you to quickly scan your train pass at the train stations here in Tokyo.
NFC capable devices and credit cards have also become more and more common in the last decade or so as a result of business owners bringing their businesses into the age of contactless payments. Societies that were once run on cash transactions have slowly shifted away from physical payments and replaced them with NFC taps and QR code scans.
Apple’s Dive into NFC
NFC itself has been around since the early 2000s, but it wasn’t until 2014 when iPhone users were first given NFC capabilities, lagging slightly behind Android users who had already been enjoying the feature for a few years. With the introduction of Apple Pay on iPhone 6 and 6+, Apple felt that it finally had a compelling use-case to get people interested in using NFC in their daily lives. Initially, NFC was restricted to only Apple Pay and third party developers had no access to the actual NFC capabilities to include in their own apps. After the release of iOS 11 in 2017 developers could finally take advantage of the technology by using Apple’s CoreNFC framework.
CoreNFC in iOS
Apple has managed to create a simple, easy to use framework which allows developers to interact with NFC capable devices with little code required. Let’s explore how to incorporate CoreNFC into an iOS application using Swift. The basic steps needed to set up CoreNFC are pretty straightforward:
- Add the NFC capability to your project and App ID
- Add a Usage Description to your info.plist
- Import the CoreNFC framework and create an
NFCNDEFReaderSession - Conform to
NFCNDEFReaderSessionDelegateand add the delegate functions that you need - Extract NFC Data from messages received in the delegate
Note: These instructions were written for apps using UIKit, Swift 5, and Xcode 13.3. The implementation might be somewhat different for SwiftUI or other versions of Swift or Xcode.
Add NFC Capability

Apps that use NFC must add the capability in their project, otherwise you won’t be able to access the framework. The first thing you should do is to navigate to your project file and select the target you’re adding NFC to. Choose “Signing and Capabilities” (1), and press the “+” button (2) at the top next to "All", “Debug” and “Release”. From the list that appears, choose “Near Field Communication Tag Reading”. This will enable your app to access NFC on your user’s devices.
After adding the NFC capability to your project and building, it should automatically enable the capability for your App ID, but if there are any issues you can manually enable the “NFC Tag Reading” service on the Apple Developer Console for your App ID.
Add Usage Description
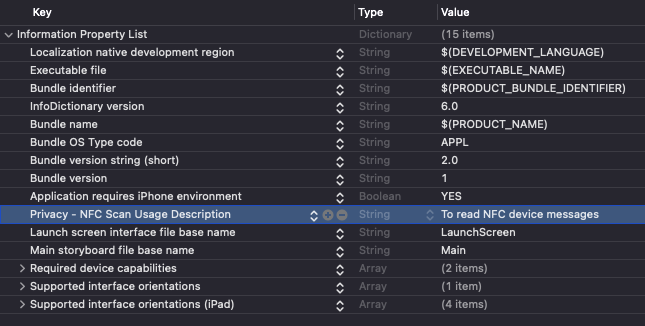
Navigate to your info.plist file and add a new line for the key named Privacy — NFC Scan Usage Description. In the past the value for this key used to be displayed to the user when they begin scanning in the original version of the framework, but this has changed since then and the message shown to the user can now be customized when starting the scan instead. Setting the value as something which explains the purpose of accessing NFC is recommended, and might make the App Store review process go smoother.
Import CoreNFC and Create Reader Session
import CoreNFC

class ScannerViewController: UIViewController {

    ...

    var session: NFCNDEFReaderSession?

    func startNFCScan() {
        session = NFCNDEFReaderSession(delegate: self, queue: nil, invalidateAfterFirstRead: true)
        session?.alertMessage = "Please tap an NFC capable device"
        session?.begin()
    }
}
In your view controller, create a session variable of NFCNDEFReaderSession type and make it optional. A reader session will handle all the logic behind presenting the modal scanner view, reading the NFC data, and outputting the resulting data and errors through the provided delegate. All we need to do is initialize a new session, customize the alert message that gets shown to the user, and then begin the scanning session. Here we’ve set the delegate as self, and queue as nil. This queue is referring to the dispatch queue to call delegate functions on, and when we set this as nil an internal serial dispatch queue is created automatically. Keep this in mind later when you need to handle your delegate functions and remember to explicitly run any UI related code on the main thread, but we’ll get to that later.
Conform to the Delegate
There are currently two different ways to interact with NFC devices in CoreNFC: The first uses NFCNDEFMessage which allows apps to read messages from nearby NFC devices, but the information on the device could not be written to. This was the standard until another method was added in iOS 13 when both reading and writing was enabled with NFCNDEFTag.
extension ScannerViewController: NFCNDEFReaderSessionDelegate {

    func readerSession(_ session: NFCNDEFReaderSession, didDetectNDEFs messages: [NFCNDEFMessage]) {

    }

    func readerSession(_ session: NFCNDEFReaderSession, didDetect tags: [NFCNDEFTag]) {

    }

    ...
}
The function readerSession(_:didDetectNDEFs:), is available for iOS 11 and above, and allows simple reading of NFC devices. If this is the only functionality you need, add this function when conforming to the session delegate. This is the function that will be used in this tutorial.
The function readerSession(_:didDetect:), is available for iOS 13 and above, and allows both reading and writing of NFC devices by connecting to a tag. If you need writing as well as reading, use this function.
NOTE: Don’t add both functions to your view controller, just add the one that you need. If you add both functions,
readerSession(_:didDetect:)will override the other and will be the only function actually called. This is because they have a similar purpose and only one is meant to be used at a time.
extension ScannerViewController: NFCNDEFReaderSessionDelegate {

    ...

    func readerSession(_ session: NFCNDEFReaderSession, didInvalidateWithError error: Error) {
        if let readerError = error as? NFCReaderError {

            let expectedError = readerError.code == .readerSessionInvalidationErrorFirstNDEFTagRead || readerError.code == .readerSessionInvalidationErrorUserCanceled

            if !expectedError {
                let alertController = UIAlertController(
                    title: "Unexpected Error",
                    message: error.localizedDescription,
                    preferredStyle: .alert)
                alertController.addAction(.init(title: "OK", style: .default))

                // Remember: this delegate function runs on a background thread,
                // we need to present the alert on the main thread
                DispatchQueue.main.async { [weak self] in
                    self?.present(alertController, animated: true)
                }
            }
        }

        self.session = nil
    }
}
Add the delegate function called readerSession(_:didInvalidateWithError:) to be able to interpret the error messages received during invalidation of the scanning session. The possible errors that can be returned by this function can be seen when we cast the error as an NFCReaderError, and we can check the error code for more details.
There are actually a few errors that we are expecting to happen that aren’t necessarily a bad thing. For example, when the session is created using invalidateAfterFirstRead as true, the session will trigger the readerSession(_:didInvalidateWithError:) function after the first NFC device read. The error code is readerSessionInvalidationErrorFirstNDEFTagRead. Another expected error code is readerSessionInvalidationErrorUserCanceled, which as you can guess is returned when the user cancels a reader session. You can display an error message to the user when an unexpected error is returned, and just ignore any expected errors that don’t require input from the user. Make sure to show the alert controller on the main thread in this function.
Now that you’ve got all the requirements for displaying the NFC reader added, you can make a button to trigger the startNFCScan function we created in the beginning. If everything is working properly you should be able to to see the modal NFC screen appear.

Extracting NFC Data
Once you’ve received a message from one of the delegate functions you’ll be able to decode and access the payload according to the type of data that it contains. For the purpose of this tutorial we will assume the NFC payload is nfcWellKnown type which contains a URL, but there are many other possible payload types that can be stored in a message’s records.
func readerSession(_ session: NFCNDEFReaderSession, didDetectNDEFs messages: [NFCNDEFMessage]) {
    guard let message = messages.first else { return }

    // Remember: this delegate function runs on a background thread,
    // we need to continue on the main thread if we plan to update the UI
    DispatchQueue.main.async {
        message.records.forEach { record in
            switch record.typeNameFormat {
            case .nfcWellKnown:
                // A
                // This function is only available from iOS 13
                if let url = record.wellKnownTypeURIPayload() {

                }

                // B
                // For compatibility with iOS versions before 13
                if let text = String(data: record.payload, encoding: .utf8) {

                }
            case .absoluteURI, .media, .nfcExternal, .empty, .unknown, .unchanged:
                break // ignore
            @unknown default:
                break // unknown
            }
        }
    }
}
One message received from a device can contain an array of records, and we can access them one by one to extract their contents. For each record we can check the payload type; we’re looking for nfcWellKnown in this case. Once we’re sure we have the right payload type we can access the data using one of two ways: The first way (A) is by using a function called wellKnownTypeURIPayload which was introduced in iOS 13 and is a helper function created to easily extract a URL from the payload when its conditions are met. Per Apple’s documentation this function “Returns the URL of a valid Well Known Type URI payload.” If support for iOS 12 or earlier is needed then the second method (B) is recommended to decode the payload into a string. Keep in mind that the payload might include a URI scheme header in the first byte if it is a properly formatted NDEF message. This header byte is meant to tell you information about what kind of link is contained in the payload, and you should be able to find the actual payload information starting from the second byte (i.e. record.payload.advanced(by: 1)).
Conclusion
And that’s all there is to know about the basics of CoreNFC in iOS! Luckily for us Apple handles the difficult aspects of NFC device connection and data transfer internally in the framework, and the externally exposed elements are fairly straightforward and easy to use. Using different record types or SwiftUI would change the implementation slightly, but the core implementation here remains the same.