Hello everyone! Vishal from SET team.
Having offices in different regions such as Tokyo, San Francisco and London, we thought it will make sense to share our devices across regions before setting up our own device farm. And we did it using OpenSTF on GCP. In this blog post, I will share our experiences and hacks we used to setup STF at Mercari.
Why Device Farm?
Delivering high-quality apps across all of the different devices and OS combinations is a major challenge for all mobile app developers. Only way to confirm app quality is by testing on various devices. This will require buying lots of devices which brings another big problem of device management. It is very difficult to manage devices across teams and projects. If we can have a central system where all devices are connected remotely, and these devices can be accessed for development and QA purpose on-demand, this would be the ideal solution. And OpenSTF is the only open-source tool available currently which let us do so.
About STF
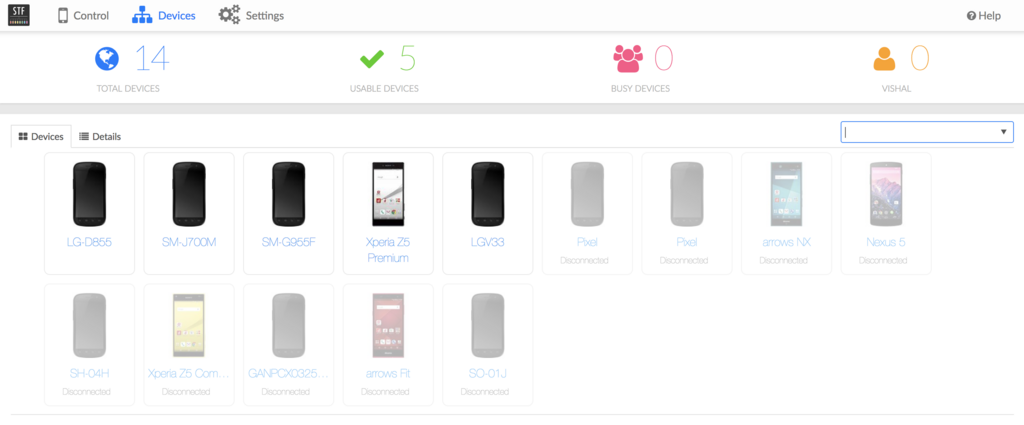
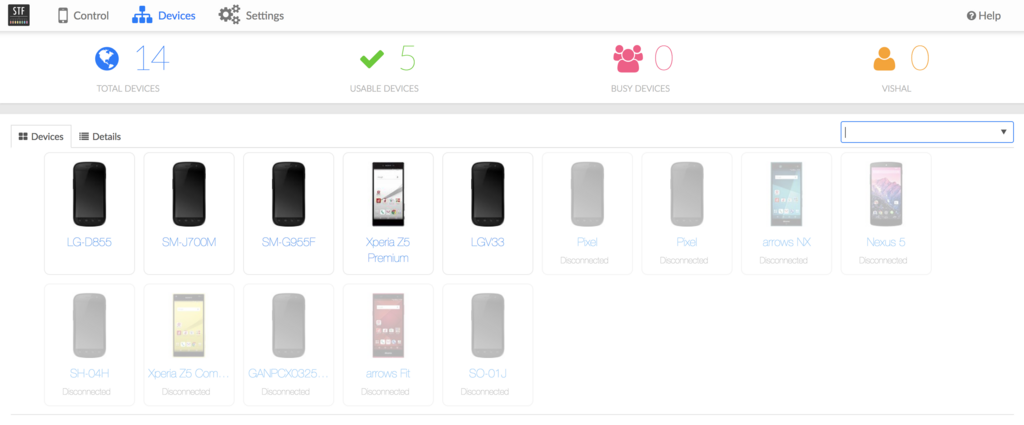
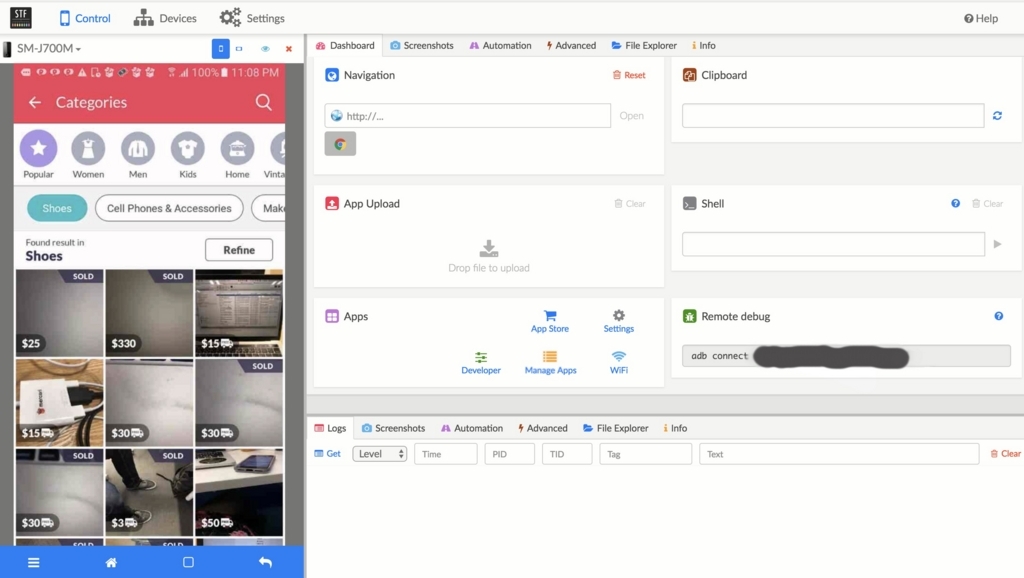
STF was developed by @sorccu & @gunta at CyberAgent with an objective to control remote devices from browser as close to using physical device in hand. And the way it works is pretty impressive. There is a long list of features STF provides such as remote control, app installation, screenshot, logcat, running shell commands and full adb access etc. In general, what you can do on a physical device in hand is possible to do on STF through browser. And there are many other shortcuts such as open settings app, developer options, control volume etc which makes using the device much easier.
STF Architecture
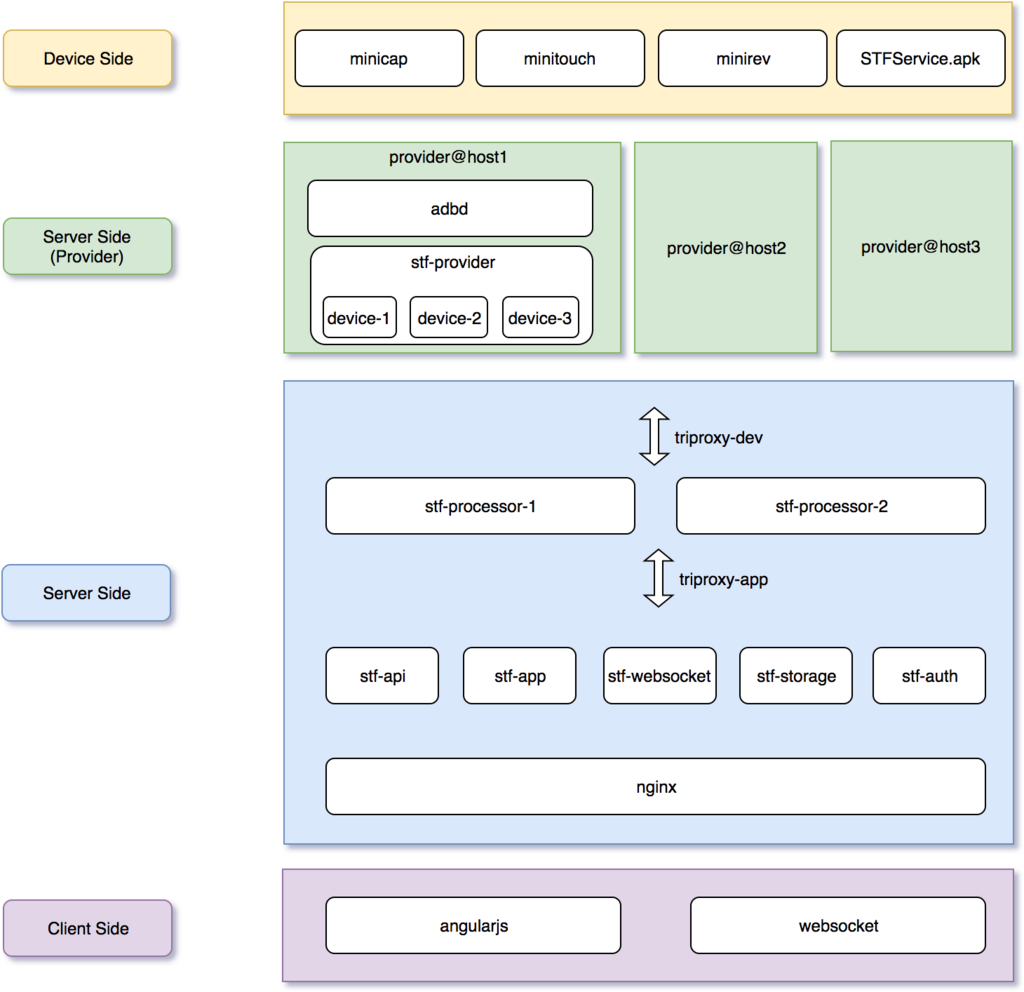
Before going ahead, it’s worth to look into STF architecture as we will be deploying it. STF architecture is microservices. Various independent services communicate with each other via ZeroMQ and Protocol Buffer. Unlike common web services with client and server side, STF has one more side where code run which is device side. So overall, architecture has:
- Device Side
- Server Side
- Client Side
Device Side
To capture screen and trigger multitouch events on Android devices, STF uses minicap and minitouch respectively, which runs inside the device and open socket that transfers data between the server side and the device side through adb. More details can be found in their READMEs.
Along with above native binaries, STF also uses STFService.apk in the device which runs in the background as Android Service. This service provides socket API for monitoring and performing various actions on the device. Again, the server side talks with STFService.apk through adb using Protocol Buffer.
Server Side
Server side consists of various independent NodeJS based microservices. These services communicate with each other via ZemoMQ. Server side can be further divided into two categories:
- Provider Layer
- Application Layer
Provider Layer consists of microservices which are responsible for direct communication with the devices. For this, STF has stf-provider service. All communications with the device is done through adb. The stf-provider service keeps a device tracker using adb and gets notifications whenever a new device is connected or if the device gets disconnected. On a new device, the stf-provider service forks a new NodeJS process called stf-device, which is responsible for all types of communication with that particular device. Overall, provider layer consists of two services. The stf-provider & adb. These services should run on all the physical machines where devices are connected.
Application Layer consist of all the other microservices such as stf-api, stf-app and stf-auth etc which completes STF. Explaining each of them would be out of scope for this blog. From the deployment point of view, these services can run anywhere. The only requirement is that they should be able to communicate with the provider through the network. Therefore it should be in the same network.
Client Side
STF client side has been implemented using AngularJS. Most of the client side and the server side communication is through websocket. STF also has a few API to list available devices and so on.
Deployment
Official Deployment Guide uses Docker + systemd + Fleet + CoreOS combination to deploy STF in production. But users are free to choose their own deployment environment and tools. Deployment requirements with official guidelines are:
- Physical machines where the devices are connected should have CoreOS or (any Linux based OS)
- All machines should have static IP
- Port Range (15000 ~ 25000) for all machines should be open to all users
- Docker & Systemd are available on each machine
Interested readers can check this tutorial which uses Vagrant to create virtual CoreOS cluster on a local machine. You can find all necessary configuration files, scripts & commands to deploy STF in this tutorial.
Limitation with official deployment
- Initial setup cost is too high
- CoreOS cluster setup
- Getting local static IPs
- Can be accessed only in local network
- (it’s possible to use VPN but very difficult when trying to connect devices from cloud CI services such as CircleCI)
- Maintenance cost is high as need to maintain all infra on-premise
STF Deployment at Mercari
The reasons we wanted to setup a device farm were:
- Can use devices across regions
- Can use devices from cloud CI services such as CircleCI for test automation.
Because of STF official setup limitations, we had to redesign the deployment architecture.
We did not want to host anything locally, as this will increase too much operation cost. Reason being that the STF cannot be hosted on cloud platform because of the physical devices that are involved. We cannot connect physical devices in cloud Virtual Machines. To host STF on cloud, we had to think about some way to connect the local devices to the cloud machines. And the solution was in adb architecture.
ADB Architecture
As I explained in STF architecture overview, all communication to physical devices are made through adb. ADB tool was developed so that developers can debug devices through their machines. Let’s understand how adb works. ADB has three components:
- adb daemon
- adb server
- adb client
ADB Daemon runs inside the device. Whenever user turns on the debug developer option in android device, this daemon starts. ADB Server and client comes within the same binary and run on the developer machine. ADB Server listens at 5037 port by default. All client queries such as (adb devices) goes to this port and then is handled by the adb server. This is the key point for our deployment architecture. If somehow, we can forward all adb client(running on cloud platform) queries to adb server(running locally where devices are connected) we can actually do the complete setup on cloud. But forwarding adb client request from cloud to local machine is not an easy job as we do not have any public IP for this purpose. The way we solved this problem was by creating a Reverse SSH Tunnel. From local machine (where devices are connected), we can create a reverse SSH Tunnel to cloud machine(where stf-provider is running), so that all adb client request on cloud provider will be forwarded to local adb server. This way cloud stf-provider will assume the devices are connected on cloud VM. This is the magic command ssh -f -N -T-R :5037:127.0.0.1:5037 user@cloud-host.
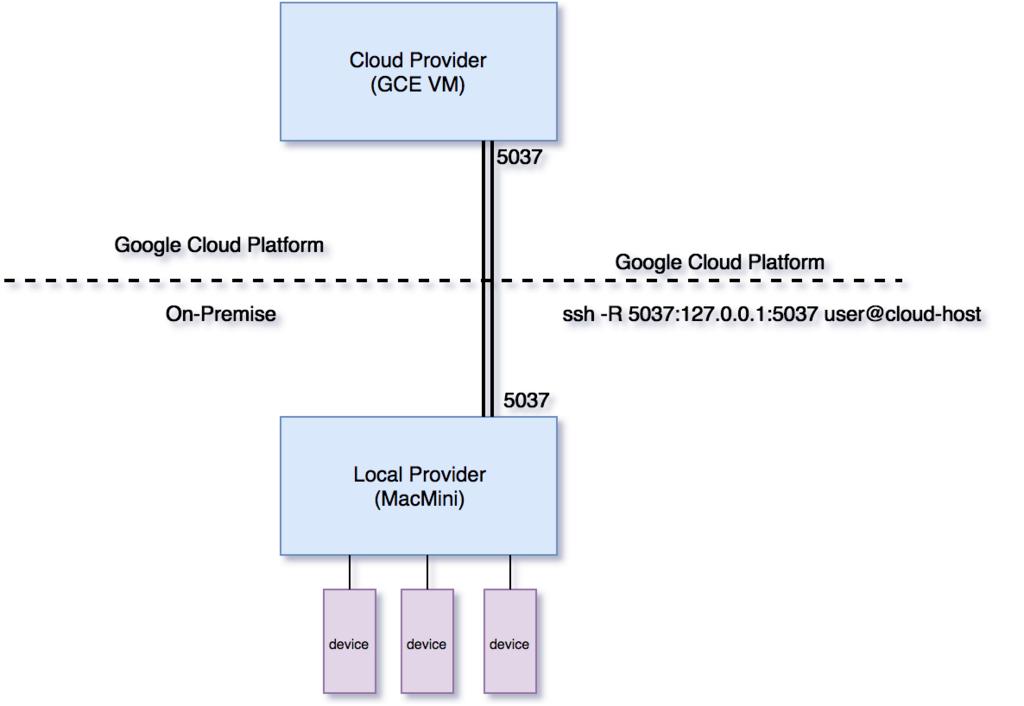
Overall STF Setup Architecture
Once we solved the device connection problem, we can now design the setup in any way we want. We have hosted STF on GCP. Setup uses GCP load balancer and it proxies all the traffic depending on the region. Each region has its own master with all STF microservices running. Services where only one instance is required such as stf-triproxy, are running only in one region. Devices are connected on mac-minis where only the adb is running. We call them the local provider. Each local provider is connected to cloud provider through Reverse SSH Tunnel.
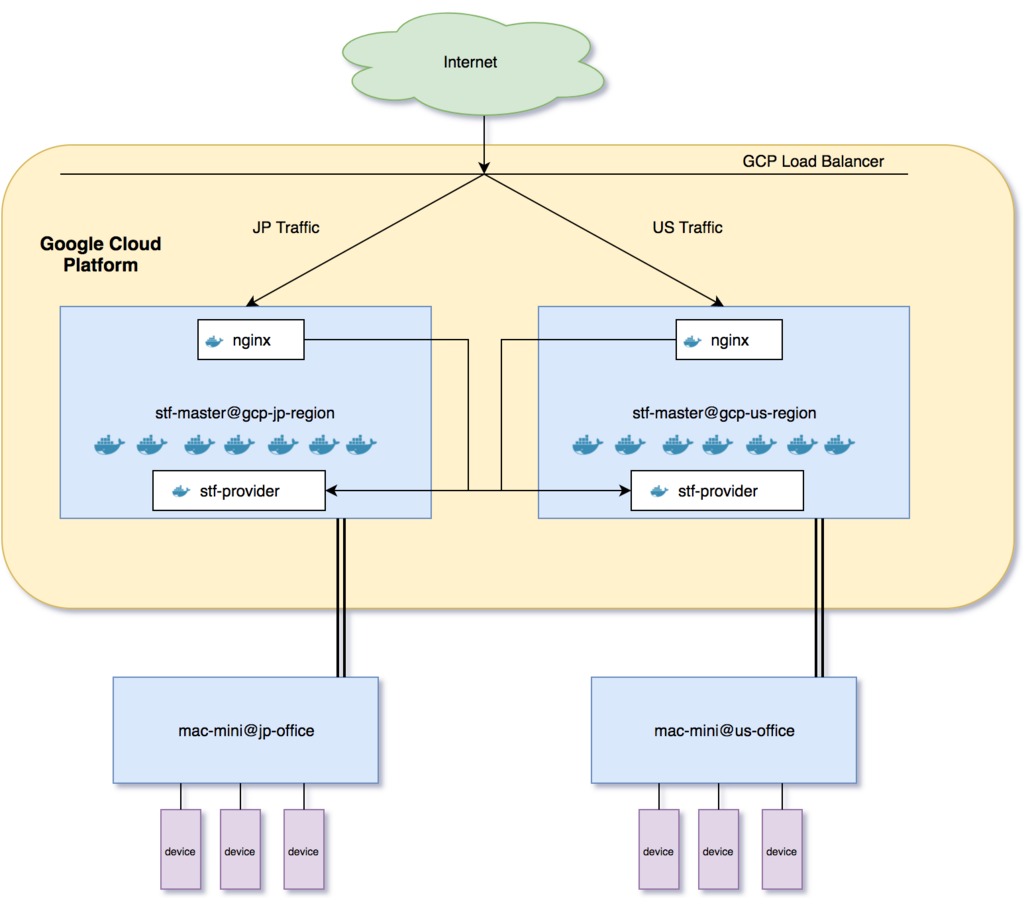
About Latency & Stability
It is obvious to doubt about stability when the whole system is dependent on SSH Tunnel. This setup was done almost 5 months ago and I waited this long to write this blog because I wanted to have some real data to prove its stability. We use autossh to keep SSH Tunnel alive at all times. And use systemd to manage all microservices. Whenever a disconnect happens, autossh will restart the tunnel and systemd will restart the cloud provider brining all the devices back. For the past few months, we haven’t seen any major disconnects. We run automated tests every night on these devices from CircleCI and till now, no test has failed because of connection issues.
Latency is a problem, but it is not that bad. It does not make STF so slow that it is impossible to use the device. But we always try to first connect with the device in our region. Sometimes, STF can become very slow if client’s wifi is slow. But this is not a deployment issue. This is because of a user side problem. One way to reduce this issue is by setting stf-provider’s screen-jpeg-quality option to 25. This will reduce the image size by 4 times without changing the quality much in the visible sense.
Conclusion
This device farm has empowered us to use any cloud CI Services to run automated tests. Before this, we only had two options. Either use cloud device farms such as AWS device farm(which are pretty expensive) or use Jenkins locally. Maintaining local Jenkins slaves and plugins are not something which I really want to do now. With this setup we can connect STF device from any CI service using STF API. Interested reader can check stf-appium-example to understand how to run automated tests on STF devices.
Maintaining device infrastructure is one of the biggest hurdles in mobile test automation journey. This setup has helped us a lot in solving this problem. I hope this will help you too!
