こんにちは。Merpay Advent Calendar 2019 の18日目を担当する、メルペイ Android チームの @KeithYokoma です。
前回の記事ではマルチモジュール構成なプロジェクトにおける画面遷移の実装について、簡単な設計の方針から解説しました。
今回の記事では、メルペイ Android 全体として採用しているアーキテクチャやテストの方針について解説します。
全体像
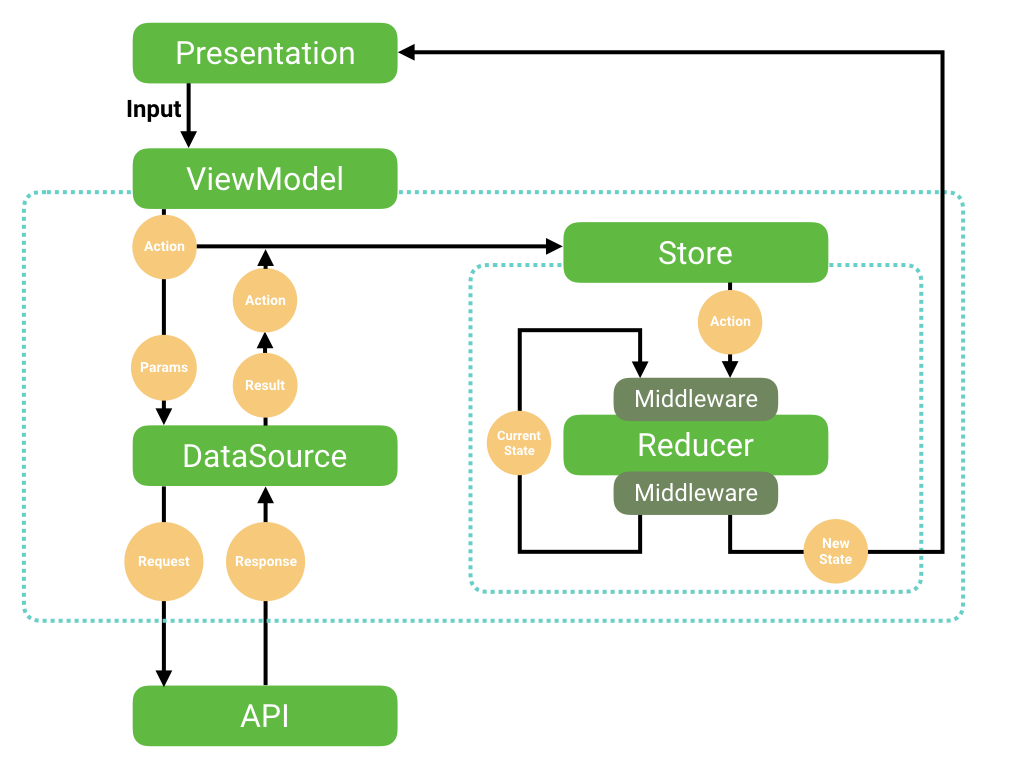
はじめに、メルペイ Android で採用しているアーキテクチャを解説する際に出てくる登場人物を整理しておきます。
メルペイ Android では、Redux の考え方と MVVM を組み合わせて使っています。Presentation は Activity や Fragment に相当する画面のことで、メルペイ Android の場合は前回の記事で触れたとおり bluelinelabs/Conductor を利用しているので Controller が Presentation になります。

ここであえてRedux の考え方と表現しているのは、仕組みとしてはほぼ Redux のそれを踏襲しているものの、Redux と違い画面ごと個別に Store や State を持っているからです。
メルペイの機能自体が多岐にわたり画面数も多いため、アプリケーション全体でひとつの State を管理すると、とても巨大な State オブジェクトをもつことになってしまい管理が複雑化します。これを避けるため、どちらかというと Flux に寄せたような作り方をしています。メルペイ Android で利用している Redux の実装は mercari/RxReduxK です。
このアーキテクチャでは、おおまかな流れとして、次の順に処理を進めていくことになります。
Presentationでクリックイベント等をトリガーにしてViewModelに入力をするViewModelはPresentationからの入力やデータ入出力の終わりなどをActionに変換しStoreに送るReducerは現在のStateと渡されたActionを見て、Stateの状態を変えるStoreは新しいStateをPresentationに通知する
またメルペイ Android では、API 通信の状態をうまく表現するために RemoteDataK を使っています。
API 通信の状態を扱えるようにしつつ、最終的な通信の結果を保持するための Either のようなものです。RemoteData という型で、API 通信の初期状態・通信中・成功・失敗が表現できます。詳しい使い方は以後の解説の中で触れていきます。
Reducer での状態管理
Redux では、アプリケーションがもつ状態を State として定義し、Action ごとにどのように State を変化させるかを Reducer に定義します。
Reducer は Action と State を受け取って、状態を変えて State を返す関数です。
interface Reducer<S: State, A: Action> {
fun reduce(currentState: S, action: A): S
}

例として、何かしらの文字列データを API 通信でとってきて表示する画面の状態を次のような State オブジェクトで表現してみましょう (以後の説明もこの例をもとにしています) 。
import com.mercari.remotedata.RemoteData
import com.mercari.rxredux.State
data class SampleState(
val text: RemoteData<String, Exception> = RemoteData.Initial
) : State
この SampleState がもつ text プロパティは初期値として RemoteData.Initial を設定しています。このプロパティを Reducer で書き換えることによって、他の状態へ変化させることになりますが、Reducer による状態の変化を起こすには Action の定義が必要です。
状態の変化を起こすタイミングとして、API 通信を開始したタイミングと、通信が終わって結果を得たタイミングの 2 つがあると考えると、次のような Action の定義ができます。
import com.mercari.remotedata.RemoteData
import com.mercari.rxredux.Action
sealed class SampleAction : Action
class StartLoadingTextAction : SampleAction()
class FinishLoadingTextAction(
// API 通信の結果: RemoteData.Success<String> または RemoteData.Failure<Exception> のいずれか
val result: RemoteData<String, Exception>
) : SampleAction()
これらの Action をもとに、状態をどう変化させるかを Reducer に記述します。
import com.mercari.rxredux.Reducer
class SampleReducer : Reducer<SampleState, SampleAction> {
override fun reduce(currentState: SampleState, action: SampleAction): SampleState = when (action) {
is StartLoadingTextAction -> {
currentState.copy(
text = RemoteData.Loading()
)
}
is FinishLoadingTextAction -> {
currentState.copy(
text = action.result
)
}
}
}
Reducer のユニットテスト
先ほどの SampleReducer のユニットテストでは次のことを確認します。
StartLoadingTextActionを与えたらSampleStateのtextがReomteData.LoadingになるFinishLoadingTextActionを与えたらSampleStateのtextがReomteData.SuccessまたはReomteData.Failureになる
これらを確認するためのテストを Spek Framework で記述すると次のようになります*1。モックフレームワークは使う必要がなくシンプルに記述できることがわかります。
import com.mercari.remotedata.RemoteData import org.amshove.kluent.shouldEqual import org.spekframework.spek2.Spek import org.spekframework.spek2.style.gherkin.Feature object SampleReducerTest : Spek({ Feature("SampleReducer") { val reducer = SampleReducer() // 1.StartLoadingTextActionを与えたらSampleStateのtextがReomteData.Loadingになる Scenario("Reducing StartLoadingTextAction") { lateinit var originalState: SampleState lateinit var newState: SampleState Given("An original state") { originalState = SampleState() } When("Reduce the state with StartLoadingTextAction") { newState = reducer.reduce(originalState, StartLoadingTextAction()) } Then("New state has loading state for text") { newState.text.isLoading shouldEqual true } } // 2.FinishLoadingTextActionを与えたらSampleStateのtextがReomteData.Successになる Scenario("Reducing FinishLoadingTextAction") { lateinit var originalState: SampleState lateinit var newState: SampleState Given("An original state") { originalState = SampleState() } When("Reduce the state with StartLoadingTextAction") { newState = reducer.reduce(originalState, FinishLoadingTextAction(RemoteData.Success("some data"))) } Then("New state has success state for text") { newState.text.isSuccess shouldEqual true } And("The value is delivered from the action") { newState.text.value shouldEqual "some data" } } // 2.FinishLoadingTextActionを与えたらSampleStateのtextがReomteData.Failureになる Scenario("Reducing FinishLoadingTextAction") { lateinit var originalState: SampleState lateinit var newState: SampleState Given("An original state") { originalState = SampleState() } When("Reduce the state with StartLoadingTextAction") { newState = reducer.reduce(originalState, FinishLoadingTextAction(RemoteData.Failure(RuntimeException()))) } Then("New state has success state for text") { newState.text.isFailure shouldEqual true } } } })
ここまでで、Redux の仕組みを使った状態の管理が実装できました。
ViewModel で Action と API 通信を Redux につなぎこむ
次に ViewModel で Store に Action を送る部分を見てみましょう。

例として、ボタンのクリックをトリガーとして先ほど説明した Redux による状態の遷移を動かしてみます。
Presentation からの入力は次に示す Input というオブジェクトを介して受け取ります。
Input は PublishSubject をラップしたもので、input メソッドは Subject#onNext へ委譲し、value は Subject を Observable に変換して返すようになっています。
class Input<T> { private val subject: Subject<T> = PublishSubject.create() //Inputを受け取るメンバー。ViewModel で使う。 val value: Observable<T> = subject.hide() //Inputに入力をするメンバー。概ね Presentation でのイベントをトリガーにして使う。 fun input(value: T) = subject.onNext(value) } // SampleInput は画面で必要な Input を定義する class SampleInput { val buttonClick: Input<Unit> = Input() }
また非同期処理で API 通信を担う部分は次のようなインタフェースを持っていることとします。
interface SampleDataSource {
fun fetchText(): Single<RemoteData<String, Exception>>
}
これらを用いて、ボタンをクリックした直後に StartLoadingTextAction を、API からのレスポンスがかえってきたときに FinishLoadingTextAction を通知する部分を次のように表現します。
// Observable<SampleAction>
// buttonClick をトリガーにして、StartLoadingTextAction を通知し非同期処理を行い、
// レスポンスが返ってきたら FinishLoadingTextAction を通知する
input.buttonClick
.value
.flatMap {
dataSource.fetchText()
.map<SampleAction>(::FinishLoadingTextAction)
.toObservable()
.startWith(StartLoadingTextAction())
}
この結果の Observable<SampleAction> を Store#dispatch(Observable<SampleAction>) にわたすと Store に Action が通知されます。
次のコード例は ViewModel の実装の全体を示しています。
内部に Store をもち、状態の初期値と Reducer を設定している部分と、変化した State を Observable にのせて公開するためのメンバーとして state を定義しています((これらは他の ViewModel でも同じように作っていくことになるため、適宜インタフェースとして括りだすとよいでしょう))。
class SampleViewModel(
private val input: SampleInput,
private val dataSource: SampleDataSource
) : LifecycleObserver {
private val compositeDisposable = CompositeDisposable()
private val store = Store(SampleState(), SampleReducer())
val states: Observable<SampleState> = store.states
@OnLifecycleEvent(Lifecycle.Event.ON_CREATE)
fun onCreate() {
store.dispatch(
input.buttonClick
.value
.flatMap {
dataSource.fetchText()
.map<SampleAction>(::FinishLoadingTextAction)
.toObservable()
.startWith(StartLoadingTextAction())
}
).addTo(compositeDisposable)
}
@OnLifecycleEvent(Lifecycle.Event.ON_DESTROY)
fun onDestroy() {
compositeDisposable.clear()
}
}
この ViewModel は Android Architecture Components にある ViewModel とは異なりますが、Activity や View など Context への参照を持たないため比較的簡単に Android Architecture Components のものへ対応できます*2。
ViewModel のテスト
SampleViewModel を例として、ViewModel のユニットテストでどんなことを確認したらよいかを説明します。
ViewModel の役割は Presentation からの入力や API 通信の結果などをきっかけとして Action を作って Store にわたすことです。
SampleViewModel ではこの結果として State が初期状態から2回変わることになるので、State が onNext で通知される回数は合計 3 回です。
テストでは TestObserver で states を subscribe し、合計 3 回 onNext が呼ばれる (初期状態、StartLoadingTextAction の結果、FinishLoadingTextAction の結果) ことを確かめます。
object SampleViewModelTest : Spek({
// RxJava のしくみで、テストから非同期な Scheduler を同期的な Scheduler に差し替え
beforeGroup {
RxJavaPlugins.setSingleSchedulerHandler { Schedulers.trampoline() }
}
Feature("Loading text from sample data source") {
// input はそのままつかう
val input = SampleInput()
// DataSource のモックを作り、適宜成功時・失敗時などを再現できるようにしておく
val dataSource: SampleDataSource = mockk(relaxed = true) {
every { fetchText() } returns Single.just(RemoteData.Success("test"))
}
val viewModel = SampleViewModel(input, dataSource)
val test = viewModel.states.test()
Scenario("On input by button click") {
When("Start a view model lifecycle") {
viewModel.onCreate()
}
And("Input#buttonClick") {
input.buttonClick.input(Unit)
}
Then("Emit state 3 times") {
// onNext が 3 回呼ばれることを検証
test.awaitCount(3)
.assertValueCount(3)
}
// 以降、N 回目に emit された state が期待した状態になっているか確かめる
And("First one should have initial state") {
test.assertValueAt(0) {
it.text.isInitial
}
}
And("Second one should have loading state") {
test.assertValueAt(1) {
it.text.isLoading
}
}
And("Third one should have success state") {
test.assertValueAt(2) {
it.text.isSuccess
}
}
}
}
})
状態の観測から UI 操作の委譲 (ViewDelegate)
Reducer によって状態遷移が定義され、ViewModel によって様々な入力が Action 変換され状態遷移を動かせるようになりました。
最後に、Presentation で状態を観測し、適切に View を更新する部分を見てみましょう。
Presentation には、API から取得した文字列を表示するための TextView と、通信状態を表現する ProgressBar、そして読み込みを開始する Button があるとします。
次の例では、SampleViewModel を作成して SampleController のライフサイクルと同期させ、レイアウトを読み込んだときに View の構築 (この例ではボタンにリスナーを設定して Input のトリガーにする) と View の操作 (この例では SampleState の text を見て読み込み中の表示を切り替えたり、結果を表示したりする) をするよう記述しています。
class SampleController : Controller() {
// Controller のライフサイクルを LifecycleObserver に通知するしくみ
private val lifecycleProducer = ControllerLifecycleProducer(this)
private val input = SampleInput()
private val viewModel = SampleViewModel(input, SampleRepository)
private val compositeDisposable = CompositeDisposable()
init {
lifecycleProducer.addObserver(viewModel)
}
override fun onCreateView(inflater: LayoutInflater, container: ViewGroup): View =
inflater.inflate(R.layout.zmp_controller_sample, container, false).also { v ->
// View の構築と state に応じた View の操作
val progressView = v.findViewById<ProgressBar>(R.id.progress)
val textView = v.findViewById<TextView>(R.id.textView)
val button = it.findViewById<Button>(R.id.button)
viewModel.states
.takeUntil(lifecycleProducer.filterEvent(Lifecycle.Event.ON_STOP))
.observeOn(AndroidSchedulers.mainThread())
.map { state ->
state.text
}
.subscribe { text ->
// View の操作
progressView.isVisible = text.isLoading
when (text) {
is RemoteData.Success -> {
textView.text = text.value
}
is RemoteData.Failure -> {
textView.setText(R.string.api_error_loading_text)
}
}
}.addTo(compositeDisposable)
// View の構築
button.setOnClickListener {
input.buttonClick.input(Unit)
}
}
override fun onDestroy() {
compositeDisposable.clear()
super.onDestroy()
}
}
今回の例では State が非常に単純化してありますが、画面に表示するものや通信する API が増えていくと、このコードは簡単に肥大化していってしまいます。
実際 Controller はユニットテストの手段に乏しいため、メルペイ Android では Presentation が受け持つ「View の構築」と「State に応じた View の操作」を委譲する ViewDelegate というインタフェースを用意して、これら2つの役割に対してユニットテストを書くようにしています。
SampleController にベタ書きした View の構築と操作のロジックを委譲するインタフェースの例を次に示します。View の構築と View の操作はそれぞれメソッドに切り出して名前をつけて管理しています。この他、companion object で簡単なファクトリメソッドを作り、SampleController から扱いやすくしています。
// 委譲のためのインタフェース
interface ViewDelegate {
val input: SampleInput
val progressView: ProgressBar
val textView: TextView
val button: Button
// View の構築にあたるメソッド
fun setUpButtonClick()
// State に応じた View の操作にあたるメソッド
fun subscribeTextStateUpdates(states: Observable<SampleState>): Disposable
}
そしてこのインタフェースを実装したクラスを次に示します。
class SampleViewDelegate @VisibleForTesting internal constructor(
override val input: SampleInput,
override val progressView: ProgressBar,
override val textView: TextView,
override val button: Button
) : ViewDelegate {
override fun setUpButtonClick() {
button.setOnClickListener {
input.buttonClick.input(Unit)
}
}
override fun subscribeTextStateUpdates(states: Observable<SampleState>): Disposable =
states.map { state ->
state.text
}
.subscribe { text ->
progressView.isVisible = text.isLoading
when (text) {
is RemoteData.Success -> {
textView.text = text.value
}
is RemoteData.Failure -> {
textView.setText(R.string.zmp_error_desc)
}
}
}
companion object {
// Controller から ViewDelegate のインスタンス生成を簡単にするメソッド
fun of(input: SampleInput, view: View): ViewDelegate = SampleViewDelegate(
input,
view.findViewById(R.id.progress),
view.findViewById(R.id.textView),
view.findViewById(R.id.purchase_button)
)
}
}
ViewDelegate の導入によって、SampleController は次のように簡素化されます。
class SampleController : Controller() {
// ...
private lateinit var viewDelegate: ViewDelegate
override fun onCreateView(inflater: LayoutInflater, container: ViewGroup): View =
inflater.inflate(R.layout.zmp_controller_empty_view, container, false).also { v ->
val states = viewModel.states
.takeUntil(lifecycleProducer.filterEvent(Lifecycle.Event.ON_STOP))
.observeOn(AndroidSchedulers.mainThread())
viewDelegate = SampleViewDelegate.of(input, v)
viewDelegate.subscribeTextStateUpdates(states).addTo(compositeDisposable)
viewDelegate.setUpButtonClick()
}
}
ViewDelegate のテスト
ViewDelegate のテストでは、View の構築が期待通りかどうかと、State の更新があったときに適切な View が操作されているかを確認します。
先ほどの SampleViewDelegate の場合、View の構築にあたる部分はボタンに OnClickListener を設定し、ボタンクリック時に Input を呼び出すようにするところです。
次の例では、mockk の機能を使って setUpButton メソッドで設定している OnClickListener のインスタンスを取り出し、コールバックメソッドを呼び出して Input が呼び出されるかどうかまでを確認しています。
Spek の制約として Robolectric の仕組みの上でテストができないため、Android Framework で定義されている各種 View はすべて自分でモックしています。
object SampleViewDelegateTest : Spek({
Feature("Compose associated view") {
val input: SampleInput by memoized(CachingMode.EACH_GROUP) {
mockk(relaxed = true)
}
val progress: ProgressBar by memoized(CachingMode.EACH_GROUP) {
mockk(relaxed = true)
}
val textView: TextView by memoized(CachingMode.EACH_GROUP) {
mockk(relaxed = true)
}
val button: Button by memoized(CachingMode.EACH_GROUP) {
mockk(relaxed = true)
}
lateinit var viewDelegate: ViewDelegate
Scenario("Compose a button") {
// OnClickListener#onClick での処理を検証するため
// setOnClickListener で設定するリスナーのインスタンスをキャプチャする
lateinit var clickListenerSlot: CapturingSlot<View.OnClickListener>
Given("A view delegate") {
clickListenerSlot = slot()
every { button.setOnClickListener(capture(clickListenerSlot)) } just Runs
viewDelegate = SampleViewDelegate(input, progress, textView, button)
}
// Button の構築をすると……
When("Setup button") {
viewDelegate.setUpButtonClick()
}
// Button に OnClickListener が設定されて……
Then("Click listener is set to the button") {
verify { button.setOnClickListener(any()) }
}
// 設定した OnClickListener にコールバックすると……
When("Call onClick") {
clickListenerSlot.captured.onClick(mockk())
}
// 期待した Input に入力があるはず
Then("A new input comes into buttonClick") {
verify { input.buttonClick.input(any()) }
}
}
}
}
次にState の更新があったときに適切な View が操作されているかを確認します。SampleViewDelegate では SampleState#text の状態が変わるごとに ProgressBar や TextView の操作をしているので、状態ごとに対応する操作が行われているかどうかを確認します。
object SampleViewDelegateTest : Spek({
beforeGroup {
RxAndroidPlugins.setMainThreadSchedulerHandler { Schedulers.trampoline() }
}
Feature("View operations by state updates") {
val input: SampleInput by memoized(CachingMode.EACH_GROUP) {
mockk(relaxed = true)
}
val progress: ProgressBar by memoized(CachingMode.EACH_GROUP) {
mockk(relaxed = true)
}
val textView: TextView by memoized(CachingMode.EACH_GROUP) {
mockk(relaxed = true)
}
val button: Button by memoized(CachingMode.EACH_GROUP) {
mockk(relaxed = true)
}
val disposables: CompositeDisposable by memoized(CachingMode.EACH_GROUP) { CompositeDisposable() }
// ViewModel からの State の更新を簡単にシミュレートするための Subject
val stateSubject: Subject<SampleState> by memoized(CachingMode.EACH_GROUP) { BehaviorSubject.create<SampleState>() }
lateinit var viewDelegate: ViewDelegate
afterGroup {
disposables.clear()
}
Scenario("Updating text") {
Given("A view delegate") {
viewDelegate = SampleViewDelegate(input, progress, textView, button)
}
// State の更新を受け付ける準備をして……
When("Subscribe text updates") {
viewDelegate.subscribeTextStateUpdates(stateSubject.hide()).addTo(disposables)
}
// 新しい State を通知すると……
And("Emit a new state describing text is loading") {
stateSubject.onNext(SampleState(text = RemoteData.Loading()))
}
// Loading 状態では ProgressBar が表示され……
Then("Progress bar becomes visible") {
verify { progress.visibility = eq(View.VISIBLE) }
}
// その後さらに新しい State を通知すると……
When("Emit a state describing text is loaded successfully") {
stateSubject.onNext(SampleState(text = RemoteData.Success("ok")))
}
// Success 状態になったので ProgressBar が非表示になり……
Then("Progress bar goes away") {
verify { progress.visibility = eq(View.GONE) }
}
// 得られた文字列を TextVeiw にセットする
And("Text is set to text view") {
verify { textView.text = eq("ok") }
}
}
}
})
おわりに
この記事では、メルペイ Android が Redux の考え方を使って状態遷移を表現していること、ViewModel でうまく Action に変換して状態遷移を動かしていること、ViewDelegate を使って Presentation レイヤーで起こりがちなコードの肥大化を防ぐことを解説しました。あわせて、それぞれのクラスに対してどのようなことをユニットテストすべきかも整理しています。メルペイが始まった当初は特に Presentation レイヤーの設計が足りずユニットテストしづらい状態でしたが、View に対してなにをしているのかを整理し名前をつけて管理できるようにしたことで、テストカバレッジが全体として10%向上しました。機能によっては20%~30%向上した部分もあります。
一方でまだまだ課題もあり、たとえば RemoteData をもった State を Bundle に保存したいときにアドホックなコードを書かざるを得なかったり、役割が違うとはいえ実装すべきものが多いため、どうしてもボイラープレートが多くなりがちといった課題があります。これは現在改善に向けて取り組んでいるところです。
明日のMerpay Advent Calendar は @t10471 さんのクリーンアーキテクチャについての記事となります。お楽しみに!


