Merpay Advent Calendar 2019 の3日目は、 Merpay iOS チームの @masamichi がお送りします。
メルペイで使っているBottomHalfModalというUIをOSSにしました。このOSSの紹介と中身の実装について紹介します。
github.com
目次
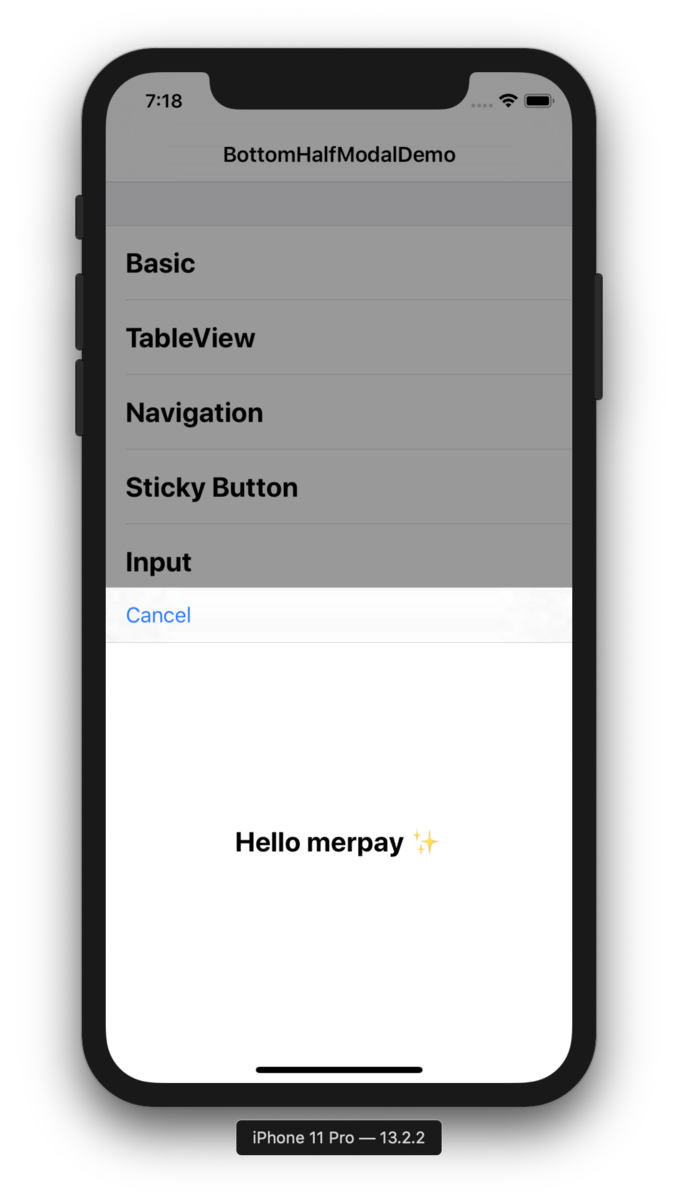
BottomHalfModalとは
メルペイでは銀行からのチャージや、メルペイスマート払いの利用上限額の選択、メルカリ内購入の確認などにこのUIを使っています。
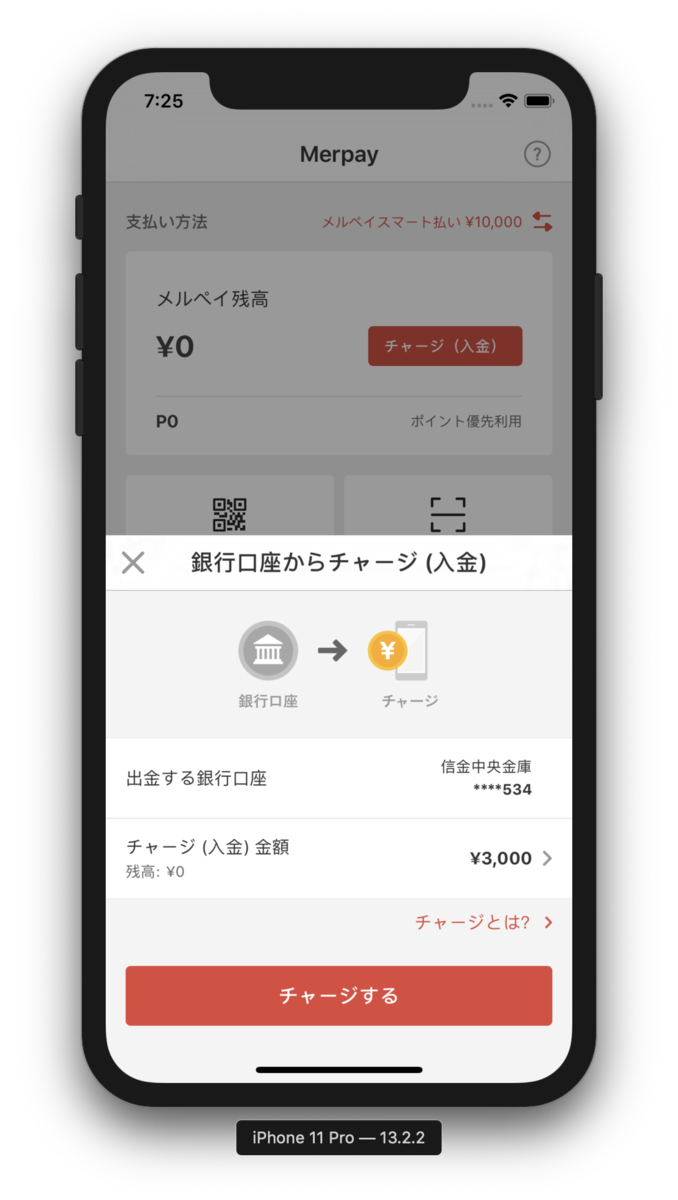
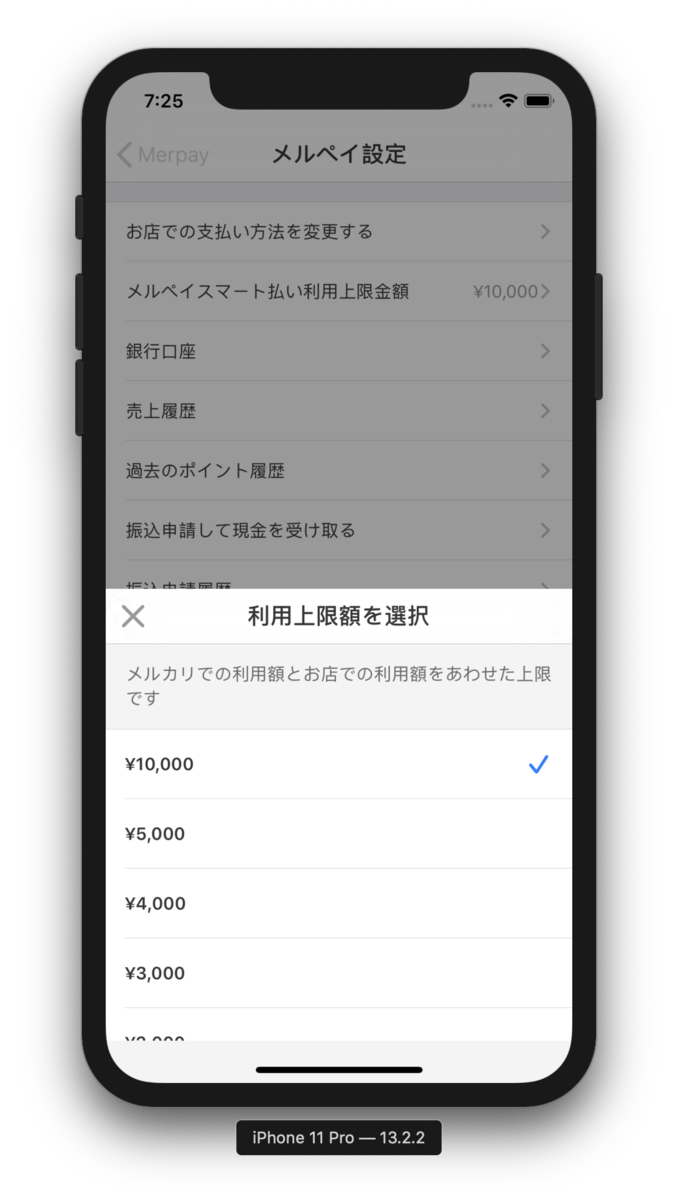
今回公開したメルペイで使用しているBottomHalfModalは、ジェスチャーで閉じることができるようには作られていません。現時点では、ApplePayでの購入時に出てくるモーダル画面が同じスタイルになっています。ナビゲーション時の挙動も極めてApplePayのスタイルに近くなっています。
一方、iOS13では、モーダル画面のデフォルトの表示がフルスクーンではなくシートになり、ジェスチャーによってインタラクティブにモーダルを閉じることができるようになりました。またAppleのアプリや、Twitter, Facebook, Slackなどの様々なアプリで、ジェスチャーで閉じることのできるインタラクティブなモーダル画面が最近使用されています。iOS13のシート形式のモーダルで有名はOSSとしては、SlackのPanModalがあります。
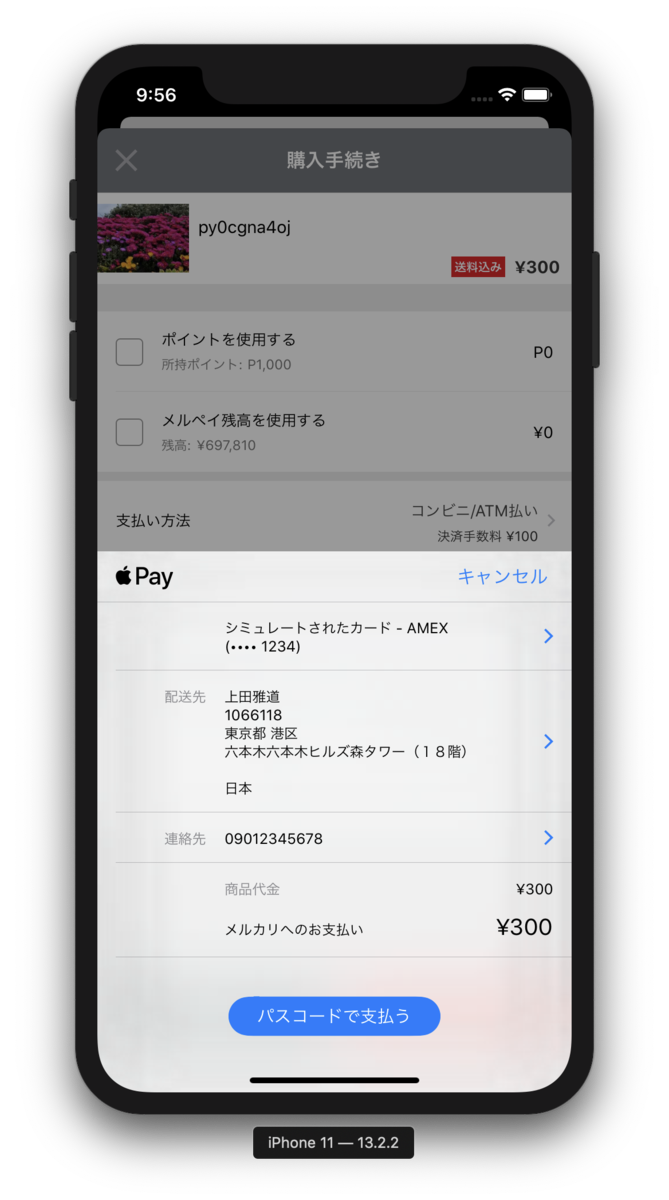
BottomHalfModalでジェスチャーをいれていないのは理由がありまして、メルペイではお客さまがお金に関わる操作をするため、操作の途中で意図せず画面を閉じてしまったり操作を中断してしまうことを避けるためです。なのでインタラクティブな操作はあえて取り入れていません。
使い方
ではBottomHalfModalの使い方について紹介します。
使い方はとても簡単で、UIViewControllerにSheetContentHeightModifiable protocolを実装して、表示されるViewControllerの高さであるsheetContentHeightToModifyをセットします。viewDidAppearでadjustFrameToSheetContentHeightIfNeededを呼び出します。このViewControllerをpresentBottomHalfModalで表示します。デバイスの回転をサポートしている場合は回転時にレイアウトを更新する必要があるので、viewWillTransitionでもadjustFrameToSheetContentHeightIfNeededを呼び出すようにしてください。
final class XXXXXViewController: UIViewController, SheetContentHeightModifiable {
let sheetContentHeightToModify: CGFloat = SheetContentHeight.default
…
override func viewDidAppear(_ animated: Bool) {
super.viewDidAppear(animated)
adjustFrameToSheetContentHeightIfNeeded()
}
override func viewWillTransition(to size: CGSize, with coordinator: UIViewControllerTransitionCoordinator) {
super.viewWillTransition(to: size, with: coordinator)
adjustFrameToSheetContentHeightIfNeeded(with: coordinator)
}
…
}
モーダル画面の中でプッシュ遷移をする必要があり、UINavigationControllerを使いたい場合は、BottomHalfModalNavigationControllerを使ってください。画面遷移時のレイアウトの変更を調整してくれます。
let vc = XXXXXViewController()
let nav = BottomHalfModalNavigationController(rootViewController: vc)
presentBottomHalfModal(nav, animated: true, completion: nil)
内部実装
内部の実装について紹介します。
画面遷移をカスタマイズする際に使用するUIViewControllerTransitioningDelegateを使っています。presentBottomHaflModal関数で表示するViewControllerの遷移のdelegateを設定しています。
public func presentBottomHalfModal(_ viewControllerToPresent: UIViewController, animated: Bool, completion: (() -> Void)?) {
viewControllerToPresent.modalPresentationStyle = .custom
viewControllerToPresent.transitioningDelegate = SheetPresentationDelegate.default
present(viewControllerToPresent, animated: animated, completion: completion)
}
SheetPresentationDelegateで、UIViewControllerTransitioningDelegateを実装しています。delegate関数内で、UIPresentationControllerを継承したSheetPresentationControllerと、UIViewControllerAnimatedTransitioningを実装したSheetAnimationControllerの2つのクラスを使って、カスタム画面遷移を実現しています。
public func presentationController(
forPresented presented: UIViewController,
presenting: UIViewController?,
source: UIViewController
) -> UIPresentationController? {
return SheetPresentationController(presentedViewController: presented, presenting: presenting)
}
public func animationController(
forPresented presented: UIViewController,
presenting: UIViewController,
source: UIViewController
) -> UIViewControllerAnimatedTransitioning? {
return SheetAnimationController(forPresenting: true)
}
public func animationController(forDismissed dismissed: UIViewController) -> UIViewControllerAnimatedTransitioning? {
return SheetAnimationController(forPresenting: false)
}
SheetPresentationController
SheetPresentationControllerでは、UIPresentationControllerの関数やプロパティをoverrideしてアニメーションを実現しています。とくに画面を表示するアニメーションを実現しているのが、preferredContentSizeDidChangeです。ViewControllerのviewDidLoadで呼び出すadjustFrameToSheetContnentHeightIfneeded関数によって、preferredContentSizeが指定のサイズにセットされ、アニメーションが実行される仕組みになっています。viewDidLoadで実行することで、push遷移を実行した時にも滑らかにアニメーションするようになっています。
protocol SheetControllerContentSizing {
var sheetContentHeight: CGFloat { get set }
}
extension UIViewController: SheetControllerContentSizing {
var sheetContentHeight: CGFloat {
get {
…
}
set {
... calculate width and height
if let nav = navigationController {
nav.preferredContentSize = CGSize(width: width, height: newValue + additionalBottomHeight)
} else {
preferredContentSize = CGSize(width: view.bounds.width, height: newValue + additionalBottomHeight)
}
}
}
...
}
final class SheetPresentationController: UIPresentationController {
...
private func animateContainerView(
with viewController: UIViewController,
frame: CGRect,
duration: TimeInterval = 0.35,
options: UIView.AnimationOptions = [.allowUserInteraction, .beginFromCurrentState],
useSpringDamping: Bool = true,
safeAreaInsets: UIEdgeInsets = UIEdgeInsets.zero
) {
// Animate Frame
}
override func preferredContentSizeDidChange(forChildContentContainer container: UIContentContainer) {
guard let vc = container as? UIViewController,
let containerView = containerView else {
return
}
let viewSize = vc.preferredContentSize
let containerViewFrame = containerView.bounds
let frame = CGRect(
x: containerViewFrame.origin.x,
y: containerViewFrame.size.height - viewSize.height,
width: viewSize.width,
height: viewSize.height
)
animateContainerView(with: vc, frame: frame)
}
...
}
他にも背景を黒い半透明にするアニメーションや、キーボード表示時のフレームサイズの対応もしています。
SheetAnimationController
SheetAnimationControllerは、UIViewControllerAnimatedTransitioningを実装していてSheetPresentationControllerと連動しつつ遷移アニメーションを実現しています。
表示のアニメーションはSheetPresentationControllerが担当していますが、SheetAnimationControllerでは初期表示時のフレームサイズや位置を調整して、SheetPresentationControllerのアニメーションが意図通りに動くようにしています。
func animatePresentationWithTransitionContext(_ transitionContext: UIViewControllerContextTransitioning) {
guard let presentedController = transitionContext.viewController(forKey: .to),
let presentedControllerView = transitionContext.view(forKey: .to) else {
return
}
let containerView = transitionContext.containerView
presentedControllerView.frame = transitionContext.finalFrame(for: presentedController)
presentedControllerView.frame.size.height = containerView.bounds.size.height
presentedControllerView.center.y += containerView.bounds.size.height
containerView.addSubview(presentedControllerView)
UIView.animate(
withDuration: duration,
delay: 0.0,
usingSpringWithDamping: 1.0,
initialSpringVelocity: 0.5,
options: .allowUserInteraction,
animations: {
presentedControllerView.center.y -= containerView.bounds.size.height
},
completion: { (completed: Bool) -> Void in
transitionContext.completeTransition(completed)
})
}
閉じるアニメーションは、SheetAnimationControllerで実行していて、素直にフレームの位置を下げるアニメーションを実行しています。SheetPresentationControllerでも閉じるアニメーションを実行できますが、背景透過のアニメーションが同時に実行されているため、モーダル画面も透過されていってしまいます。そのため、SheetAnimationControllerを使ってモーダル自体のアルファは変えずにdismissしつつ背景のアルファをアニメーションしています。
func animateDismissalWithTransitionContext(_ transitionContext: UIViewControllerContextTransitioning) {
guard let presentedControllerView = transitionContext.view(forKey: .from) else {
return
}
let containerView = transitionContext.containerView
UIView.animate(
withDuration: duration + 0.5,
delay: 0.0,
usingSpringWithDamping: 1.0,
initialSpringVelocity: 0.5,
options: .allowUserInteraction,
animations: {
presentedControllerView.center.y += containerView.bounds.size.height
}, completion: {(completed: Bool) -> Void in
transitionContext.completeTransition(completed)
if !self.forPresenting {
let fromVC = transitionContext.viewController(forKey: .from)
fromVC?.view?.removeFromSuperview()
}
})
}
終わりに
メルペイで使っているBottomHalfModalというUIのOSSを紹介しました。お金に関わる機能を実装する際には便利に使えると思うので、活用してみてください。改善ポイントがあればPullRequestもお待ちしております。
github.com
メルペイではミッション・バリューに共感しているiOSエンジニアを募集しています。一緒に働ける仲間をお待ちしております。
明日の執筆担当は、Androidチームの @keithyokoma さんです。引き続きお楽しみください。


